- Installing Roblox Studio
- Using Studio Templates
- Working with the Game Editor
- Translating, Scaling, and Orienting Objects
- Snapping
- Collisions
- Anchoring
- Saving and Publishing Your Project
- Playtesting
- Summary
- Q and A
- Workshop
- Exercises
This chapter is from the book
This chapter is from the book
This chapter is from the book
Translating, Scaling, and Orienting Objects
You’ve learned how to create a part; now you can make it move! In Roblox Studio, it is possible to move (translate) and rotate (orient) objects in the scene. There are multiple ways to get the same results, but in this section, we will solely use the Roblox Studio default tools and keyboard shortcuts.
There are two settings you can use to get greater control when moving parts: snapping and collisions.
![]() Snapping is the amount a part will move, scale, or rotate at a time. Snapping is useful when creating items that need to be exactly aligned, like how walls of buildings need to be at 90-degree angles.
Snapping is the amount a part will move, scale, or rotate at a time. Snapping is useful when creating items that need to be exactly aligned, like how walls of buildings need to be at 90-degree angles.
![]() Collisions happen when two objects (or rigid bodies) intersect or get within a certain range of each other.
Collisions happen when two objects (or rigid bodies) intersect or get within a certain range of each other.
Because these two settings are most used when playing with two or more parts, turn them off for now while you freely move a single part around. Later, you’ll turn them back on when we discuss how they work.
![]() To turn OFF snap: In the Model tab, uncheck the box next to Rotate or Move (Figure 2.16).
To turn OFF snap: In the Model tab, uncheck the box next to Rotate or Move (Figure 2.16).
)
FIGURE 2.16 Turn off snap.
![]() To turn OFF collisions: In the Model tab, collisions are on if the button is highlighted gray. Click the Collisions button to toggle it off (Figure 2.17).
To turn OFF collisions: In the Model tab, collisions are on if the button is highlighted gray. Click the Collisions button to toggle it off (Figure 2.17).
)
FIGURE 2.17 Turn off collisions.
Translating
Now you can freely start translating, or moving, objects. Go to the Model or Home tab and click the Move icon (Figure 2.18).
)
FIGURE 2.18 Move tool.
Now, a gizmo should appear on the selected objects. When you click, hold, and drag one of the arrows, the object moves along that axis (Figure 2.19).
)
FIGURE 2.19 Moving the gizmo.
Scaling
To scale objects, go to the Model or Home tab and click the Scale icon (Figure 2.20).
)
FIGURE 2.20 Scale tool.
The gizmo should appear again, this time with orbs on selected objects. When you click, hold, and drag one of the orbs, the object scales along that axis (Figure 2.21).
)
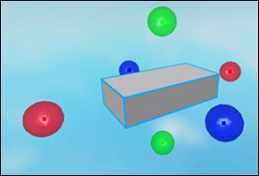
FIGURE 2.21 Scaling a gizmo.
If you want to scale on two sides simultaneously, hold Ctrl (Windows) or Command (Mac) while clicking, holding, and dragging one of the orbs.
If you want to scale while keeping the current proportions, you can do so by holding Shift while scaling.
Rotating
To rotate objects, go to the Model or Home tab, and click the Rotate icon (Figure 2.22).
)
FIGURE 2.22 Rotate tool.
Another gizmo should appear, now with orbs and circular, connecting lines on selected objects (Figure 2.23). When you click, hold, and drag one of the orbs, the object will rotate along that axis.
)
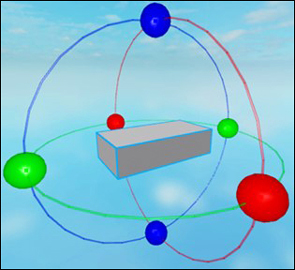
FIGURE 2.23 Rotating a gizmo.
Transforming
The transform tool (Figure 2.24) is particularly important as an all-in-one building tool. It enables multiple moves, scales, and rotations within one continuous operation. Think of it as a bundle of move, scale, and rotate. Basically, it can transform your part in any way possible. It also can lock an axis and snap to the grid.
)
FIGURE 2.24 Transform tool.
With your part selected, click on the transform tool and markers for manipulation appear around your part (Figure 2.25).
)
FIGURE 2.25 Using the Transform tool.
![]() The yellow cone is used to move the part on different planes on the Y axis. We can drag the part on its own plane once the plane is set.
The yellow cone is used to move the part on different planes on the Y axis. We can drag the part on its own plane once the plane is set.
![]() The red, green, and blue arcs are used to rotate the part by 360 degrees on the X, Y, and Z axes.
The red, green, and blue arcs are used to rotate the part by 360 degrees on the X, Y, and Z axes.
![]() The white boxes are used to scale the side of the part to which they are attached. The scaling happens in the measurement of studs, which is the measurement of each single square that forms the baseplate.
The white boxes are used to scale the side of the part to which they are attached. The scaling happens in the measurement of studs, which is the measurement of each single square that forms the baseplate.