- Sams Teach Yourself Microsoft Windows 2000 Professional in 10 Minutes
- Table of Contents
- Copyright
- Tell Us What You Think!
- About the Authors
- Introduction
- Conventions Used in This Book
- Lesson 1. Navigating Windows 2000 Professional
- What Is Windows 2000 Professional?
- Starting Windows 2000
- Understanding the Windows Desktop
- Using the Mouse
- Using the Start Button
- Using the Taskbar
- Shutting Down Windows 2000 Professional
- Lesson 2. Working with a Window
- What Is a Window?
- Opening a Window
- Sizing a Window with Maximize, Minimize, and Restore
- Sizing a Window's Borders
- Using Scroll Bars
- Moving a Window
- Viewing a Window's Contents
- Closing Windows
- Lesson 3. Using Menus
- Using Toolbar Buttons
- What Is a Menu?
- Choosing Menu Commands
- Reading a Menu
- Using Shortcut Keys Instead of Menus
- Using Shortcut Menus
- Lesson 4. Using Windows 2000 Professional Help
- Getting Help in Windows 2000
- The Help Window
- Using Windows Online Help
- Using Web Help
- Lesson 5. Using Dialog Boxes
- What Is a Dialog Box?
- Using the Components of a Dialog Box
- Using the What's This? Feature
- Using Text Boxes
- Using Option Buttons
- Using Check Boxes
- Using Command Buttons
- Using Property Sheets and Tabs
- Lesson 6. Working with Multiple Windows and Applications
- Opening a Windows Application
- Viewing an Application's Window
- Exiting an Application
- Arranging Windows on the Desktop
- Moving Between Applications
- Moving Between Windows in the Same Application
- Lesson 7. Copying, Moving, and Linking Between Windows and Applications
- Using the Clipboard
- Selecting Text for Copying or Moving
- Selecting Graphics
- Copying Information Between Windows
- Moving Information Between Windows
- Sharing Information Between Applications
- Understanding Linking
- Creating Links
- Understanding Embedding
- Embedding Objects
- Using the ClipBook Viewer
- Lesson 8. Using My Computer
- What Is My Computer?
- Browsing Folder Options
- The My Computer Menu
- The My Computer Toolbars
- Customizing View Columns
- Lesson 9. Managing Files with My Computer
- Selecting Files and Folders
- Moving Files and Folders
- Copying Files and Folders
- Deleting Files and Folders
- Renaming Files and Folders
- Using Windows Explorer
- Creating Shortcuts
- Searching for Files and Folders
- Lesson 10. Using WordPad
- What Is WordPad?
- Moving the Text Insertion Point
- Inserting and Deleting Text
- Selecting, Cutting, Copying, and Pasting Text
- Formatting a Document
- Saving a Document and Exiting WordPad
- Lesson 11. Understanding File Properties and the Recycle Bin
- Filenames
- File Size
- File Creation Date and Time
- File Attributes
- Viewing Properties
- Managing the Recycle Bin
- Opening the Recycle Bin
- Emptying the Recycle Bin
- Restoring Files
- Recycle Bin Properties
- Lesson 12. Printing
- Installing a Printer
- Printing from an ApplicationControlling the Print Job
- Working with the Print Folder
- Controlling the Print Job
- Using Drag and Drop
- Lesson 13. Using My Network Places
- What Is a Network?
- About Clients and Servers
- What Is My Network Places?
- Logging On to a Network
- Accessing My Network Places
- Logging Off a Network
- Lesson 14. Using the Control Panel
- What Is the Control Panel?
- What Can You Accomplish in the Control Panel?
- Selecting a Screen Saver
- Configuring Video Options
- Configuring Sound Options
- Configuring Multimedia Devices
- Configuring Your Keyboard and Mouse
- Lesson 15. Using Outlook Express Mail
- Opening and Closing Outlook Express Mail
- The Outlook Express Mail Window
- Sending a Message
- Using the Windows Address Book
- Retrieving and Reading Your Messages
- Saving a File Attached to a Message
- Replying to a Message
- Deleting Old Messages
- Lesson 16. Sharing Workstations and Setting Passwords
- Assigning Passwords to Screen Savers
- Changing Your Password
- Sharing Resources on Your Computer
- Sharing Folders and Disk Drives on Your Computer
- Setting File Permissions
- Creating and Sharing a Printer
- Sharing an Already-Defined Printer
- Setting Printer Permissions
- Lesson 17. Using Internet Explorer 5
- Starting Internet Explorer 5
- Navigating the IE5 Window
- The IE5 Toolbars
- Navigating a Web Page
- Reading URLs
- Visiting a Web Site
- Understanding Links
- Understanding Caching
- Lesson 18. Web Site and Document Searching
- Understanding Searches
- Creating a Web Search
- Searching for Text on a Web Page
- Lesson 19. Troubleshooting, Restarting, and Disaster Planning
- Task Manager
- Restarting Windows 2000
- What is a Computer Virus?
- Curing and Preventing Computer Viruses
- Creating a Startup Disk
- Troubleshooting Windows 2000
- Lesson 20. Customizing the Windows 2000 Environment
- Creating Shortcuts
- Arranging Icons
- Choosing Colors and Backgrounds
- Changing Fonts
- Customizing the Taskbar
- Changing the Time or Date
- Creating Custom Toolbars
Recommended Book
Recommended Book
Recommended Book
Customizing the Taskbar
The taskbar serves as a program launcher and an application switching platform. Open applications are represented by buttons on the taskbar. Click a program button to make that program your active window. The taskbar also displays a set of icons that are indicators for utility programs and hardware such as PC cards, so you can check the current status of items or change control settings. The clock appears next to these icons. Toolbars also appear on the toolbar, such as the Quick Launch toolbar that gives you shortcuts to Internet Explorer, Outlook Express, the desktop, or the channels.
By default, the taskbar appears at the bottom of your screen. You can change its position so that it appears at the top, left, or right of the screen. In Figure 20.6, the taskbar is on the left side of the screen.
)
Figure 20.6 The taskbar has been moved to the left side of the screen.
To move the taskbar:
- Point to a spot in the middle of the taskbar where there are no buttons.
- Hold down your left mouse button.
- Drag to the side of the screen where you want to position the taskbar.
- The taskbar jumps to that side of the screen. Keep dragging the taskbar if it doesn't jump to the side you want right away.
- Release the mouse button when it appears in the desired position.
Sizing the Taskbar
For those of us who work with several windows open or minimized at the same time, the taskbar can become crowded. To accommodate the number of buttons on the taskbar, the buttons become smaller and smaller as the number of buttons increases. To make more room for the buttons, you can make the taskbar thicker so that buttons appear stacked and larger than if they were in a single row. Later, when you no longer need the room, you can make the taskbar thinner again.
To change the size of the taskbar:
- Point to the border on the edge of the taskbar (your mouse pointer will become a two-headed arrow, as in Figure 20.7).
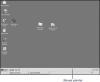
Figure 20.7 The mouse pointer becomes a two-headed arrow as you drag the Taskbar border.
- Drag in one of the directions shown by the two-headed arrow to make the taskbar thinner or thicker. The border of the taskbar will jump in increments as you drag.
- Release the mouse button when the border is where you want it.
)
To readjust the size of the taskbar after you have closed all your application or folder windows, repeat steps 1 through 3, but drag in the opposite direction to narrow the taskbar.
Hiding the Taskbar
You can hide the taskbar to maximize the display of a program. This is useful when you are working in programs such as graphics or desktop publishing programs. To hide your taskbar:
- Choose Settings, Taskbar, Start menu from the Start menu, or right-click a gray area of the taskbar and choose Properties from the pop-up menu. The Taskbar and Start Menu Properties box appears (see Figure 20.8).

Figure 20.8 Check Auto hide to have the taskbar disappear when you aren't using it.
- Click the Taskbar Options tab, if it's not already selected.
- Enable Auto hide.
- Click OK.
)
The taskbar will automatically reduce to a double-line thickness when an application is open and will reappear when you point to the double line.
There are five options in the properties box:
- Always on top: Enable this to be able to see the taskbar even when an application is running fully maximized. Otherwise, the application window will cover the taskbar.
- Auto hide: When enabled, the Taskbar reduces to a double-line once you activate an application. Just point to the taskbar to have it reappear. This feature allows you to see an application fully maximized and to make maximum use of your screen space, while still having the taskbar available to you.
- Show small icons in Start menu: Check this to reduce the size of the Start menu icons (see the sample picture in the properties box to see the difference). The bar along the side of the Start menu that says "Windows 2000 Professional" disappears when you enable this option.
- Show clock: Check this to have the time show on the taskbar.
- Use Personalized Menus: Personalized menus keep the programs that you use most often visible on your pop-up menus on the start menu. Clicking the down arrow located at the bottom of personalized menus expands the menu and shows you all available programs in that category. Disabling this option means that all menu options are visible when you click on a menu from the Start button.