- Lab Requirements
- Creating Your Lab
- Self-Assessment
- Summary
Creating Your Lab
The first step to creating your own lab is to select the cloud platform you will use to deploy your lab. This chapter will use the Azure platform to deploy the lab. However, for scenarios one and two, you can use your personal computer to perform the required tasks. Here are a couple of things to remember when reading these scenarios:
If you already have experience performing the tasks for scenarios one and two, you can skip to scenario three.
The explanation provided in this chapter won’t go into deep technical details about each element covered in the scenarios. The intent here is for you to gain familiarity with the terminologies, gain some hands-on experience, and use it as a foundation to get started. You must be diligent and look for other sources of information regarding the technologies covered in each scenario. Some resources tailored to each scenario are available at yuridiogenes.us.
Scenario 1—Operating Systems Process
A deep understanding of operating systems is critical for any cybersecurity professional. You can access a curated list of online resources and books I recommend to learn more about operating systems by visiting yuridiogenes.us. There, you will find a section dedicated to this book where you can see the references per chapter.
For this first scenario, you can use your own computer if you have Windows 10 or 11 installed. Once you confirm the Windows version, follow these steps:
Download Process Monitor from the Systeinternals website and store it in a folder named Temp on the C: drive. (If you don’t already have a Temp folder, create it and extract the files there.)
Before launching Procmon.exe, make sure to close all open applications.
Once you do that, double-click Procmon.exe.
On the Process Monitor License Agreement page, click Agree.
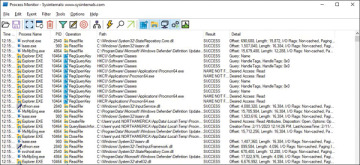
If the User Account Control window pops up, click Yes, and you should see a dashboard like the one shown in Figure 3.2.

Figure 3.2 Process Monitor
This dashboard can be overwhelming at first, but you need to understand why you are here in the first place. When a program is executed, a process is created. Each process has a name, which is represented in the Process Name column in the Process Monitor dashboard. Each process receives a unique identifier (ID) shown in the PID column. (PID means process ID.)
Figure 3.2 shows an example of the Explorer.exe process, which appears multiple times, meaning multiple operations are happening. The operation’s name that appears in the Operation column might be the same, but the path may vary. For example, the Explorer.EXE process may be querying multiple registry keys. The Result column is important because it shows the result of the operation done by the process in the path shown in the Path column. To better understand this, do a simple test:
In the Process Monitor, click Filter and then click the Filter option.
Select Process Name.
In the name field, type notepad.exe and click the Add button.
Click the OK button.
Once the filtering is finished, click the Windows Start icon, type notepad.exe, and press Enter.
Now review the number of things that happened just by executing notepad.exe.
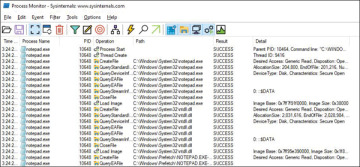
The Process Monitor window will be empty, and after you execute the previous step, you will notice the process and a thread being created, as shown in Figure 3.3.

Figure 3.3 Events generated by executing notepad.exe
A process can create one or more threads, the basic unit the OS will use to allocate processor time. Why should you care about this information? Because when you are investigating a computer that is apparently compromised, you will use tools like Process Monitor to identify suspicious activities performed by a potentially malicious process.
Scenario 2—Network Traffic Analysis
Another foundational scenario you need to be familiar with is capturing and interpreting network traffic. Having a good understanding of how traffic flows between hosts is imperative for security professionals. While many tools are available to capture network traffic, the most common is Wireshark. This tool will enable your computer to listen to all network traffic and capture all frames for later analysis. Wireshark can also be used for network forensics and to identify malicious activities.
You can perform the steps below on your home computer, just like in scenario 1. To get started with this experiment, make sure to download and install Wireshark from www.wireshark.org. After that, follow the steps below:
Open Wireshark.
On the first screen, you should see the available network interfaces. For example, you will see multiple options if you have an Ethernet connection (cable) connected to your computer and a WiFi connection. For this example, we will select Ethernet. (This option requires a cable connection to your computer.)
Right-click Ethernet and then click Start Capture.
At this point, you should see a lot of traffic on the screen.
Open your browser and go to www.pearson.com.
Go back to Wireshark, click the Capture menu, and then click Stop.
Now that you have captured the traffic, let’s make some sense of it. In a TCP/IP network, when you try to access a domain by providing the domain name, such as www.pearson.com, the next step is to identify who owns that domain (in other words, identify the IP address). To do that, your local computer will consult the Domain Name Service (DNS) to resolve that name. Using Wireshark, you can create a filter to see exactly when this happened. Type dns.qry.name == “www.pearson.com” to filter DNS queries for www.pearson.com, as shown in Figure 3.4, and then press Enter.

Figure 3.4 Creating filters in Wireshark
Notice that two packets appeared, one with the DNS query and the other with the DNS response. While the source and destination IP address from Figure 3.4 may vary according to your computer’s network subnet, the point is that you were able to find exactly the moment that the name gets resolved. Now, let’s see what a packet looks like. Click the first packet (DNS query), and you should see the different layers of information, as shown in Figure 3.5.

Figure 3.5 Reading a network package
These layers are explained below:
The first layer on top contains information related to the frame itself.
The second layer (Ethernet II) has the data-link layer, such as the computer’s physical address, also known as Media Access Control (MAC) address. This address is unique for each network device.
The third layer contains information about the network protocol in use, which in this case is the Internet Protocol (IP). Expanding this layer will show your computer’s IP address and your DNS server’s destination access.
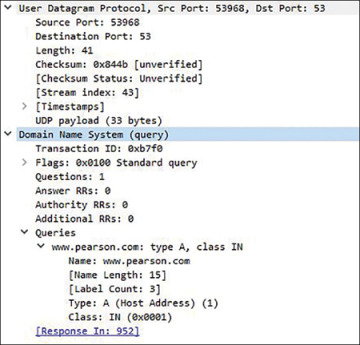
The fourth layer has information about the transport protocol in use, which, in this case, is the User Datagram Protocol (UDP). You will also find the source port (which will vary on each connection) and the destination port, which, in this case, is 53 (DNS service).
The last layer contains information about the application, which, in this case, is DNS.
If you expand the transport and application layers, you should have a full visualization of the information you need for this exercise, as shown in Figure 3.6.

Figure 3.6 Analyzing a DNS query
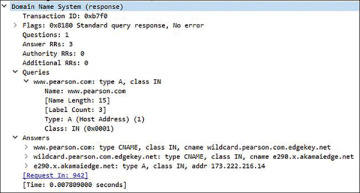
Repeat the same process for the second packet, the DNS response. In the response, you will see that the information is a bit different. Instead of having a section for queries, you will see a section for answers, as shown in Figure 3.7.

Figure 3.7 Analyzing the DNS answer
While this is a very simple analysis, it gives you an idea of the importance of understanding network traffic communication, protocols, and the use of Wireshark. New cybersecurity professionals who skip the foundational basics of computer networks have difficulty understanding how things work behind the scenes, impacting their capability to evolve in their field. For this reason, it is imperative to learn computer networks if you are going to work with cybersecurity.
Scenario 3—Cloud Security Posture Management
If you plan to work in cybersecurity, you must learn about cloud computing. Once you learn about cloud computing, you will quickly understand why one of the challenges organizations face nowadays is ensuring they have visibility and control over all workloads provisioned in their cloud environment. In addition, most attacks against cloud workloads are successfully accomplished because of customer misconfiguration, mismanagement, and mistakes. You need a cloud security posture management (CSPM) solution to ensure your cloud environment is more secure.
Microsoft Defender for Cloud is the CSPM solution we will use in this scenario. Since this is a very mature product, there are many resources available that you can use to ramp up on this technology. The team that I manage at Microsoft created a Defender for Cloud Public Lab to help customers to learn more about the product, so for this scenario, follow the steps below:
Visit https://aka.ms/MDFCLabs.
Perform the steps from the following modules:
Module 1: In this module, you will provision your Azure environment using an Azure trial subscription.
Module 2: In this module, you will learn more about Defender for Cloud and how it helps to manage the security posture of your cloud environment.
After finishing these modules, you will have an environment ready for your 30 days trial. This means that now is the time to add the reminder on your calendar to ensure you cancel the subscription before the 30 days. Also, at this point, you must diligently perform all tests you need in this environment before the trial expires.
Scenario 4—Multi-Cloud Security
The “Flexera 2022 State of the Cloud Report” revealed that a multi-cloud approach is still the de facto standard among 89 percent of the organizations surveyed. This means you’re very likely to find a job in the cybersecurity field that requires you to know the main cloud providers—Microsoft (Azure), Amazon (AWS), and Google (GPC). Security posture management across multiple cloud providers can be even more challenging, and that’s why the CSPM solution must be able to provide visibility and control across clouds.
Defender for Cloud has this capability, and you can test it in the same lab environment that you started during scenario 3. To do that, go to https://aka.ms/MDFCLabs and complete modules 10 (GCP) and 11 (AWS). These modules will enable you to connect to each cloud provider and allow the information to flow to the Defender for Cloud dashboard.
Scenario 5—Regulatory Compliance
As you look for cybersecurity jobs, you must be mindful of the industry you will be working in. For example, if you are going to be a cybersecurity analyst in a hospital (health industry), you might need to know the regulatory standards required for that industry. You don’t need to be an expert, but you should know what this means for the workloads you protect. Some of these workloads might need to comply with the Health Insurance Portability and Accountability Act (HIPAA).
The cloud security posture management platform needs to provide awareness of your workload’s security state. It needs to also provide security recommendations to help improve those workloads’ security posture by tailoring the hardening according to the industry standard, which, in this case, is HIPAA (Health Insurance Portability and Accountability Act of 1996).
To practice that, you will use the same lab from scenarios 3 and 4, but now you will follow the steps from Module 4.
Scenario 6—Attack Simulation
Many organizations adopt the red and blue teams strategy to better understand how threat actors operate and exploit vulnerabilities:
Red team The red team is responsible for constantly attacking its own platform to identify breaches before the threat actors do it.
Blue team The blue team is composed of defenders—cybersecurity professionals with relevant skills to ensure the environment is more secure. The blue team will also incorporate feedback from the red team to improve their security controls and reduce the likelihood of compromise.
If you are planning to work in this area within the cybersecurity field, this scenario is very important for you. Here are the labs you should perform to practice attack simulation:
Attack simulation for Windows Visit http://bit.ly/cybercareerch3link10 and follow the steps to execute attacks against a Windows system and see how Defender for Cloud detects those attacks. Notice that the attacker and target VMs can be provisioned in the same environment you created in scenario 3.
Attack simulation for Linux Visit https://bit.ly/cybercareerch3link11 and follow the steps to execute attacks against a Linux system. You can also provision the Linux VM in the same environment you created in scenario 3.
Scenario 7—Security Information and Event Management
Cybersecurity professionals who work on security operations (SOC) teams need to be familiar with the use of security information and event management (SIEM) systems. The goal of a SIEM solution is to aggregate data coming from different data sources, correlate this data, and enable security teams to consume this data for different purposes, including security investigation, incident response, and threat hunting.
Microsoft Sentinel is a cloud-based SIEM platform that operates on top of Azure but can ingest data coming from other cloud providers or on-premises resources. To practice hands-on activities in Microsoft Sentinel, visit https://aka.ms/MSSentinelLab and execute the steps from the following modules:
Module 1: In this module, you will provision Microsoft Sentinel. You should use the Azure subscription trial you started in scenario 3.
Module 2: In this module, you will start collecting data from different services.
Module 3: In this module, you will create analytics rules and incidents.
Module 4: In this module, you will learn more about incident management.
This is a long lab, so reserve enough time to perform it and review the terminologies you are unfamiliar with by visiting Microsoft Sentinel documentation at http://aka.ms/SentinelDocs.
Scenario 8—Threat Hunting
Threat hunting is a relatively new discipline that usually belongs to the security operations (SOC) team. Threat hunters usually perform a proactive investigation to identify indications of compromise (IOC) or indication of attack (IOA).
If you plan to work in the Security Operations Team, learning how to perform threat hunting is important. This expands your reach and adds an extra skill to your portfolio. Follow the steps below to practice different approaches for threat hunting (use the same Azure subscription that you used in previous scenarios for both tasks below):
Visit https://aka.ms/MSSentinelLab and execute the steps from Module 5.
This module will go over the steps on how to perform threat hunting using Microsoft Sentinel capabilities.
After you finish this module, visit https://bit.ly/cybercareerch3link14 and execute the steps from there. This article will go over the steps to perform threat hunting using Defender for Cloud.
Scenario 9—Threat Intelligence
The use of threat intelligence has expanded over the years, and nowadays, most large organizations already understand that they must have this capability available. Threat intelligence gives context and actionable insights on attacks (active and old ones), as well as potential threats to the environment. This information is critical for decision-makers and security teams to use and be better prepared to deal with threat actors.
The MITRE ATT&CK® framework is “a curated knowledge base and model for cyber adversary behavior, reflecting the various phases of an adversary’s attack lifecycle and the platforms they are known to target.” You can leverage this knowledge base to better understand how adversaries operate, which can be beneficial in many scenarios, including when you need to enrich your threat intelligence. Follow the steps below to learn how to navigate through the MITRE ATT&CK framework:
Visit the MITRE ATT&CK website at https://attack.mitre.org.
Click the Search button and type ipconfig. Wait until the results appear. Click the ipconfig, Software S0100 link.
The ipconfig page supplies the details about this command, the mapping for the technique, and the groups (adversaries) used by this command. Notice that the technique in which this command is used is mapped to System Network Configuration Discovery.
Click this technique (T1016) to see that this is a subtechnique from Discovery. This means that in the discovery phase, the adversary is still trying to understand the environment. In other words, the threat actor is still at the beginning of their mission.
The MITRE ATT&CK framework is highly utilized in many products, including Microsoft Sentinel and Microsoft Defender for Cloud. To practice using threat intelligence in a SIEM platform, visit https://aka.ms/MSSentinelLab and complete the steps from Module 7.
