
- 2.1 Planning the Application
- 2.2 The Users Resource
- 2.3 The Microposts Resource
- 2.4 Conclusion
This chapter is from the book
This chapter is from the book
This chapter is from the book
2.3 The Microposts Resource
Having generated and explored the Users resource, we turn now to the associated Microposts resource. Throughout this section, I recommend comparing the elements of the Microposts resource with the analogous user elements from Section 2.2; you should see that the two resources parallel each other in many ways. The RESTful structure of Rails applications is best absorbed by this sort of repetition of form. Indeed, seeing the parallel structure of Users and Microposts even at this early stage is one of the prime motivations for this chapter.
2.3.1 A Micropost Microtour
As with the Users resource, we’ll generate scaffold code for the Microposts resource using rails generate scaffold, in this case implementing the data model from Figure 2.3:6
$ rails generate scaffold Micropost content:text user_id:integer

      invoke  active_record
      create    db/migrate/<timestamp>_create_microposts.rb
      create    app/models/micropost.rb
      invoke    test_unit
      create      test/models/micropost_test.rb
      create      test/fixtures/microposts.yml
      invoke  resource_route
       route    resources :microposts
      invoke  scaffold_controller
      create    app/controllers/microposts_controller.rb
      invoke    erb
      create      app/views/microposts
      create      app/views/microposts/index.html.erb
      create      app/views/microposts/edit.html.erb
      create      app/views/microposts/show.html.erb
      create      app/views/microposts/new.html.erb
      create      app/views/microposts/_form.html.erb
      invoke    test_unit
      create      test/controllers/microposts_controller_test.rb
      create      test/system/microposts_test.rb
      invoke    helper
      create      app/helpers/microposts_helper.rb
      invoke      test_unit
      invoke    jbuilder
      create      app/views/microposts/index.json.jbuilder
      create      app/views/microposts/show.json.jbuilder
      create      app/views/microposts/_micropost.json.jbuilder
      invoke  assets
      invoke    scss
      create      app/assets/stylesheets/microposts.scss
      invoke  scss
   identical    app/assets/stylesheets/scaffolds.scss
To update our database with the new data model, we need to run a migration as in Section 2.2:
$ rails db:migrate
== CreateMicroposts: migrating ===============================================
-- create_table(:microposts)
   -> 0.0023s
== CreateMicroposts: migrated (0.0026s) ======================================
Now we are in a position to create microposts in the same way we created users in Section 2.2.1. As you might guess, the scaffold generator has updated the Rails routes file with a rule for Microposts resource, as seen in Listing 2.12.7 As with users, the resources :microposts routing rule maps micropost URLs to actions in the Microposts controller, as seen in Table 2.3.
Listing 2.12: The Rails routes, with a new rule for Microposts resources.
config/routes.rb
Rails.application.routes.draw do
  resources :microposts
  resources :users
  root 'users#index'
end
Table 2.3: RESTful routes provided by the Microposts resource in Listing 2.12.
HTTP request |
URL |
Action |
Purpose |
|---|---|---|---|
GET |
/microposts |
index |
page to list all microposts |
GET |
/microposts/1 |
show |
page to show micropost with id 1 |
GET |
/microposts/new |
new |
page to make a new micropost |
POST |
/microposts |
create |
create a new micropost |
GET |
/microposts/1/edit |
edit |
page to edit micropost with id 1 |
PATCH |
/microposts/1 |
update |
update micropost with id 1 |
DELETE |
/microposts/1 |
destroy |
delete micropost with id 1 |
The Microposts controller itself appears in schematic form in Listing 2.13. Note that, apart from having MicropostsController in place of UsersController, Listing 2.13 is identical to the code in Listing 2.8. This is a reflection of the REST architecture that is common to both resources.
Listing 2.13: The Microposts controller in schematic form.
app/controllers/microposts_controller.rb
class MicropostsController < ApplicationController
  .
  .
  .
  def index
    .
    .
    .
  end

  def show
    .
    .
    .
  end

  def new
    .
    .
    .
  end

  def edit
    .
    .
    .
  end

  def create
    .
    .
    .
  end

  def update
    .
    .
    .
  end

  def destroy
    .
    .
    .
  end
end
To make some actual microposts, we click on New Micropost on the micropost index page (Figure 2.12). We then enter information at the new microposts page, /microposts/new, as seen in Figure 2.13.
)
Figure 2.12: The micropost index page (/microposts).
)
Figure 2.13: The new micropost page (/microposts/new).
At this point, go ahead and create a micropost or two, taking care to make sure that at least one has a user_id of 1 to match the id of the first user created in Section 2.2.1. The result should look something like Figure 2.14.
)
Figure 2.14: The micropost index page with a couple of posts.
Exercises
Solutions to the exercises are available to all Rails Tutorial purchasers at https://www.railstutorial.org/aw-solutions.
To see other people’s answers and to record your own, subscribe to the Rails Tutorial course or to the Learn Enough All Access Bundle.
(For readers who know CSS) Create a new micropost, then use your browser’s HTML inspector to determine the CSS id for the text “Micropost was successfully created.” What happens when you refresh your browser?
Try to create a micropost with empty content and no user id.
Try to create a micropost with more than 140 characters of content (say, the first paragraph from the Wikipedia article on Ruby).
Destroy the microposts from the previous exercises.
2.3.2 Putting the Micro in Microposts
Any micropost worthy of the name should have some means of enforcing the rules governing the length of the post. Implementing this constraint in Rails is easy with validations; to accept microposts with at most 140 characters (à la the original design of Twitter), we use a length validation. At this point, you should open the file app/models/micropost.rb in your text editor or IDE and fill it with the contents of Listing 2.14.
Listing 2.14: Constraining microposts to be at most 140 characters.
app/models/micropost.rb
class Micropost < ApplicationRecord
  validates :content, length: { maximum: 140 }
end
The code in Listing 2.14 may look rather mysterious—we’ll cover validations more thoroughly starting in Section 6.2—but its effects are readily apparent if we go to the new micropost page and enter more than 140 characters for the content of the post. As seen in Figure 2.15, Rails renders error messages indicating that the micropost’s content is too long. (We’ll learn more about error messages in Section 7.3.3.)
)
Figure 2.15: Error messages for a failed micropost creation.
Exercises
Solutions to the exercises are available to all Rails Tutorial purchasers at https://www.railstutorial.org/aw-solutions.
To see other people’s answers and to record your own, subscribe to the Rails Tutorial course or to the Learn Enough All Access Bundle.
Try to create a micropost with the same long content used in a previous exercise (Section 2.3.1). How has the behavior changed?
(For readers who know CSS) Use your browser’s HTML inspector to determine the CSS id of the error message produced by the previous exercise.
2.3.3 A User has_many Microposts
One of the most powerful features of Rails is the ability to form associations between different data models. In the case of our User model, each user potentially has many microposts. We can express this relationship in code by updating the User and Micropost models as in Listing 2.15 and Listing 2.16, respectively.
Listing 2.15: A user has many microposts.
app/models/user.rb
class User < ApplicationRecord
  has_many :microposts
end
Listing 2.16: A micropost belongs to a user.
app/models/micropost.rb
class Micropost < ApplicationRecord
  belongs_to :user
  validates :content, length: { maximum: 140 }
end
We can visualize the result of this association in Figure 2.16. Because of the user_id column in the microposts table, Rails (using Active Record) can infer the microposts associated with each user.
)
Figure 2.16: The association between microposts and users.
In Chapter 13 and Chapter 14, we will use the association of users and microposts both to display all of a user’s microposts and to construct a Twitter-like micropost feed. For now, we can examine the implications of the user–micropost association by using the console, which is a useful tool for interacting with Rails applications. We first invoke the console with rails console at the command line, and then retrieve the first user from the database using User.first (putting the results in the variable first_user), as shown in Listing 2.17.8 (I include exit in the last line just to demonstrate how to exit the console. On most systems, you can also use Ctrl-D for the same purpose.)9
Listing 2.17: Investigating the state of the application using the Rails console.
$ rails console
>> first_user = User.first
   (0.5ms) SELECT sqlite_version(*)
  User Load (0.2ms) SELECT "users".* FROM "users" ORDER BY "users"."id" ASC
  LIMIT ? [["LIMIT", 1]]
 => #<User id: 1, name: "Michael Hartl", email: "michael@example.org",
 created_at: "2019-08-20 00:39:14", updated_at: "2019-08-20 00:41:24">
>> first_user.microposts
  Micropost Load (3.2ms) SELECT "microposts".* FROM "microposts" WHERE
  "microposts"."user_id" = ? LIMIT ? [["user_id", 1], ["LIMIT", 11]]
 => #<ActiveRecord::Associations::CollectionProxy [#<Micropost id: 1, content:
 "First micropost!", user_id: 1, created_at: "2019-08-20 02:04:13", updated_at:
 "2019-08-20 02:04:13">, #<Micropost id: 2, content: "Second micropost",
 user_id: 1, created_at: "2019-08-20 02:04:30", updated_at: "2019-08-20
 02:04:30">]>
>> micropost = first_user.microposts.first
  Micropost Load (0.2ms) SELECT "microposts".* FROM "microposts" WHERE
  "microposts"."user_id" = ? ORDER BY "microposts"."id" ASC LIMIT ?
  [["user_id", 1], ["LIMIT", 1]]
 => #<Micropost id: 1, content: "First micropost!", user_id: 1, created_at:
 "2019-08-20 02:04:13", updated_at: "2019-08-20 02:04:13">
>> micropost.user
 => #<User id: 1, name: "Michael Hartl", email: "michael@example.org",
 created_at: "2019-08-20 00:39:14", updated_at: "2019-08-20 00:41:24"
>> exit
There’s a lot going on in Listing 2.17, and teasing out the relevant parts is a good exercise in technical sophistication (Box 1.2). The output includes the actual return values, which are raw Ruby objects, as well as the structured query language (SQL) code that produced them.
In addition to retrieving the first user with User.first, Listing 2.17 shows two other things: (1) how to access the first user’s microposts using the code first_user.microposts, which automatically returns all the microposts with user_id equal to the id of first_user (in this case, 1); and (2) how to return the user corresponding to a particular post using micropost.user. We’ll learn much more about the Ruby involved in Listing 2.17 in Chapter 4, and more about the association facilities in Active Record in Chapter 13 and Chapter 14.
Exercises
Solutions to the exercises are available to all Rails Tutorial purchasers at https://www.railstutorial.org/aw-solutions.
To see other people’s answers and to record your own, subscribe to the Rails Tutorial course or to the Learn Enough All Access Bundle.
Edit the user show page to display the content of the user’s first micropost. (Use your technical sophistication (Box 1.2) to guess the syntax based on the other content in the file.) Visit /users/1 to confirm that it worked.
The code in Listing 2.18 shows how to add a validation for the presence of micropost content to ensure that microposts can’t be blank. Verify that you get the behavior shown in Figure 2.17.
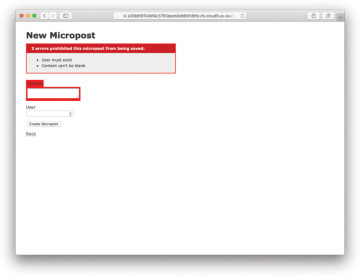
Figure 2.17: The effect of a micropost presence validation.
Update Listing 2.19 by replacing FILL_IN with the appropriate code to validate the presence of name and email attributes in the User model (Figure 2.18).
)
)
)
Figure 2.18: The effect of presence validations on the User model.
Listing 2.18: Code to validate the presence of micropost content.
app/models/micropost.rb
class Micropost < ApplicationRecord
  belongs_to :user
  validates :content, length: { maximum: 140 },
                      presence: true
end
Listing 2.19: Adding presence validations to the User model.
app/models/user.rb
class User < ApplicationRecord
  has_many :microposts
   validates FILL_IN, presence: true   # Replace FILL_IN with the right code.
   validates FILL_IN, presence: true   # Replace FILL_IN with the right code.
end
2.3.4 Inheritance Hierarchies
We end our discussion of the toy application with a brief description of the controller and model class hierarchies in Rails. This discussion will make more sense if you have some experience with object-oriented programming (OOP), particularly classes. Don’t worry if it’s confusing for now; we’ll discuss these ideas more thoroughly in Section 4.4.
We start with the inheritance structure for models. Comparing Listing 2.20 and Listing 2.21, we see that both the User model and the Micropost model inherit (via the left angle bracket <) from ApplicationRecord, which in turn inherits from ActiveRecord::Base, which is the base class for models provided by Active Record; a diagram summarizing this relationship appears in Figure 2.19. By inheriting from ActiveRecord::Base, our model objects gain the ability to communicate with the database, treat the database columns as Ruby attributes, and so on.
)
Figure 2.19: The inheritance hierarchy for the User and Micropost models.
Listing 2.20: The User class, highlighting inheritance.
app/models/user.rb
class User < ApplicationRecord
  .
  .
  .
end
Listing 2.21: The Micropost class, highlighting inheritance.
app/models/micropost.rb
class Micropost < ApplicationRecord
  .
  .
  .
end
The inheritance structure for controllers is essentially the same as that for models. Comparing Listing 2.22 and Listing 2.23, we see that both the Users controller and the Microposts controller inherit from the Application controller. Examining Listing 2.24, we see that ApplicationController itself inherits from ActionController::Base, which is the base class for controllers provided by the Rails library Action Pack. The relationships between these classes are illustrated in Figure 2.20.
)
Figure 2.20: The inheritance hierarchy for the Users and Microposts controllers.
Listing 2.22: The UsersController class, highlighting inheritance.
app/controllers/users_controller.rb
class UsersController < ApplicationController
  .
  .
  .
end
Listing 2.23: The MicropostsController class, highlighting inheritance.
app/controllers/microposts_controller.rb
class MicropostsController < ApplicationController
  .
  .
  .
end
Listing 2.24: The ApplicationController class, highlighting inheritance.
app/controllers/application_controller.rb
class ApplicationController < ActionController::Base
  .
  .
  .
end
As with model inheritance, both the Users and Microposts controllers gain a large amount of functionality by inheriting from a base class (in this case, ActionController::Base), including the capability to manipulate model objects, filter inbound HTTP requests, and render views as HTML. Since all Rails controllers inherit from ApplicationController, all rules defined in the Application controller automatically apply to every action in the application. For example, in Section 9.1 we’ll see how to include helpers for logging in and logging out of all of the sample application’s controllers.
Exercises
Solutions to the exercises are available to all Rails Tutorial purchasers at https://www.railstutorial.org/aw-solutions.
To see other people’s answers and to record your own, subscribe to the Rails Tutorial course or to the Learn Enough All Access Bundle.
By examining the contents of the Application controller file, find the line that causes ApplicationController to inherit from ActionController::Base.
Is there an analogous file containing a line where ApplicationRecord inherits from ActiveRecord::Base? Hint: It would probably be a file called something like application_record.rb in the app/models directory.
2.3.5 Deploying the Toy App
With the completion of the Microposts resource, now is a good time to push the repository up to GitHub:
$ git status    # It's a good habit to check the status before adding
$ git add -A
$ git commit -m "Finish toy app"
$ git push
Ordinarily, you should make smaller, more frequent commits, but for the purposes of this chapter a single big commit at the end is fine.
At this point, you can also deploy the toy app to Heroku as is described in Section 1.4:
$ git push heroku
(This assumes you created the Heroku app in Section 2.1. Otherwise, you should run heroku create and then git push heroku master.)
At this point, visiting the page at Heroku yields an error message, as shown in Figure 2.21. We can track down the problem by inspecting the Heroku logs:
$ heroku logs
)
Figure 2.21: An error page at Heroku.
Scrolling up in the logs, you should see a line that includes something like this:
ActionView::Template::Error (PG::UndefinedTable: ERROR: relation "users" does
not exist
This line is a big hint that there is a missing users table. Luckily, we learned how to handle that problem way back in Listing 2.4: All we need to do is run the database migrations (which will create the microposts table as well).
The way to execute this sort of command at Heroku is to prefix the usual Rails command with heroku run, like this:
$ heroku run rails db:migrate
This updates the database at Heroku with the user and micropost data models as required. After running the migration, you should be able to use the toy app in production, with a real PostgreSQL database back end (Figure 2.22).10
)
Figure 2.22: Running the toy app in production.
Finally, if you completed the exercises in Section 2.3.3, you will have to remove the code to display the first user’s micropost to get the app to load properly. In this case, simply delete the offending code, make another commit, and push again to Heroku.
Exercises
Solutions to the exercises are available to all Rails Tutorial purchasers at https://www.railstutorial.org/aw-solutions.
To see other people’s answers and to record your own, subscribe to the Rails Tutorial course or to the Learn Enough All Access Bundle.
Create a few users on the production app.
Create a few production microposts for the first user.
By trying to create a micropost with content exceeding 140 characters, confirm that the validation from Listing 2.14 works on the production app.