
- Installing Unity
- Getting to Know the Unity Editor
- Navigating the Unity Scene View
- Summary
- Q&A
- Workshop
- Exercise
This chapter is from the book
This chapter is from the book
This chapter is from the book
Getting to Know the Unity Editor
Now that you have Unity installed, you can begin exploring the Unity editor. The Unity editor is the visual component that enables you to build games in a “what you see is what you get” fashion. Because most interaction you have is actually with the editor, many people refer to it as simply Unity. This section examines all the different elements of the Unity editor and how they fit together to make games.
The Project Dialog
When opening Unity for the first time, you see the Project dialog (see Figure 1.3). You use this dialog to open recent projects, browse for projects that have already been created, or start new projects.
)
FIGURE 1.3 The Project dialog (Windows version shown; the Mac version is similar).
If you have created a project in Unity already, whenever you open the editor, you are taken directly to that project. To get back to the Project dialog, in Unity, select File > New Project to get to the Create New Project dialog or select File > Open Project to get to the Open Project dialog.
TRY IT YOURSELF: CREATING YOUR FIRST PROJECT
You are ready to create a project. Pay special attention to where you save the project so that you can find it easily later if necessary. Figure 1.4 shows the dialog box you use to create the project. Follow these steps:
Open Unity and locate the New Project dialog. (If Unity opens to a project, click File > New Project.)
Select a location for your project. I recommend that you create a folder called Unity Projects to keep all your book projects together. If you are unsure where to put your project, you can leave the default location.
Name your project Hour 1 TIY. Unity creates a folder with the same name as the project, in the location specified in this dialog.
Leave 3D selected and ignore the Add Asset Package and Enable Unity Analytics options for now.
Click Create Project.
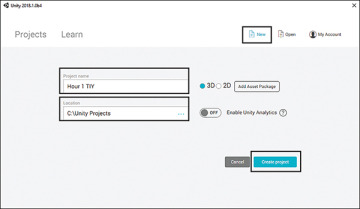
FIGURE 1.4 The settings for your first project.
)
The Unity Interface
So far, you have installed Unity and looked at the Project dialog. Now it is time to dig in and start playing around. When you open a new Unity project for the first time, you see a collection of gray windows (called views), and everything is rather empty (see Figure 1.5). Never fear; you will quickly get this place hopping. The following section look at each of the unique views, one by one. First, though, let’s talk about the layout as a whole.
)
FIGURE 1.5 The Unity interface.
For starters, Unity allows you to determine exactly how you want to work. Any of the views can be moved, docked, duplicated, or changed. For instance, if you click the word Hierarchy (on the left) to select the Hierarchy view and drag it over to the Inspector (on the right), you can tab the two views together. You can also place your cursor on any line between views and resize the windows. In fact, why don’t you take a moment to play around and move things so that they are to your liking? If you end up with a layout that you don’t much care for, you can quickly and easily switch back to the built-in default view by going to Window > Layouts > Default Layout. While you are playing around, go ahead and try out a few of the other layouts. (I’m a fan of the Wide layout.) If you create a custom layout you like, you can save it by going to Window > Layouts > Save Layout. (I used a custom layout called Pearson for the writing of this book.) After you’ve saved a custom layout, if you accidentally change the layout, you can always get it back.
Duplicating a view is a fairly straightforward process as well. You can simply right-click any view tab (such as Inspector in Figure 1.6), hover the mouse cursor over Add Tab, and a list of views pops up for you to choose from (see Figure 1.6). You may wonder why you would want to duplicate a view. Say that in your view-moving frenzy, you accidentally closed the view. Re-adding the tab will give it back to you. Also, consider the capability to create multiple Scene views. Each Scene view could align with a specific element or axis within your project. If you want to see this in action, check out the 4 Split built-in layout by going to Window > Layouts > 4 Split. (If you created a layout that you like, be sure to save it before you check out 4 Split.)
)
FIGURE 1.6 Adding a new tab.
Now, without further ado, let’s look at the specific views themselves.
The Project View
Everything that has been created for a project (files, scripts, textures, models, and so on) can be found in the Project view (see Figure 1.7). This is the window that shows all the assets and organization of a project. When you create a new project, you see a single folder item called Assets. If you go to the folder on your hard drive where you save the project, you also find an Assets folder. This is because Unity mirrors the Project view with the folders on the hard drive. If you create a file or folder in Unity, the corresponding file or folder appears in the explorer (and vice versa). You can move items in the Project view simply by dragging and dropping. This enables you to place items inside folders or reorganize your project on-the-fly.
)
FIGURE 1.7 The Project view.
When you click a folder in the Project view, the contents of the folder are displayed under the Assets section on the right. As you can see in Figure 1.7, the Assets folder is currently empty; therefore, nothing appears on the right. If you would like to create assets, you can do so easily by clicking the Create drop-down menu. This menu enables you to add all manner of assets and folders to a project.
The Favorites buttons enable you to quickly select all assets of a certain type. This makes it possible for you to get an “at a glance” view of your assets quickly. When you click one of the Favorites buttons (All Models, for instance) or perform a search with the built-in search bar, you can narrow down the results between Assets and Asset Store. If you click Asset Store, you can browse the assets that fit your search criteria from the Unity Asset Store (see Figure 1.8). You can further narrow your results by free and paid assets. This is a fantastic feature because it enables you to grab assets that you need for your project without ever leaving the Unity interface.
)
FIGURE 1.8 Searching the Unity Asset Store.
The Hierarchy View
In many ways, the Hierarchy view (see Figure 1.9) is a lot like the Project view. The difference is that the Hierarchy view shows all the items in the current scene instead of the entire project. When you first create a project with Unity, you get the default scene, which has just two items in it: Main Camera and Directional Light game objects. As you add items to your scene, they appear in the Hierarchy view. Just like with the Project view, you can use the Create menu to quickly add items to your scene, search using the built-in search bar, and click and drag items to organize and “nest” them.
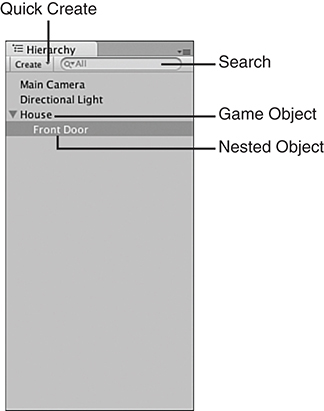
FIGURE 1.9 The Hierarchy view.
The Inspector View
The Inspector view enables you to see all the properties of a currently selected item. Simply click any asset or object from the Project or Hierarchy view, and the Inspector view automatically propagates with information.
In Figure 1.10, you can see the Inspector view after the Main Camera object is selected from the Hierarchy view.
Let’s break down some of this functionality:
If you click the check box next to the object’s name, it becomes disabled and does not appear in the project.
Drop-down lists (such as the Layer and Tag lists; more on those later) are used to select from a set of predefined options.
Text boxes, drop-downs, and sliders can have their values changed, and the changes are automatically and immediately reflected in the scene—even if the game is running!
Each game object acts like a container for different components (such as Transform, Camera, and Audio Listener in Figure 1.10). You can disable these components by unchecking them or remove them by right-clicking and selecting Remove Component.
Components can be added by clicking the Add Component button.
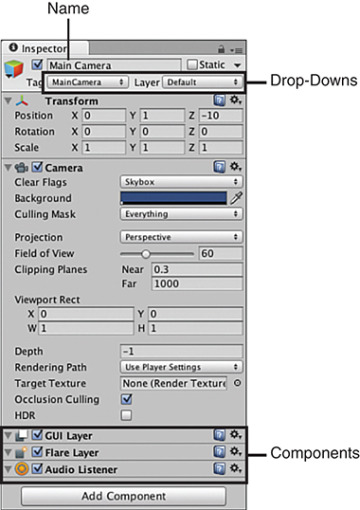
FIGURE 1.10 The Inspector view.
)
The Scene View
The Scene view is the most important view you work with because it enables you to see your game visually as it is being built (see Figure 1.11). Using the mouse controls and a few hotkeys, you can move around inside your scene and place objects where you want them. This gives you an immense level of control.
)
FIGURE 1.11 The Scene view.
In a little bit, you will learn about moving around within a scene, but for now, let’s focus on the controls that are part of the Scene view:
Draw mode: This controls how the scene is drawn. By default, it is set to Shaded, which means objects will be drawn with their textures in full color.
2D/3D view: This control changes from a 3D view to a 2D view. Note that in 2D view, the scene gizmo (described later this hour) does not show.
Scene lighting: This control determines whether objects in the Scene view are lit by default ambient lighting or only by lights that actually exist within the scene. The default is to include the built-in ambient lighting.
Audition mode: This control sets whether an audio source in the Scene view functions.
Game overlay: This control determines whether items like skyboxes, fog, and other effects appear in the Scene view.
Gizmo selector: This control enables you to choose which gizmos—that is, indicators that help with visual debugging or aid in setup—appear in the Scene view. This control also determines whether the placement grid is visible.
Scene gizmo: This control shows which direction you are currently facing and aligns the Scene view with an axis.
The Game View
The last view to go over is the Game view. Essentially, the Game view allows you to “play” the game inside the editor by giving you a full simulation of the current scene. All elements of a game function in the Game view just as they would if the project were fully built. Figure 1.12 shows what a Game view looks like. Note that although the Play, Pause, and Step buttons are not technically a part of the Game view, they control the Game view and therefore are included in the image.
)
FIGURE 1.12 The Game view.
The Game view comes with some controls that assist with testing games:
Play: The Play button enables you to play the current scene. All controls, animations, sounds, and effects are present and working. Once a game is running, it should behave very closely to how it would behave if it were actually being run in a standalone player (such as on your PC or mobile device). To stop the game from running, click the Play button again.
Pause: The Pause button pauses the execution of the currently running Game view. The game maintains its state and continues exactly where it was when paused. Clicking the Pause button again causes the game to continue running.
Step: The Step button works while the Game view is paused and causes the game to execute a single frame of the game. This effectively allows you to “step” through the game slowly and debug any issues you might have. Clicking the Step button while the game is running causes the game to pause.
Aspect drop-down: From this drop-down menu, you can choose the aspect ratio you want for the Game view window while running. The default is Free Aspect, but you can change this to match the aspect ratio of the target platform you are developing for.
Maximize on Play: This button determines whether the Game view takes up the entirety of the editor when run. By default, this is off, and a running game is only the size of the Game view tab.
Mute Audio: This button turns off the sounds when playing the game. This is handy when the person sitting next to you is getting tired of hearing your repeated play-testing!
Stats: This button determines whether rendering statistics are displayed on the screen while the game is running. These statistics can be useful for measuring the efficiency of a scene. The stats are turned off by default.
Gizmos: This is both a button and a drop-down menu. The button determines whether gizmos are displayed while the game is running. Game view gizmos are not displayed by default. The drop-down menu (the small arrow) on this button determines which gizmos appear if gizmos are turned on.
Honorable Mention: The Toolbar
Although not a view, the toolbar is an essential part of the Unity editor. Figure 1.13 shows the toolbar components:
Transform tools: These buttons enable you to manipulate game objects and are covered in greater detail later in this book. Pay special attention to the button that resembles a hand. This is the Hand tool, and it is described later this hour.
Transform gizmo toggles: These toggles allow you to manipulate how gizmos appear in the Scene view. Leave them alone for now.
Game view controls: These buttons control the Game view.
Account and Services controls: These buttons allow you to manage the Unity account you are using as well as the services you are using in your project.
Layers drop-down: This menu determines which object layers appear in the Scene view. By default, everything appears in the Scene view. Leave this alone for now. Layers are covered in Hour 5, “Lights and Cameras.”
Layout drop-down: This menu allows you to quickly change the layout of the editor.

FIGURE 1.13 The toolbar.
)
)