- Introducing Our Sample Application
- Getting Started with Server-Side Configuration
- Fundamentals of .NET Application Structure
- Managing and Referencing NuGet Packages
- Summary
- Q&A
- Workshop
- Exercise
Managing and Referencing NuGet Packages
We quickly jumped through the topic of managing and referencing NuGet packages during the construction of the .csproj file (earlier this hour), and it needs to be covered more completely before we move on to further developing the application. Dependencies in ASP.NET Core applications are primarily delivered the same way they are in many other modern development languages and frameworks: through packages of related content. Typically, in older versions of .NET, references to other parts of the framework or third-party libraries are made through DLL (dynamic link library) files. Make no mistake, this binary delivery of software is still being used, but it has been bundled into a NuGet package.
NuGet packages allow you to deliver more than just a single library for an application to reference, as you can bundle multiple libraries that are targeted for various runtimes and framework versions. In addition, you can bundle PowerShell scripts and other content for use in your application. This package concept is very compelling for a framework that wants to deliver binary references and ensure that those references work across platforms.
The NuGet client commands are repackaged and made available through the dotnet command-line tool. The NuGet tool allows you to download and install packages from remote repositories or locally accessible folders. NuGet keeps a configuration file that defines some basic options about how and from where to retrieve these packages:
On Windows, the NuGet.config file is kept in %AppData%\NuGet.
On Mac and Linux, the NuGet.config file is kept in ~/.config/NuGet.
How do you know what packages you should install, what packages are available, and what those packages do? In Visual Studio 2017, there is a Package Manager user interface that you can access from the Tools > NuGet Package Manager menu option; you can also right-click the project in the Solution Explorer window and select Manage Packages from the context menu. This user interface allows you to search NuGet repositories, both public and private, and see the descriptions of the packages and features you have searched for. In addition, Visual Studio 2017 provides type-ahead IntelliSense for the name and version number of NuGet packages if you edit the project file by hand.
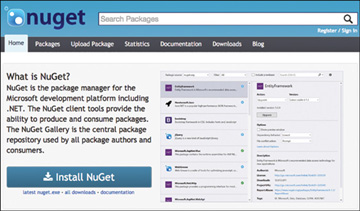
If you do not have Visual Studio, you can search the public NuGet.org repository by pointing your favorite browser at the www.nuget.org website, shown in Figure 4.2.

FIGURE 4.2 NuGet.org website.
You can search this public repository for packages and features that you may want to add to your project. At the time of this writing, there are more than 43,000 unique packages available to enhance your web applications.
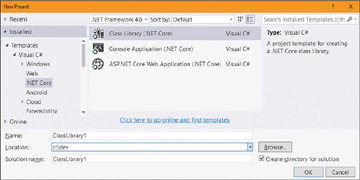
You can also choose to write your own packages of reusable content for your web applications. In Visual Studio 2017, you can create a new project and choose Class Library (.NET Core), as shown in Figure 4.3. This project type is similar to a normal class library that you can reference in other .NET project types, but the output is a NuGet package instead of a DLL file.

FIGURE 4.3 Creating a new class library (.NET Core) in Visual Studio 2017.
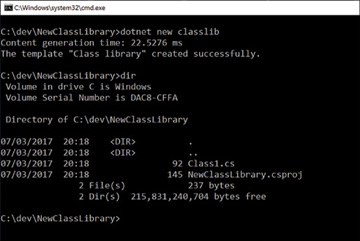
If you do not have Visual Studio 2017, how can you create a package from a class library? The dotnet command-line tool’s new feature (refer to Hour 2, “Setting Up Your Work Environment for ASP.NET Core”) has a Class Library project template available that will assist you in scaffolding the initial structure for this type of project. Choose this template type and, as demonstrated in Figure 4.4, you can start building a class library by using the syntax discussed in this chapter.

FIGURE 4.4 Creating a new class library from the dotnet command-line tool.
With this project created, you need to restore any packages that are referenced by the base template. To do this, run the following at the command line:
dotnet restore
You can now write as many classes inside the folder as you need and then compile with either the native Visual Studio 2017 compiler or another command-line tool. You can execute the following command to build your project:
dotnet build
The appropriate DLL files are then generated and written to disk for you in the bin/Debug folder off the root of this project folder. What you really need is the NuGet package that contains the DLL you generated. To construct the NuGet package, you can use the following command:
dotnet pack
This instructs the dotnet command to build your project (if it has changed since the last build) and then package the resultant DLLs with a specification file called a “nuspec” file into a NuGet package. This package has several traits, based on how your folder structure and project are defined:
The base name of the package is the name of the root folder. If you created your project in a folder called CoolProject, your package will start with the name CoolProject, followed by a period.
The version specified in the .csproj file is placed next. If no version is specified in your .csproj file, the version 1.0.0 is used by default.
The extension for a NuGet package is .nupkg.
Based on these examples, the CoolProject version 1.0.0 package would have the filename CoolProject.1.0.0.nupkg. The 0.4.0 version of our web project as shown earlier in the hour, called AspTravlerz, would have a filename AspTravlerz.0.4.0.nupkg.
The nupkg file (sometimes referred to as a “Nupp-Keg” by the ASP.NET and NuGet development teams) can then be shared on NuGet.org or placed in a secure folder location where other developers can reference the content to add to their projects.
