- Understanding the Web Server/Browser Paradigm
- Setting Up a Web Development Environment
- Summary
- Q&A
- Workshop
This chapter is from the book
This chapter is from the book
This chapter is from the book
Setting Up a Web Development Environment
With the brief introduction to dynamic web programming out of the way, it is time to cut to the chase and get your development environment ready to write jQuery and JavaScript.
The development environment can make all the difference when you are writing jQuery and JavaScript projects. The development environment should have these following components:
- Easy to Use IDE—The IDE provides text editors that allow you to modify your code in the simplest manner possible. Choose an IDE that you feel comfortable with and that is extensible to support HTML, CSS, JavaScript, jQuery, and AngularJS.
- Development Web Server—You should never develop directly on a live web server (although most of us have done it at one point or another). A test development web server is required to test out scripts and interactions.
- Development Web Browser(s)—Again, you should initially develop to the browser that you are most comfortable with or that will be the most commonly used.
For the purposes of this book, we have chosen to use Eclipse for the IDE and Node.js for the development web server. These technologies are very easy to set up, configure, and get going with. They also integrate well with each other and are easily extended. The following sections take you through the process of setting up Node.js and Eclipse for JavaScript development.
Setting Up Node.js
Node.js is a JavaScript platform based on Google Chrome’s V8 engine that enables you to run JavaScript applications outside of a web browser. It is an extremely powerful tool, but this book covers only the basics of using it as the web server to support your web application examples.
To install and use Node.js, you need to perform the following steps:
Go to the following URL and click INSTALL. This will download an installable package to your system. For Windows boxes, you will get an .MSI file; for Macs, you will get a .PKG file; and for Linux boxes, you can get a .tar.gz file.
http://nodejs.org
Install the package. For Windows and Macs, simply install the package file. For Linux, go to the following location for instructions on installing using a package manager:
https://github.com/joyent/node/wiki/Installing-Node.js-via-package-manager
- Open a terminal or console window.
- Type node to launch the Node.js JavaScript shell, and you should see a > prompt. The Node.js shell provides the capability to execute JavaScript commands directly on the underlying JavaScript engine.
- If the node application is not found, you need to add the path to the node binary directory to the PATH for your development system (this process is different for each different platform). The binary directory is typically /usr/local/bin/ on Macs and Linux boxes. On Windows, the binary directory will be in the <install>/bin folder, where <install> is the location you specified during the installation process.
Then you get to the > prompt. Type the following command and verify that Hello is printed on the screen, as shown in Figure 1.6:
console.log("Hello");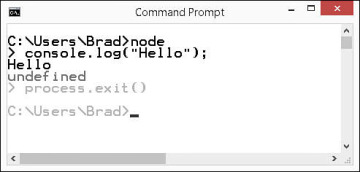
FIGURE 1.6 Starting and using the Node.js command prompt.
Use the following command to exit the Node.js prompt:
process.exit();
)
You have now successfully installed and configured Node.js.
Configuring Eclipse as a Web Development IDE
The IDE is the most important aspect when developing with JavaScript. An IDE integrates the various tasks required to write web applications into a single interface. In reality, you could use any text editor to write HTML, CSS, JavaScript, and jQuery code. However, you will find it much more productive and easy to use a good IDE.
We chose Eclipse for this book because it is a great general IDE that is easy to configure and set up. You can use your own IDE if you would rather; however, this might be a good chance to try a different IDE if you are unfamiliar with Eclipse.
Use the following steps to download, install, and configure Eclipse:
Install a Java JRE or JDK. For this book, we downloaded and installed the Java SE Development Kit 8 from the following location:
http://www.oracle.com/technetwork/java/javase/downloads/jdk8-downloads-2133151.html
Download and extract Eclipse. The location you extract the Eclipse files to will be the installation location. For this book, we installed the Luna version Eclipse IDE for Java Developers from the following location:
- Start Eclipse by double-clicking the Eclipse executable file.
After Eclipse has loaded, install the Node.js plug-in for Eclipse by selecting Help, Eclipse Marketplace from the main menu. Then type nodeclipse into the Find box and click Install to install the package, as shown in Figure 1.7. You will need to accept the license agreement as part of the install process.
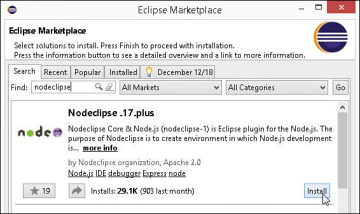
FIGURE 1.7 Installing the Nodeclipse plug-in for Eclipse.
After the Nodeclipese plug-in is installed, install the HTML Editor plug-in by selecting Help, Eclipse Marketplace from the main menu. Then type html editor into the Find box and click Install to install the package, as shown in Figure 1.8. You will need to accept the license agreement as part of the install process.

FIGURE 1.8 Installing the HTML Editor plug-in for Eclipse.
- Restart Eclipse to enable the new plug-ins.
Verify that the .js extensions uses Nodeclipse and .html extensions use HTML Editor as their default editors. To do this, select Window, Preferences, and then select General, Editors, File Associations and click the file types to see the associated editors, as shown in Figure 1.9.
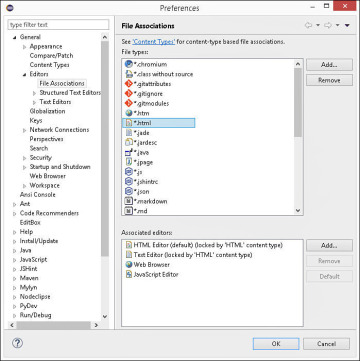
FIGURE 1.9 Setting default editors for file types in Eclipse.
- Set the path to the Node.js executable by selecting Window, Preferences and then selecting Nodeclipse in the navigation pane. The Node.js path option is toward the top of the options.
- Create a project for this book by selecting File, New, Project to launch the New Project Wizard. Then select Node, Node.js Project. Click Next and type in the name of the project; for example, LearningJavaScript. Then click Finish to create the project.
- Now we’ll validate that things work by creating and running a JavaScript Application from Eclipse. Select the new project and then select File, New JavaScript File from the main menu. Name the file first.js and click Finish to create the file.
Type the following line of code into the file and save it:
console.log("Hello");- Double-click to the left of line number 2 so that a small circle appears, noting that a breakpoint has been set.
Select Run, Run As, Node Application. You should see the word “Hello” printed to the Console window, as shown in Figure 1.10.
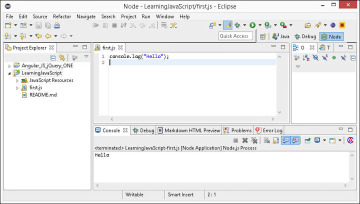
FIGURE 1.10 Running a JavaScript application in Eclipse.
)
)
)
)
Eclipse is now set up and ready for you to begin developing JavaScript.
Creating an Express Web Server Using Node.js
Node.js is a very modular platform, meaning that Node.js itself provides a very efficient and extensible framework, and external modules are utilized for much of the needed functionality. Consequently, Node.js provides a very nice interface to add and manage these external modules.
Express is one of these modules. The Express module provides a simple-to-implement web server with a robust feature set, such as static files, routes, cookies, request parsing, and error handling.
The best way to use Node.js as the web server for your web development is to utilize the Express module. In the following exercise, you build a Node.js/Express web server and use it to serve static files.
Use the following steps to build and test a Node.js/Express web server capable of supporting static files and server-side scripting:
- Open a console prompt and navigate to the location where you created the project folder for this book. If you don’t know the path, right-click the project in Eclipse and select Properties from the menu. Then select Resource, and the full path to the project folder is shown in the Location field to the right.
From a console prompt in the project folder, execute the following command, as shown in Figure 1.11. This command will install the Express module version 4.6.1 for Node.js into a subfolder named node_modules:
npm install express@4.6.1
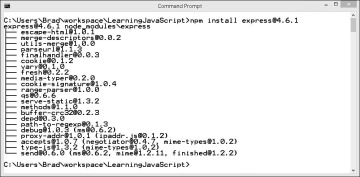
FIGURE 1.11 Installing the Express npm module for Node.js from a console prompt.
Execute the following command to install the body-parser module for Node.js. This module makes it possible to parse the query parameters and body from HTTP GET and POST requests. This command will install the body-parser module version 1.6.5 for Node.js into a subfolder named node_modules:
npm install body-parser@1.6.5
- Go back to Eclipse, right-click the project, and select Refresh. You should see the node_modules folder with body-parser and express subfolders.
- Create a file named server.js in the root of your project directory, place the contents from Listing 1.5 inside of it, and save it. This is a basic Node.js/Express web server that will service static files using the root of your project directory as the website root location.
Verify that your Node.js web server will run correctly. Start the web server by right-clicking the server.js file and selecting Run As, Node Application from the menu. The Console window, shown in Figure 1.12, should show that the server.js file is running and provide a red box to stop the server. If you are running multiple applications in Eclipse, you can click the Console Select button to select a specific console, as shown in Figure 1.12.
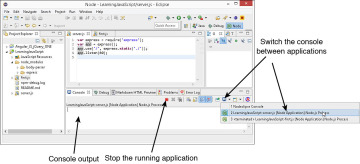
FIGURE 1.12 Running a JavaScript application in Eclipse.
Hit the server from a web browser at the following address. Because the web server is servicing static files using the ./ path, the actual contents of the server.js file should be displayed in the browser:
localhost/server.js
- Stop the web server by clicking the red box in the Console window.
)
)
You have now successfully set up a Node.js/Express web server in Eclipse. You will use this web server for most of the examples in the book. A few of the lessons require AJAX interaction, and a separate server will be created for those lessons.
LISTING 1.5 server.js Creating a Basic Node.js/Express Web Server
01 var express = require('express');
02 var app = express();
03 app.use('/', express.static('./'));
04 app.listen(80);
Adding HTML
The first step is to create a simple web page that has an HTML element that you can stylize and manipulate. Use the following steps in the editor to create the HTML document that you will use as your base:
- Create a folder named lesson01 in your project.
- Right-click the lesson01 folder that you created.
- Select New, File from the pop-up menu.
- Name the file first.html and click OK. A blank document should be opened up for you.
Type in the following HTML code. Don’t worry if you are not too familiar with HTML; you’ll learn enough to use it a bit later in the book:
<!DOCTYPE html> <html> <head> <meta http-equiv="content-type" content="text/html; charset=utf-8" /> </head> <body> <span>Click Me</span> </body> </html>- Save the file.
Open the following URL in your web browser and you should see the text “Click Me” appear:
http://localhost/lesson01/first.html
That’s it. All the basic HTML elements are now in place. In the next section, you stylize the <span> element so that Click Me looks more like a button.
Adding CSS
The simple text rendered by the browser is pretty plain, but that problem can quickly be solved by adding a CSS style. In this section, you use CSS to make the text appear more like a button.
Use the following steps to add the CSS style to the <span> element. For reference, the style changes you make in these steps are shown in the final script in Listing 1.6:
Add the following code inside the <head> tags of the web page to include a CSS <style> element for all <span> elements:
<style>
  span{
  }
</style>
Add the following property setting to the span style to change the background of the text to a dark blue color:
background-color: #0066AA;
Add the following property settings to the span style to change the font color to white and the font to bold:
color: #FFFFFF;
font-weight: bold;
Add the following property settings to the span style to add a border around the span text:
border-color: #C0C0C0;
border:2px solid;
border-radius:5px;
padding: 3px;
Add the following property settings to the span style to set an absolute position for the span element:
position:absolute;
top:150px;
left:100px;
- Save the file.
Open the following URL in your web browser, and you should see the stylized text Click Me appear, as shown in Figure 1.13:
http://localhost/lesson01/first.html
)

FIGURE 1.13 <span> element stylized to look like a button.
Writing a Dynamic Script
Now that the HTML is stylized the way you want it, you can begin adding dynamic interactions. In this section, you add a link to a hosted jQuery library so that you will be able to use jQuery, and then you link the browser mouse event mouseover to a JavaScript function that moves the text.
Follow these steps to add the jQuery and JavaScript interactions to your web page:
Change the <span> element to include an ID so that you can reference it, and also add a handler for the mouseover event, as shown in line 30 of Listing 1.6:
<span id="elusiveText" onmouseover="moveIt()">Click Me</span>
Add the following line of code to the <head> tag, as shown in line 6 of Listing 1.6. This loads the jQuery library from a hosted source:
<script src="https://code.jquery.com/jquery-2.1.3.min.js"></script>
Add the following JavaScript function to the <head>, as shown in lines 6–13 of Listing 1.6. This function creates an array of coordinate values from 10 to 350, then randomly sets the top and left CSS properties of the span element each time the mouse is moved over it:
function moveIt(){ var coords = new Array(10,50,100,130,175,225,260,300,320,350); var x = coords[Math.floor((Math.random()*10))]; var y = coords[Math.floor((Math.random()*10))]; $("#elusiveText").css({"top": y + "px", "left": x + "px"}) }- Save the file.
Open the following URL in your web browser, and you should see the stylized text Click Me appear, as shown in Figure 1.13:
http://localhost/lesson01/first.html
- Now try to click the Click Me button. The button should move each time the mouse is over it, making it impossible to click it.
- Find someone who annoys you, and ask them to click the button.
LISTING 1.6 A Simple Interactive jQuery and JavaScript Web Page
01 <!DOCTYPE html>
02 <html>
03   <head>
04     <meta charset="utf-8" />
05     <script src="https://code.jquery.com/jquery-2.1.3.min.js"></script>
06     <script>
07       function moveIt(){
08         var coords = new Array(10,50,100,130,175,225,260,300,320,350);
09         var x = coords[Math.floor((Math.random()*10))];
10         var y = coords[Math.floor((Math.random()*10))];
11         $("#elusiveText").css({"top": x + "px", "left": y + "px"})
12       }
13     </script>
14     <style>
15       span{
16         background-color: #0066AA;
17         color: #FFFFFF;
18         font-weight: bold;
19         border-color: #C0C0C0;
20         border:2px solid;
21         border-radius:5px;
22         padding: 3px;
23         position:absolute;
24         top:150px;
25         left:100px;
26       }
27     </style>
28   </head>
29   <body>
30     <span id="elusiveText" onmouseover="moveIt()">Click Me</span>
31   </body>
32 </html>