- Getting to Know the Daydream Controller
- Controlling the Controller
- Summary
This chapter is from the book
This chapter is from the book
This chapter is from the book
Controlling the Controller
The rest of this chapter will guide you through the practical knowledge required to work with the controller in conjunction with Daydream’s SDK components and code. First, you will be introduced to the controller API, which is your direct point of contact when handling user input and manipulating objects in 3D space. After that, you explore ways to tweak the default appearance of the controller by reskinning or swapping it out altogether with other GameObjects. By the end of this section, you should have strong knowledge and be technically proficient in the essentials needed to develop apps with the controller.
Unless otherwise stated, most of the recipes in this chapter assume a starting point of Recipe 2.5. This means that the GvrControllerMain prefab, as well as a Player GameObject with a GvrControllerPointer prefab, have been added to the scene. Many recipes also require the GvrPointerPhysicsRaycaster added to the main camera as a starting step, but this will be indicated and you will be guided through the prerequisite steps.
Handling the Controller API
The recipes in this section use the controller API to read data from the controller’s various inputs and sensors. These inputs include the physical user buttons and touchpad, the three main sensors, and some system-level information the SDK exposes to your app.
The controller API is a singleton polling-style API. This means there is a single instance of it and its static properties are accessed by reading them directly from the GvrControllerInput class. Usually this will happen from inside the Update() method of a MonoBehaviour class.
By default, the GvrControllerInput script is attached to the GvrControllerMain prefab. Because all the recipes in this chapter start from the Daydream base class you built in Recipe 2.5, they have the GvrControllerMain prefab already added to the scene.
Recipe 3.1: User Input
This recipe creates a script to handle all the possible interactive events from the controller’s touch inputs and displays them in a UI Text component in the environment. Although you generally would not need to poll the controller API for all of these static variables in one class as done here, it is helpful for learning to see them all in one place.
To get started with this recipe, open the Recipe_3.1_Start scene. It is already set up with a Player GameObject and the necessary Daydream prefabs to build to VR (see Recipe 2.5, Building a VR Player in First Person). It also includes a Canvas with UI Text components to display the states of the various controller events.
Add a new C# script to the Player GameObject by selecting it and choosing Add Component > New Script. Name it ControllerManager or something similar.
Update the ControllerManager class so that it looks like Listing 3.1.
Listing 3.1 Controller Manager Script
using UnityEngine;
using UnityEngine.UI;

public class ControllerManager : MonoBehaviour {

    public Text infoTextField;

    void Update () {
        HandleControllerUserInput ();
    }

    private void HandleControllerUserInput () {

        /// ---- TouchPad
        ///
        if (GvrControllerInput.TouchDown) {
            // Is true for 1 frame after touchpad is touched.
            infoTextField.text = "TouchDown";
        }

        if (GvrControllerInput.TouchUp) {
            // Is true for 1 frame after touchpad is released.
            infoTextField.text = "TouchUp";
        }

        if (GvrControllerInput.IsTouching) {
            // Check IsTouching before retrieving TouchPos.
            Vector2 touchPos = GvrControllerInput.TouchPos;
            infoTextField.text = "touchPos: " + touchPos.x + "," + touchPos.y;
        }

        /// ---- Click Button (touchpad button)
        ///
        if (GvrControllerInput.ClickButton) {
            // True if the click button is currently being pressed.
            infoTextField.text = "ClickButton";
        }

        if (GvrControllerInput.ClickButtonDown) {
            // True for one frame after click button  pressed.
            infoTextField.text = "ClickButtonDown";
        }

        if (GvrControllerInput.ClickButtonUp) {
            // True for one frame after click button  released.
            infoTextField.text = "ClickButtonUp";
        }

        /// ---- APP BUTTON
        ///
        if (GvrControllerInput.AppButton) {
            // The App Button is currently being pressed
            infoTextField.text = "AppButton";
        }

        if (GvrControllerInput.AppButtonDown) {
            // True for 1 frame after App Button has been pressed.
            infoTextField.text = "AppButtonDown";
        }

        if (GvrControllerInput.AppButtonUp) {
            // True for 1 frame after App Button has been released.
            infoTextField.text = "AppButtonUp";
        }

        /// ---- Home Button
        ///
        if (GvrControllerInput.HomeButtonDown) {
            // Home button is currently down, always false in the emulator
            infoTextField.text = "HomeButtonDown";
        }

        if (GvrControllerInput.HomeButtonState) {
            // always false in the emulator
            infoTextField.text = "HomeButtonState true";
        }
    }
}
In the Hierarchy window, expand out the Canvas GameObject to expose its child Text object. Drag the Text object from the hierarchy into the ControllerManager script’s Info Text Field. This is used to display the current controller event.
Build and Run. Try touching and clicking all the various buttons to see the correlating feedback in the floating text component.
Recipe 3.2: Sensor Input
The controller’s sensor inputs can be used to capture shakes, wrist flicks, and other complex user gestures. All of these gestures are constructed from the basic readings of the three main sensors: acceleration, orientation, and gyroscope.
In this recipe, you learn to handle each of these, and simply display the readings in a UI Text component. The starting point for the recipe is Recipe_3.2_Start. As with the other recipes in this chapter, it is already set up with a Player GameObject and the requisite Daydream prefabs to run in VR. There is also an additional Canvas with three UI Text components, to view the three controller sensors readings.
Follow these steps to read the sensors:
Add a new C# script to the Player GameObject by selecting it and choosing Add Component > New Script. Name it ControllerInputSensorManager or something similar.
Update the new class to look like Listing 3.2.
Listing 3.2 Sensor Input Class
using UnityEngine;
using UnityEngine.UI;

public class ControllerSensorInputManager : MonoBehaviour {

    public Text gyroTextField;
    public Text accelTextField;
    public Text orientTextField;

    void Update () {
        HandleControllerSensors ();
    }

    private void HandleControllerSensors () {
        // Retrieve the angular velocity
        Vector3 angVel = GvrControllerInput.Gyro;
        gyroTextField.text = "angVel: " + angVel.x + "," + angVel.y + "," + angVel.z;

        // Retrieve the acceleration from accelerometer
        Vector3 accel = GvrControllerInput.Accel;
        accelTextField.text = "accel: " + accel.x + "," + accel.y + "," + accel.z;
        // Retrieve the orientation of the controller
        Vector3 orient = GvrControllerInput.Orientation.eulerAngles;
        orientTextField.text = "orient: " + orient.x + "," + orient.y + "," + orient.z;
    }
}
Drag and drop the three text components in the Canvas from the Hierarchy window into the relevant fields in the ControllerInputSensorManager script.
Build and Run. Test out the various sensors by spinning the controller, shaking it, and changing its orientation.
Recipe 3.3: App System Inputs
Along with the interactive inputs, the controller also exposes some system-level properties to use in your app. These include battery level, charging state, and the controller connection state.
Open Recipe_3.3_Start and use the following steps to read system data from the controller. There is a Canvas added to the scene with several text components added to hook up to the relevant controller properties:
Add a new C# script to the Player GameObject by selecting it and choosing Add Component > New Script. Name it AppSystemInputManager, or something similar.
Double-click the script to open it in your code editor and update it to look like Listing 3.3.
Expand the Canvas GameObject out in the hierarchy. With the Player GameObject selected, drag the four text components from the Canvas into the empty slots for each property: API Status, State, Battery, and Is Charging.
Build and Run to test out the scene on your phone. Make sure you have added the open scene in Build Settings.
Listing 3.3 App System Inputs
using UnityEngine;
using UnityEngine.UI;

public class AppSystemInputManager : MonoBehaviour {

    public Text apiStatusT;
    public Text stateT;
    public Text batteryT;
    public Text isChargingT;

    void Update () {
        apiStatusT.text = GvrControllerInput.ApiStatus.ToString();
        stateT.text = GvrControllerInput.State.ToString();
        batteryT.text = GvrControllerInput.BatteryLevel.ToString();
        isChargingT.text = GvrControllerInput.IsCharging ? "is charging" : "is not charging";
    }
}
Recipe 3.4: Left or Right Handed
You access a user’s handedness through GvrSettings. Knowing whether the user is left or right handed is useful for displaying UI in the correct location for ease of use. Handedness is a Daydream system preference set by the user and is a read-only property for developers, so it can’t be changed. (See Listing 3.4.)
Listing 3.4 Handling Handedness
 GvrSettings.UserPrefsHandedness handedness = GvrSettings.Handedness;

 if (handedness == GvrSettings.UserPrefsHandedness.Left) {
      // Handle left handed
 } else {
      // Handle right handed
 }
Basic Interaction
The next set of recipes continue to build upon your knowledge of the controller API and combine it with the Daydream Event System. The Event System is used to handle pointer interaction on GameObjects in the 3D space.
Instead of listening for controller events via the GvrControllerInput class, as in the previous recipes, the Event System is used to send event messages to target GameObjects. These GameObjects then handle the events accordingly.
The following recipes combine simple pointer events to achieve extremely useful behaviors such as selection of objects, hover state feedback, and drag-and-drop functionality. These are a basic, yet necessary, starting point for all forms of interaction in your app.
Recipe 3.5: Selecting 3D Objects
On any platform—VR, mobile, web or otherwise—the most foundational interactive events are hover and click. In this recipe, you wire up Unity’s Event System in the Editor to handle hover and click events on 3D objects from the Daydream controller.
Using the controller to interact with 3D objects in the scene requires four essential components:
Input Manager: In the form of the GvrPointerInputModule attached to the GvrEventSystem; see Recipe 2.5 for setting up a base Daydream scene ready to handle input events.
Raycaster: The GvrPointerPhysicsRaycaster needs to be added to the scene’s main camera. In all the recipes in this chapter, the main camera is housed in the Player GameObject.
Event Trigger: Attached to the GameObject, this handles the event and triggers a method in your code.
Collider: A collider component needs to be attached to the relevant GameObject to be interacted with.
Open Recipe_3.5_Start. As with the previous recipes, it starts off in a similar place to Recipe_2.5_Finished with a Player GameObject, a GvrEventSystem, and the other required Daydream VR prefabs. Here, the environment is slightly changed, and a sphere has been added to the scene to interact with. It is important to make sure any GameObjects being used to interact with have colliders attached; otherwise, they will not be interactive. By default, all the Unity primitive shapes have colliders attached.
In the finished recipe when the pointer hovers over the sphere, its color changes to give visual feedback of the event to the user. When the user clicks on the sphere, its scale increases slightly.
Firstly, the GvrPointerPhysicsRaycaster needs to be added to the scene’s main camera. Do this by selecting the Camera GameObject; it is a child of the Player GameObject in the hierarchy. In the Inspector click Add Component, search for GvrPointerPhysicsRaycaster, and add it to the camera. This will raycast from the camera and the object being pointed at from the controller.
Create a new GameObject called Scripts in the hierarchy. All scripts will be added to this GameObject.
Create a new C# script on the Scripts GameObject and call it SelectingObjectsManager or something similar and update it to look like Listing 3.5.
Listing 3.5 Selecting Objects
using UnityEngine;

public class SelectingObjectsManager : MonoBehaviour {

    public GameObject sphere;
    public Material normalMat;
    public Material hoverMat;

    public void HandlePointerEnter(){
        sphere.GetComponent<Renderer> ().material = hoverMat;
    }

    public void HandlePointerExit(){
        sphere.GetComponent<Renderer> ().material = normalMat;
    }

    public void HandlePointerClicked(){
        Vector3 currentScale = sphere.transform.localScale;
        const float scaleAmt = 1.03f;
        sphere.transform.localScale = new Vector3 (currentScale.x * scaleAmt, currentScale.y * scaleAmt, currentScale.z * scaleAmt);
    }
}
In the SelectingObjectsManager class (see Listing 3.5), three public methods are created to handle the enter, exit, and click events from the pointer. In the HandlePointerEnter() method, the object’s material is changed while the pointer is hovering. In the HandlePointerExit() method, the material is changed back to the original, and in the HandlePointerClicked() method, the object is scaled up slightly. The next few steps use an Event Trigger to hook up the UI to the code and catch the pointer events on the sphere. Select the sphere GameObject, or whichever GameObject you want to make interactive, and click Add Component in the Inspector. Search for the Event Trigger and select it from the list to add it to the sphere (see Figure 3.3).
)
Figure 3.3 Event Trigger component added to the Inspector.
In the newly added Event Trigger component, select Add New Event Type and select Pointer Enter (see Figure 3.4).
)
Figure 3.4 Pointer Enter event added to Event Trigger component.
The Pointer Enter list is empty. Click the + button to add a new field (see Figure 3.5).
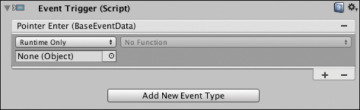
Figure 3.5 New field added to Event Trigger component.
Drag the Scripts GameObject into the empty field, and in the drop-down menu, select the name of the script you created previously, SelectingObjectsManager. Choose the HandlePointerEnter method by choosing SelectingObjectsManager > HandlePointerEnter(). See Figure 3.6.
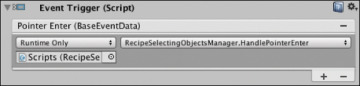
Figure 3.6 Function handler associated with the Pointer Enter event.
Repeat the preceding two steps for the Pointer Exit event. Choose Add New Event Type > PointerExit, drag the Scripts GameObject into the empty field (if it is not automatically added), and then in the drop-down menu choose RecipeSelectingObjectsManager > HandlePointerExit().
Repeat steps 4 and 5 for the Click event type. Choose Add New Event Type > PointerClick, drag in the Scripts GameObject to the empty field, and in the drop-down menu select RecipeSelectingObjectsManager > HandlePointerClicked().
Your Event Trigger component should now look like Figure 3.7. Build and Run the app in Daydream. When you hover over the sphere it should change color, and when you click it, it grows in size slightly.
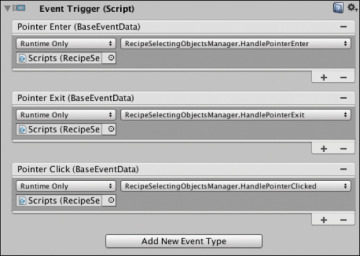
Figure 3.7 Finished Event Trigger component.
)
)
)
Recipe 3.6: Manipulating Objects—Drag and Drop Method 1
An important part of creating presence in VR is giving users agency over the world around them. The easiest way to achieve this is for objects in the virtual world to behave in the same way that they would in the real world. When you grab, throw, and move things, they should respond and behave as expected, with the same sorts of natural forces.
This recipe explores one method, without physics, of moving objects in the virtual world. The method locks the position of the GameObject to the controller’s pointer when dragged. Unlike the previous recipe, an Event Trigger will not be used to wire everything up in the Editor. Instead, a Unity messaging system interface will be implemented in code to handle the event. It sounds scary, but it is actually very simple.
Open Recipe_3.6_Start, where you have an environment and sphere ready to start the tutorial:
Add the GvrPointerPhysicsRaycaster to the scene’s main camera by selecting the Camera GameObject—it is a child of the Player GameObject in the hierarchy. In the Inspector, click Add Component and search for GvrPointerPhysicsRaycaster, and then add it to the camera. This will raycast from the camera and the object being pointed at from the controller.
In the Hierarchy window, select the sphere GameObject and add a new C# script to it. Call it DragAndDropManager, or something similar, and update it to look like Listing 3.6.
Listing 3.6 Drag and Drop Method 1
using UnityEngine;
using UnityEngine.EventSystems;

public class DragAndDropManager : MonoBehaviour, IPointerDownHandler, IPointerUpHandler {

    public GameObject controller;
    private bool pointerisDown;

    void Start () {
        pointerisDown = false;
    }

    void Update () {
        if (pointerisDown) {
            Transform pointerTransform = GvrPointerInputModule.Pointer.PointerTransform;
            Vector3 controllerDirect = pointerTransform.rotation * Vector3.forward;
            Ray ray = new Ray (pointerTransform.position, controllerDirect);
            Vector3 newPos = ray.GetPoint (Vector3.Distance  (transform.position, pointerTransform.position));
            transform.position = newPos;
        }
    }

    public void OnPointerDown (PointerEventData eventData) {
        pointerisDown = true;
    }

    public void OnPointerUp (PointerEventData eventData) {
        pointerisDown = false;
    }
}
Hook up the Controller GameObject to the public variable in the Unity Editor. In the Editor, select the sphere, or GameObject, you attached the DragAndDropManager to and drag the Controller GameObject into the field (choose Player > GvrControllerPointer > Controller).
Repeat step 3 for the Laser Pointer field (choose Player > GvrControllerPointer > Laser).
Build and Run. Remember, when you click and drag on the sphere, you should be able to drag it around.
In this drag and drop recipe, C# interfaces are used to extend the behavior of the DragAndDropManager. You do this by adding IPointerDownHandler and IPointerUpHandler in the class declaration next to MonoBehaviour, and then implementing the requisite interface methods, in this case, OnPointerUp() and OnPointerDown(). This negates the need to hook up Event Triggers manually, making the process simple. You can now add this script to any GameObject to make it capable of dragging.
Recipe 3.7: Manipulating Objects—Drag and Drop Method 2
This method of drag and drop uses a slightly different technique to the previous recipe. When the user clicks the GameObject to start the drag, the GameObject’s parent is set to the controller’s pointer. Because it is a child of the controller’s pointer, when the user moves the controller around the scene, the object moves around with it. When the user releases the controller button, the object is unparented, removed from the pointer and placed back in world space.
This very elegant solution is totally self-contained and reusable. However, if your GameObjects have intricate parent-child relationships, you might run into complications. In this case, implementing the drag and drop method outlined in Recipe 3.6 is better.
Open Recipe_3.7_Start, and follow these steps to start dragging and dropping:
A GvrPointerPhysicsRaycaster has already been added to the camera in Recipe_3.7_Start, so if you are not using that as your starting point, make sure to add the raycaster to the camera in the same way covered in the preceding couple recipes.
Add a new script to the sphere GameObject and name it DragAndDropManager2 or something similar. Update the script to look like Listing 3.7.
Listing 3.7 Drag and Drop Method 2
using UnityEngine;
using UnityEngine.EventSystems;

public class DragAndDropManager2 : MonoBehaviour, IPointerDownHandler, IPointerUpHandler  {

    public void OnPointerDown (PointerEventData eventData) {
        Transform pointerTransform = GvrPointerInputModule.Pointer.PointerTransform;
        transform.SetParent(pointerTransform, false);
        transform.localPosition = new Vector3(0f, 0f, 2f);
    }

    public void OnPointerUp (PointerEventData eventData) {
        transform.SetParent(null, true);
    }
}
In the code’s using namespace directives, make sure you are using UnityEngine.Event Systems so as to implement the pointer interfaces. IPointerDownHandler and IPointerUpHandler have been added next to MonoBehaviour in the class declarations, so implementing the actual interface method handlers is imperative.
In the OnPointerDown() method, you get the Transform component of the pointer, set the GameObject’s parent to be the pointer, and then shift the position of the GameObject closer to the user so that it’s in view.
In the example, the transform.localPosition is being set to 2 on the z axis. Play around with this to bring the object closer or move it further away. You can also leave it out altogether if you want the GameObject to stay the same distance from the user.
In OnPointerUp(), simply set the parent of the GameObject to null, placing it back in the root of the scene.
Recipe 3.8: Simple Rotating Objects
Mapping the controller’s rotation to the rotation of another GameObject is easy. This recipe does just that. Simply add the script in Listing 3.8 to any GameObject and it will follow the rotational movement of the controller.
Listing 3.8 Simple Rotating Objects
using UnityEngine;

public class RotateObjectSimpleScript : MonoBehaviour {

    void Update () {
        transform.rotation = GvrControllerInput.Orientation;
    }
}
Recipe 3.9: Selecting an Object to Rotate
This recipe lets the user select an object to be rotated from a series of GameObjects in view. It tracks the currently clicked GameObject, maps its rotation to the controller, and swaps it over when a new GameObject is clicked.
This mechanic could easily be turned into a simple virtual store app. The user can select an item to inspect it in more detail, or put it down and select another one.
Open Recipe_3.9_Start, and follow these steps:
The GvrPointerPhysicsRaycaster has already been added to the camera in Recipe_3.9_Start, so if you are not using that as your starting point, make sure to add the raycaster to the main camera in the same way discussed in previous recipes.
Create a new empty GameObject and call it Scripts. Add to it a new script called RotationManager and update it to look like Listing 3.9.
Listing 3.9 Rotating Multiple Objects
using UnityEngine;
using UnityEngine.EventSystems;

public class RotationManager : MonoBehaviour {

    public GameObject cubeLeft;
    public GameObject cubeMid;
    public GameObject cubeRight;

    private GameObject currentCube;

    void Update () {
        currentCube.transform.localRotation = GvrControllerInput.Orientation;
    }

    public void HandlePointerClick (BaseEventData data){
        PointerEventData pointerData = data as PointerEventData;
        currentCube = pointerData.pointerCurrentRaycast.gameObject;
    }
}
Add three cubes to the scene, by choosing GameObject > 3D Object > Cube. Space the cubes evenly on the horizontal axis in front of the Player GameObject. Label them cubeLeft, cubeMid, and cubeRight.
Select cubeLeft and add an Event Trigger component in the Inspector. In the added Event Trigger, click Add New Event Type and select Pointer Click from the drop-down menu.
Click the + button in the Pointer Click event and in the empty object field, drag in the Scripts GameObject you created in step 2.
Still in the Pointer Click event in the Inspector, in the Function drop-down menu to the right of the object field, select RotationManager > HandlePointerClick.
Repeat steps 4–6 to add Event Triggers to cubeMid and cubeRight.
Link the cubes to their reference in the RotationManager script by selecting the Scripts GameObject in the hierarchy and dragging each cube into its corresponding empty field in the RotationManager script in the Inspector.
Build and Run the scene. You should be able to click on a cube to lock its rotation to the controller. When you click another cube, it becomes the focus of rotation.
The RotationManager class (refer to Listing 3.9) has references to the three cubes in the scene and the currentCube. The currentCube GameObject is used to reference the currently selected cube. In the Update() method the currentCube’s rotation is mapped to the controller the same as in Recipe 3.8. The HandlePointerClick() method was attached to a Pointer Click event on each of the cubes via the Event Trigger added in steps 4–6.
The magic happens in the HandlePointerClick() method. The BaseEventData from the event is passed through from the Event Trigger as an argument. The data is type cast as a PointerEventData object and from there the actual GameObject that was clicked on is obtained. This is set as the reference to the currentCube, and it begins to rotate.
Recipe 3.10: Drag and Drop Intersect
Many applications require a mechanic where one object is used as a tool to select another object. By dragging one object onto another object, a collision occurs and an event or action triggers. This could be a virtual file being moved to the trash, or a spaceship hitting an asteroid. Let’s look at how this mechanic works in VR.
Open Recipe_3.10_Start, which follows on from Recipe 3.6, Drag and Drop Method 1. The sphere is dragged, and when the collider intersects with another sphere, its color is changed (by updating its material) to give feedback of the event.
Create a new empty GameObject called Scripts, and add new script to it called SelectionManager or something similar, and update it to look like Listing 3.10.
In the Unity Editor, drag the two spheres into the relevant fields in the SelectionManager’s component and drag two materials into the material slots to be used to change the look of the spheres when they collide.
Listing 3.10 Drag and Drop Intersection
using UnityEngine;

public class SelectionManager : MonoBehaviour {
    public GameObject sphere01;
    public GameObject sphere02;
    public Material normalMat;
    public Material hoverMat;

    private bool justExited;

    void Start () {
        justExited = false;
    }

    void Update () {
        if (sphere01.GetComponent<SphereCollider> ().bounds.Intersects (sphere02.GetComponent<SphereCollider> ().bounds)) {
            sphere02.GetComponent<Renderer> ().material = hoverMat;
            justExited = true;
        } else if (justExited){
            justExited = false;
            sphere02.GetComponent<Renderer> ().material = normalMat;
        }
    }
}
Build and Run. When you click and drag sphere01 so that it intersects with sphere02, sphere02’s color changes.
In the Update() method of the SelectionManager (refer to Listing 3.10), the Intersects() method checks to see whether the two spheres’ colliders bounds have intersected. If they have, then sphere02’s material is swapped to give the user feedback of the collision. The justExited boolean is used so the material swaps back to normal only on the first frame after the intersection ends, not continuously thereafter.
Recipe 3.11: Simple Teleportation
Using your knowledge of point and click from the previous recipes, you can implement a lightweight and uncomplicated teleportation system, one that doesn’t require the overhead of the Daydream Elements TeleportationController (refer to Recipe 2.6). This method is as simple as clicking the ground, retrieving the location, and then moving the Player to that location.
Open Recipe_3.11_Start and take a peek. Inside is an environment with the standard Player GameObject. To get this simple teleportation system working, follow these steps:
A GvrPointerPhysicsRaycaster has already been added to the camera in Recipe_3.11_Start, so if you are not using that as your starting point, be sure to add the raycaster to the camera in the same way as in previous recipes in this section.
The ground plane you teleport around on will need a collider. In this recipe’s accompanying code, the Ground GameObject already has a Mesh collider attached. If the ground plane in your scene doesn’t, in the Hierarchy window, select your Ground GameObject, and attach a collider to it by choosing Add Component > Box Collider.
Create a new script called TeleportationSimple, or something similar, and update it to look like Listing 3.11.
With the Ground GameObject selected in the hierarchy, drag the Player GameObject into the TeleportationSimple script’s empty Player field.
Listing 3.11 Simple Teleportation
using UnityEngine;
using UnityEngine.EventSystems;

public class TeleportationSimple : MonoBehaviour, IPointerClickHandler {

    public GameObject player;

    public void OnPointerClick (PointerEventData eventData) {
        Vector3 worldPos = eventData.pointerCurrentRaycast.worldPosition;
        Vector3 playerPos = new Vector3(worldPos.x, player.transform.position.y, worldPos.z);
        player.transform.position = playerPos;
    }
}
Build and Run, and you should be able to teleport around by clicking the ground plane.
The TeleportationSimple class implements the IPointerClickHandler interface. This means any GameObject it is attached to is clickable and the class will receive click event callbacks.
In the OnPointerClick() method, the worldPosition of the click on the ground is extracted from the PointerEventData argument of the method. The world position is used to create a new Vector3 with only the x and y values of the PointerEventData being used; the y position of the Player GameObject doesn’t change. The Player’s position is then updated with this new position created from the pointer’s click location.
Recipe 3.12: Touchpad Interaction: Controlling a GameObject
The fine-grained input of the touchpad can be used as a novel way to control the movement of a GameObject. The touch controls in this recipe could be applied to things like steering a car or piloting a plane, but in this recipe, you will navigate an alien slug around the environment.
The touchpad returns a Vector2 position of the location of the user’s thumb on the touchpad. The top left is 0,0 and 1,1 is the bottom right. This code maps the Vector2 to the velocity of a GameObject in the scene, moving it around on a 2D plane based on the touchpad’s x and z positions.
Open the Recipe_3.12_Start scene. Select the Alien GameObject and add a new script to it called AlienMovement or something similar. Update the script to look like Listing 3.12.
Listing 3.12 Touchpad Interaction: Controlling a GameObject
using UnityEngine;

public class AlienMovement : MonoBehaviour {

    void Update () {
        if (GvrControllerInput.IsTouching) {
            Vector2 touchPos = GvrControllerInput.TouchPos;
            float velocityZ = (1 - (touchPos.y * 2f)) * .2f;
            float velocityX = (touchPos.x - 0.5f) * .2f;
            Vector3 newPos = new Vector3 (transform.position.x + velocityX, transform.position.y, transform.position.z + velocityZ);
            Vector3 relativePos = newPos - transform.position;
            Quaternion rotation = Quaternion.LookRotation(relativePos);
            transform.rotation = rotation;
            transform.position = newPos;
        }
    }
}
In the AlienMovement class (see Listing 3.12), the Alien GameObject’s position is controlled by the touchpad via code in the Update() method. The velocity of the GameObjects on the x- and z-axes is calculated from the TouchPos property. It is adjusted so when the thumb is in the center of the touchpad the x and z velocities are zero. The greater the thumb’s distance from the center of the touchpad, the greater the velocity in that particular direction.
To move the GameObject, this velocity is added to the current position of the GameObject through a new Vector3, newPos. The GameObject is rotated to face the direction it is moving by subtracting the current position from the new position to get the relative position, which is then passed into the quaternion’s LookRotation() method. The alien now faces the direction it is moving.
Visualizing the Controller
Although the default controller provided by the SDK is exceedingly useful, it won’t work for every situation. Most applications you build require some kind of cosmetic change, from a simple reskin to a totally distinct change in form factor.
Recipe 3.13: Reskinning the Controller
The ControllerVisual prefab is the place to go to reskin the material of the default controller. The prefab is a child of the GvrControllerPointer prefab (see Figure 3.8). To change the skin of the controller, simply replace the texture assigned to the material, called ControllerBase, that is attached to the ControllerVisual.
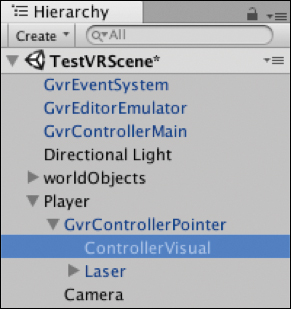
Figure 3.8 The ControllerVisual prefab in the Hierarchy window.
If you simply want to change the color of the controller, update it in the ControllerBase material. In the ControllerVisual’s Inspector, expand out the ControllerBase material, click on the color picker, and select a new color. The button’s colors can also be updated in the GvrControllerVisual script’s color pickers attached to the ControllerVisual.
The accompanying Unity project has an updated controller texture for you to use that has already been reskinned. In this recipe, the controller is reskinned by attaching these new materials to the controller’s various interactive states in the GvrControllerVisual script (see Figure 3.9).
)
Figure 3.9 The GvrControllerVisual script.
Open the Recipe_3.13_Start scene:
Select the ControllerVisual GameObject (refer to Figure 3.8), and in the Inspector in the GvrControllerVisual script (refer to Figure 3.9) under the Attachment Prefabs, make sure the GvrControllerTooltips object is assigned to Element 0.
Still in the ControllerVisual’s Inspector, in the ControllerBase material (refer to Figure 3.10), click the texture’s Select button and search for ddControllerBook, or whichever texture you have created.
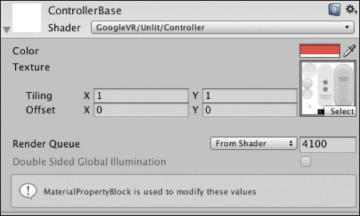
Figure 3.10 The ControllerBase material.
Select the texture by double-clicking on it. The controller updates with a new skin.
To change the color of the controller, update the color picker in the ControllerBase.
To change the color of the controller’s buttons, do it in the GvrControllerVisual script.
)
Recipe 3.14: Manually Changing the Default Controller Mesh
The Daydream controller is adaptable enough to be turned into almost anything your app requires. This recipe turns the controller into a Roman candle firework. The default controller GameObject and laser are replaced with a cylinder to represent the firework stick, and a particle emitter to shoot the fireworks. Pressing the controller button emits firework particles from the end of the cylinder.
Open Recipe_3.14_Start, which has a base scene with a Player GameObject and controller ready to be replaced with a custom GameObject.
In the Hierarchy window, create a new empty GameObject called Firework.
Add a cylinder as a child of the Firework and rotate (90,0,0) and scale (0.081, 0.153, 0.081) the cylinder to give it a Roman candle firework feel.
Add a particle system as a child of the Firework by choosing GameObject > Particle System. Translate its position so that it sits at the tip of the cylinder, from which the fireworks will emit (0, 0, 0.201). Scale the particle system’s Transform down to (0.1, 0.1, 0.1).
Play around with different settings of the particle system to achieve the desired effect (see Figure 3.11 for the settings used in the sample recipe). Other settings that were updated include setting the shape to a cone and setting the color to change between two gradients over a lifetime.
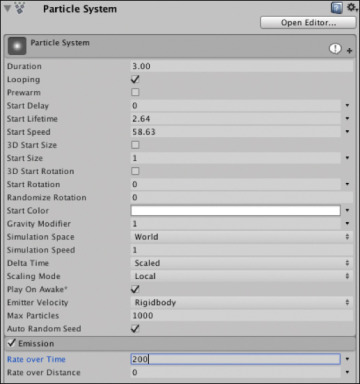
Figure 3.11 Particle System component.
Select the Cylinder GameObject and in its Inspector, add a new script. Call it FireWorks, or something similar, and update it to look like Listing 3.13.
Listing 3.13 FireWorks Script
using UnityEngine;

public class FireWorks : MonoBehaviour {

    public ParticleSystem particleSystem;

    void Start () {
        particleSystem.Stop();
    }

    void Update () {
        if (GvrControllerInput.ClickButtonDown) {
            particleSystem.Play ();
        }

        if (GvrControllerInput.ClickButtonUp) {
            particleSystem.Stop ();
        }
    }
}
Listing 3.13 is straightforward; it controls the particle system via the Daydream controller. In the Start() method, Stop() is called on the particle system to stop it from emitting. In the Update() function on ClickButtonDown, the particle system is set to Play(), firing a stream of particles, and on ClickButtonUp the particle system is stopped again.
In the Cylinder’s Inspector, drag the particle system into the Fireworks script’s Public field. Drag the Firework GameObject into the Project Window to turn it into a prefab, and delete it from the scene.
Select the ControllerVisual GameObject and drag the Firework prefab into the GvrControllerVisual’s Attachment Prefabs field at Element 0. The script should now look like Figure 3.12.
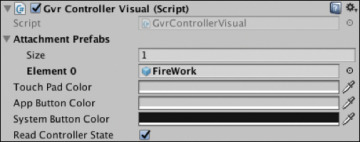
Figure 3.12 GvrControllerVisual script.
Build and Run to see the fireworks display when you press the controller button.
)
)
Recipe 3.15: Updating the Controller Tooltips
The controller tooltips are used to educate users as to the function of the controller’s buttons in your app. People are generally reluctant to try new things, especially in VR. Therefore, if you don’t inform the user as to the behavior of your app’s buttons, it is highly unlikely they will ever be pressed.
The two ways to update the tooltips are by updating the texture attached to the GvrControllerTooltipsSimple prefab, or by updating the UI text in the GvrControllerTooltipsTemplate prefab. Either way you decide to update the prefab, you then need to connect it to the GvrControllerVisual script’s Attachment Prefabs list.
By default, four tooltips are visible on the controller: Touch Pad Inside, Touch Pad Outside, App Button Inside, and App Button Outside (refer to Figure 3.2). It may be confusing, but the outside and inside do not refer to the location of the user’s touch on the buttons themselves. They refer to the positioning of the tooltip based on the handedness of the user. For example, if you only use the App Button Outside tooltip, when a left-handed user sees it, it will be on their outside left, but when a right-handed user sees it, it will be on their outside right.
This recipe updates the outside tooltips of the GvrControllerTooltipsTemplate to display some useful text and hide the inside tooltips. This means the tooltips always display on the outside of the controller, no matter which hand the user has her Daydream preferences set to. To update the tooltips, open Recipe_3.15_Start and follow these steps:
In the Project window, search for the GvrControllerTooltipsTemplate (GoogleVR/Prefabs/Controller/Tooltips), make a copy of it, and name it something appropriate, such as GvrControllerTooltipsBook.
Drag the renamed tooltip prefab into the scene. In the hierarchy expand the Canvas GameObject to expose each of the tooltip objects.
Select the TouchPadInside and AppButtonInside objects in the hierarchy and then deactivate them in the Inspector by clicking off the check box next to their names.
Drill down into the TouchPadOutside object to find TouchPadOutsideText. In the Inspector, update the text to something new.
Repeat step 4 for the AppButtonOutside tooltip.
Select GvrControllerTooltipsBook in the hierarchy, and save the changes that have been made to the prefab by choosing GameObject > Apply Changes To Prefab.
Delete the tooltip GameObject from the scene.
The tooltips are added to the ControllerVisual script on the ControllerVisual GameObject, a child of the GvrControllerPointer prefab (see Figure 3.13). Select the ControllerVisual GameObject and in the Inspector, in the GvrControllerVisual script, drag the GvrControllerTooltipsBook prefab into the Attachment Prefabs Element 0 field.
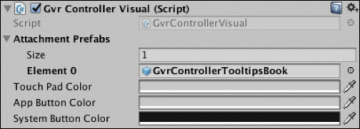
Figure 3.13 GvrControllerVisual script.
Build and Run. You should see updated tooltip text when you look closely at the controller. Test out left and right handedness by toggling it in the GvrTooltip script; this is a global property.
)
Recipe 3.16: Swapping the Controller GameObject Dynamically
Not only is it possible to swap out the controller’s GameObject and mesh manually in the Editor, it is also possible to do this programmatically at runtime. This recipe shows three GameObjects in the scene that replace the controller when clicked.
Open Recipe_3.16_Start. It is ready to go with three GameObjects to select and a GvrPointerPhysicsRaycaster added to the camera.
Create a new empty GameObject called Scripts, and add a new script to it called ControllerSwapManager or something similar. Update this script to look like Listing 3.14. This will keep track of the mesh currently being presented.
Listing 3.14 ControllerSwapManager
using UnityEngine;

public class ControllerSwapManager : MonoBehaviour {

    public GameObject defaultController;
    private ControllerSwap currentController;

    void Update () {
        if (GvrControllerInput.AppButtonUp) {
            currentController.ReturnToInitPos();
            currentController = null;
            defaultController.SetActive (true);
        }
    }

    public void SetCurrentController (ControllerSwap aCurrentController){
        if (currentController != null) {
            currentController.ReturnToInitPos ();
        }
        defaultController.SetActive (false);
        currentController = aCurrentController;
    }
}
Select the Scripts GameObject and then drag the ControllerVisual GameObject (choose Player > GvrControllerPointer > ControllerVisual) from the hierarchy into the empty defaultController field in the ControllerSwapManager script in the Inspector.
Create a new script called ControllerSwap, or something similar. Update it so that it looks like Listing 3.15, and attach it to each of the three custom controller GameObjects in the scene (ControllerLeft, ControllerMid, and ControllerRight).
Listing 3.15 ControllerSwap
using UnityEngine;
using UnityEngine.Events;
using UnityEngine.EventSystems;

public class ControllerSwap : MonoBehaviour, IPointerDownHandler, IPointerUpHandler {

    private ControllerSwapManager controllerSwapManager;
    private Vector3 initPos;
    private Quaternion initRot;

    void Start () {
        initPos = transform.position;
        initRot = transform.rotation;
        controllerSwapManager = GameObject.Find ("Scripts") .GetComponent<ControllerSwapManager> ();
    }

    public void OnPointerDown (PointerEventData eventData) {
        Transform pointerTransform = GvrPointerInputModule.Pointer.PointerTransform;
        transform.SetParent(pointerTransform, false);
        transform.localPosition = new Vector3(0, 0, 2);
    }

    public void OnPointerUp (PointerEventData eventData) {
        transform.localPosition = new Vector3(0, 0, 0);
        controllerSwapManager.SetCurrentController (this);
    }

    public void ReturnToInitPos (){
        transform.SetParent(null, true);
        transform.position = initPos;
        transform.rotation = initRot;
    }
}
In this recipe, the user can click a GameObject for it to become the controller, then return it by either pressing the App button or selecting another GameObject.
The ControllerSwap script (Listing 3.15), is added to each selectable GameObject. The script implements the IPointerDownHandler and the IPointerUpHandler interfaces. In the Start() method, references to the initial rotation and position of the GameObject are created. These references are used later to reset the GameObject to its original positions. A reference to the ControllerSwapManager is also created in the ControllerSwap Start() method.
In the OnPointerDown() method the parent of the GameObject is set to be the controller’s pointer. This lets the user drag the GameObject around to view it. In the OnPointerUp() handler, the local position is set to (0,0,0), the center point of the controller, and then passed as a reference of the GameObject to the ControllerSwapManager. The ReturnToInitPos() method is called from the ControllerSwapManager and returns the GameObject to its original position and rotation and detaches it from the controller.
The ControllerSwapManager (Listing 3.15) keeps a reference to the currently selected GameObject and resets it when the user clicks another object or clicks the App button. The Update() method listens for the AppButtonUp event; it then executes the ReturnToInitPos() method on the currentController, the currentController reference is nulled, and the default controller is set to active. The other method, SetCurrentController(), is called from the GameObject, stores a reference, and deactivates the default controller.
Recipe 3.17: Customizing the Laser Pointer
Daydream provides many adjustable properties for customizing the default laser. Changing things such as the color of the laser, the distance it tapers, and the actual GameObject used for the reticle is relatively easy.
In this recipe you change the color of the laser by adjusting it in the GvrLaserVisual script, and you also learn about all the adjustable properties. Open Recipe_3.17_Start to get started tweaking the laser:
The GvrLaserVisual script (see Figure 3.14) is your main point of contact for visual updates to the laser pointer. The GvrLaserPointerVisual script is attached to the Laser GameObject child of the GvrControllerPointer. Select the Laser GameObject to reveal the GvrLaserPointerVisual script in the Inspector (choose Player > GvrControllerPointer > Laser).
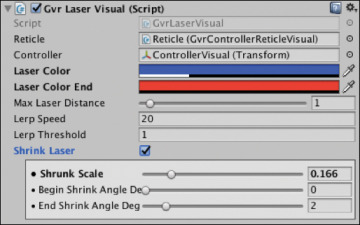
Figure 3.14 The GvrLaserVisual script.
In the GvrLaserPointerVisual script, adjust the color by selecting the color picker in the Laser Color field (see Figure 3.14). Update it to something different. I have chosen a more neon blue.
)
)
)
The GvrLaserVisual script has these editable properties:
Reticle Changes the color of the laser.
Controller Used to rotate the current position.
Laser Color The start color of the laser.
Laser Color End The end color of the laser.
Max Laser Distance The maximum distance the laser renders when not currently pointing at an object.
Lerp Speed The speed at which the laser moves from its current position to the target position. This helps with pointer jitter when moving short distances.
Lerp Threshold If the distance to move is greater than this threshold, the pointer jumps to the target position straight away.
Shrink Laser This is for when the laser should be shrunk when not pointing in the forward direction. You can adjust various properties of the shrinking.
Recipe 3.18: Tweaking the Arm Model
The arm model provided by Daydream is a mathematical approximate of where the user’s controller should be. The properties can be tweaked in the GvrArmModel script, attached to the GvrControllerPointer prefab.
For ergonomic and usability reasons, the laser points at an angle of 15 degrees down from the controller. Through usability testing, Google’s Daydream team found this to be the perfect angle for holding the controller comfortably while using the laser pointer. You can adjust this angle (found in the arm model) to suit your particular app.
If you require more detail and control over the arm model, you can create your own custom arm model script. The Daydream Elements project contains several premade arm models to mimic things such as holding a sword or swinging a bat.
Figure 3.15 shows the editable properties, and descriptions of what they do follow.
)
Figure 3.15 The GvrArmModel script.
Elbow Rest Position Position of the elbow joint relative to the head before the arm model is applied.
Wrist Rest Position Position of the wrist joint relative to the elbow before the arm model is applied.
Controller Rest Position Position of the controller relative to the wrist before the arm model is applied.
Arm Extension Offset Offset applied to the elbow position as the controller is rotated upward.
Elbow Bend Ratio Amount of the controller’s rotation to be applied to the rotation of the elbow. The rest of the rotation is applied to the rotation of the wrist.
Fade Controller Offset Offset in front of the controller for what position to use when determining whether the controller should fade. Useful when objects are attached to the controller.
Fade Distance From Head Forward Controller distance from the left or right of the head, after which the controller disappears.
Fade Distance From Head Side Controller distance from the left or right of the head, after which the controller disappears.
Tooltip Min Distance From Face Controller distance from face for the tooltips to appear.
Tooltip Max Angle From Camera The angle from the camera at which the tooltips show and hide.
Is Locked To Neck If true, the controller rotates around with the movement of the HMD.