This chapter is from the book
This chapter is from the book
This chapter is from the book
Configuration Manager and WMI
ConfigMgr leverages WMI heavily. At its simplest, the client uses WMI to extract information about the hardware, OS, and installed software of the client machine. ConfigMgr also uses WMI to enable client agent and server-side functions. It is important for anyone working on ConfigMgr to understand WMI and its leverage by ConfigMgr. If you are already familiar with ConfigMgr and considering getting a deeper understanding of ConfigMgr’s internals, WMI is one of the best areas to focus on. If you are considering automating ConfigMgr via scripts and applications, the following sections are critical for understanding when and where to leverage WMI, as they show how ConfigMgr uses WMI on its servers and look at the client-side elements. They also take a brief look at how PowerShell and WMI interact in the context of ConfigMgr.
WMI on Configuration Manager Servers
The SMS provider is a WMI provider that exposes all the editable objects in the ConfigMgr site database as WMI-managed objects. The ConfigMgr console leverages the SMS provider to perform all administrative actions. Ancillary ConfigMgr tools such as Resource Explorer and Service Manager leverage the SMS provider to provide information. Chapter 8, “Using the Configuration Manager Console,” discusses the ConfigMgr console.
The SMS provider is typically deployed alongside the site server or site database server at each site, as discussed in Chapter 4, “Architecture Design Planning.” The provider also implements the ConfigMgr role-based administration (RBA) security model; ConfigMgr requires more granular administration controls than those provided by the WMI infrastructure. Chapter 23, “Security and Delegation in Configuration Manager,” covers RBA and security in detail.
The SMS provider has existed since Systems Management Server (SMS) was released. While the internals of the provider have changed, and object types have come and gone, its function remains unchanged. MSDN (Microsoft Developer Network) documentation sometimes refers to it as the SDK provider. The provider provides a translation layer between ConfigMgr console and the underlying SQL Server database, as shown in Figure 3.8. As SDKs tend to be stable to ensure backward compatibility and avoid breaking developer applications, the translation function of the SMS provider is critical. As Microsoft changes the database to support alterations to ConfigMgr, the SMS provider’s internal implementation also changes to talk to the altered components, keeping the public side of the interface intact. When entire features are deprecated and removed from ConfigMgr, the SMS provider removes the public interfaces.
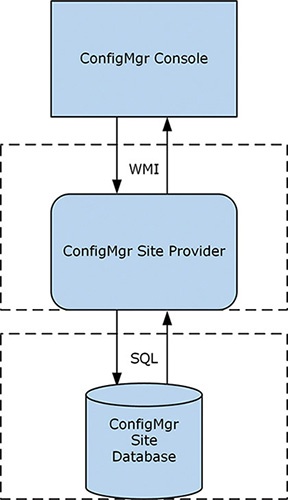
FIGURE 3.8 Diagram of the SMS provider architecture.
An important gating and control mechanism used by the SMS provider is a locking mechanism called Serialized Editing of Distributed Objects (SEDO), which helps ensure that objects are locked across the ConfigMgr hierarchy or within a site.
This is all handled for the user by the console and the SMS provider. When the same object is edited in one site while open in another site (even by the same user), an error is thrown by the console, allowing the user to either view the object as read-only or retry accessing the same object. Figure 3.9 shows an example of the error message.
)
FIGURE 3.9 An error message generated by a failure to lock a remote object via SEDO.
This section uses ConfigMgr collections to illustrate how to walk through the capabilities provided by the SMS provider. (For information regarding collections, see Chapter 11 and Chapter 13.) It also walks through various SMS provider methods of extracting data. It assumes that these commands are local on the server hosting the SMS provider (usually the site server or the site database server) and that the site code of the ConfigMgr site is CAS. The commands are native PowerShell methods of interacting with WMI and not ConfigMgr-specific cmdlets, discussed in the “Interaction Between WMI and PowerShell” section, later in this chapter.
The following PowerShell command pulls all collection objects from the SMS provider:
Get-WmiObject -class SMS_Collection -namespace "root\SMS\site_CAS"
This command should return a number of collections. The following is an example of the output, showing a selection of important properties:
CollectionID                   : SMS00001
Comment                        : All Systems
LastChangeTime                 : 20160424145345.500000+***
LastMemberChangeTime           : 20160425182902.723000+***
LastRefreshTime                : 20160530110058.993000+***
MemberClassName                : SMS_CM_RES_COLL_SMS00001
MemberCount                    : 11
Name                           : All Systems
This output includes the MemberClassName property, which returns the class for all members of the collection. Use the following command to determine what devices are members of the All Systems collection:
Get-WmiObject -class SMS_CM_RES_COLL_SMS00001 -namespace "root\SMS\site_CAS"
This returns all instances of the SMS_CM_RES_COLL_SMS00001 class, which itself inherits the SMS_CollectionMember class (a generic definition of what any collection member should look like). There is one instance of the SMS_CM_RES_COLL_xxxxxxxx class per member of a collection. Each instance contains information about a member device or user (jointly referred to as a resource). Following are examples of properties that appear in the output:
DeviceOS                                 : Microsoft Windows NT Server 10.0
Domain                                   : ODYSSEY
IsClient                                 : False
Name                                     : PANTHEON
ResourceID                               : 2097152003
ResourceType                             : 5
Next, a ResourceID property is obtained. Every resource in the database has a ResourceID property that uniquely identifies it. You can use this property to find details about the client. These client details are intrinsic to that client and not related to its membership in one or more collections. The following command (which you can modify to match your client machine’s ResourceID) retrieves that information:
Get-WmiObject -class SMS_R_System -namespace "root\SMS\site_CAS" -filter
"ResourceID=2097152003"
Some of the object types introduced with ConfigMgr 2012 contain string properties that store eXtensible Markup Language (XML). While the role of the provider remains intact, using these XML properties allows for complex object models, such as the application model, and any objects based on compliance settings to be represented easily without massively extending the SMS provider object model. (Chapters 11 and 12 discuss the application model, and Chapter 10, “Managing Compliance,” covers compliance settings.) Storing this level of detail in distinct properties would mean a lot of inflexibility in regard to changes. The “Interaction Between WMI and PowerShell” section, later in this chapter, discusses how to read this information. You would write to these XML attributes by using .NET code (which is what the console does) published in the ConfigMgr SDK or PowerShell cmdlets specifically written to support these XML properties. You can see one of these XML elements by running the command in Listing 3.1 to return the XML definition of a ConfigMgr application object. (In this code, replace '7-Zip 15.14 (x64 edition)' with the name of an application in your environment.)
LISTING 3.1 Returning the XML Definition of a ConfigMgr Application Object
$app = Get-WmiObject -Class SMS_Application -Namespace "root\SMS\site_CAS"
   -Filter "LocalizedDisplayName='7-Zip 15.14 (x64 edition)'"
$app.Get()
$app.SDMPackageXML
The script returns a single string containing the XML definition of the application object. The $app variable shows very little specific information about the application, as all the critical information is stored in the SDMPackageXML property in XML.
The script has an intermediary step of calling $app.Get(). This is an important step, as the SDMPackageXML property is defined as a “lazy” property in WMI by the SMS provider. Marking a property lazy denotes that it is expensive to return relative to the other properties in an object. This may only be noticeable when a large number of instances of the class are returned. Because lazy properties are not returned using the default instantiation process for a class, these properties are returned null by default when queried. Using Get() tells WMI to return all lazy properties for a given instance of a class.
The Configuration Manager Client WMI Namespace
The ConfigMgr client heavily leverages WMI internally and externally. It creates its own additional classes in the root\CIMv2 namespace and creates its own distinct namespaces to support client activities. These namespaces begin with root\CCM. This namespace is actually shared between clients and the MP, as they share the same core process, ccmexec.exe. Underneath root\CCM are multiple additional namespaces supporting various client operations. As shown in Figure 3.10, you can see some of the additional namespaces via wbemtest (Windows Management Instrumentation Tester). Launch the wbemtest tool from any machine by running wbemtest.exe from the command prompt or the Windows Run dialog. Follow these steps to view the namespaces:
Run wbemtest.exe with elevated administrative rights.
Click Connect.
Under Namespace, enter root\CCM.
Click Connect.
Click Enum Instances.
Type __NAMESPACE and click OK.
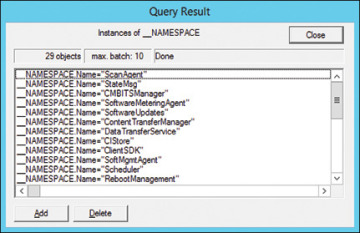
FIGURE 3.10 Using wbemtest to view namespaces under the root\CCM namespace.
)
Some of the most interesting namespaces are root\CCM\Policy and its child namespaces root\CCM\Policy\Machine\actualconfig and root\CCM\Policy\<User SID>\actualconfig, which show machine and user policies targeted to that ConfigMgr agent. (Replace <User SID> with the Windows account security identifier [SID] for that user.) A policy is a combination of client settings, deployment, and schedules sent to the client by the ConfigMgr site, as discussed in the next section.
Other interesting namespaces are root\CCM\SoftwareUpdates and root\CCM\ClientSDK. The SoftwareUpdates namespace is used to store information returned from the Windows Update Agent (WUA) API calls performed by the ConfigMgr agent as part of software update management. (See Chapter 15, “Managing Software Updates,” for information on software updates.) The ClientSDK namespace allows you to automate client-side activities. The “Automating the ConfigMgr Client via WMI” section, later in this chapter, discusses combining these two classes.
Obtaining Hardware Inventory Through WMI
The ConfigMgr client agent gathers hardware inventory data by querying WMI. The client agent settings determine what object classes were queried and sent to the server as the client’s inventory data. Most types of data gathered by hardware inventory are defined under the client agent settings in the ConfigMgr console. You can add or modify the total set of potential inventory collected by editing the default client agent settings or creating a custom client setting and deploying it to a collection of the systems from which you need to gather that information. Chapter 9, “Client Management,” describes client settings and inventory customizations through the ConfigMgr console.
The Default Settings client settings ship out of the box with a number of preconfigured classes to gather. In some cases, you might require a custom data class. For example, you might need to gather information about an application or a specific OS configuration exposed in WMI. There may also be some Registry information you want to gather as a part of hardware inventory. (You can also determine how the Registry is configured via compliance settings; see Chapter 10.) In these cases, you import a .mof file into the default client settings or a custom client setting to gather this additional information.
To apply inventory settings from a custom .mof file, navigate to Administration -> Client Settings and either select Default Client Settings or create a Custom Client Device Settings object. On the Properties page, choose Hardware Inventory, click Set Classes, and click Import.
ConfigMgr clients download client settings as part of their machine policy retrieval cycle. Any changes are compiled and loaded into the WMI Repository. The ConfigMgr client stores its machine policy in the root\CCM\Policy\Machine\actualconfig WMI namespace. Use wbemtest to examine some of the inventory-related objects in this namespace. Follow these steps to launch wbemtest:
Run wbemtest.exe with elevated administrative rights.
Click Connect.
Under Namespace, as shown in Figure 3.11, enter root\CCM\Policy\Machine\actualconfig.
Click Connect.
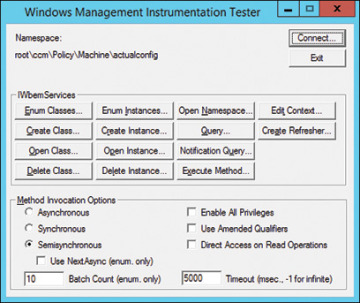
FIGURE 3.11 Using wbemtest to connect to the root\CCM\Policy\Machine\actualconfig namespace.
)
)
To return a list of available classes in this namespace, click Enum Classes. You can double-click any of the returned classes to show their definitions. Then, to return all instances of a class, click Instances. Alternatively, if you know the name of the class you want to view, use Enum Instances instead of Enum Classes on the main page of wbemtest. Use either method to view the instances of the InventoryDataItem class.
InventoryDataItem is the class that represents inventory items defined in machine policy. At first, the list looks quite intimidating, with a bunch of globally unique identifiers (GUIDs) returned in a list. However, if you scroll to the right, you see the ItemClass property and much more human-readable information. Double-clicking the row for Win32_Service returns a list of all Windows services.
The Namespace and ItemClass properties tell the InventoryAgent thread of CCMExec.exe (the main ConfigMgr client process) what to inventory and its location. InventoryAgent is the component of the client responsible for gathering inventory. The Properties property contains a comma-separated list of properties to gather for each instance of Win32_Service under the root\CIMv2 namespace. These properties follow:
DisplayName, Name, PathName, ServiceType, StartMode, StartName, Status
Instances of the Win32_Service class have additional properties beyond those listed. To add additional properties to be gathered as part of hardware inventory, modify the client settings (either default or custom ones). To view these settings, open the ConfigMgr console and navigate to Administration -> Default Client Agent Settings -> Properties -> Hardware Inventory -> Set Classes. Classes that are checked are collected along with any checked properties. Figure 3.12 shows the properties for the Win32_Service class, which represents Windows background services.
)
FIGURE 3.12 The hardware inventory properties gathered for instances of Win32_Service on ConfigMgr clients.
Following is a list of the key ConfigMgr client namespaces:
ScanAgent
StateMsg
SoftwareUpdates
ContentTransferManager
DataTransferService
CIStore
ClientSDK
Scheduler
RebootManagement
Messaging
DCMAgent
dcm
Policy
InvAgt
LocationServices
Automating the ConfigMgr Client via WMI
One of the most significant namespaces mentioned in the preceding section is the root\CCM\ClientSDK namespace. This namespace provides a wealth of classes, with information and methods that allow you to write client-side scripts or automation using WMI. While the other classes are useful for understanding some of the internal behaviors of the ConfigMgr client, the ClientSDK namespace has practical, everyday applications.
For example, if you want to automate software update management, you can use the CCM_SoftwareUpdatesManager and CCM_SoftwareUpdate classes to interact with and get the status of software updates, respectively. You can do the same for software distribution by using CCM_Program and CCM_ProgramManager and/or CCM_Application, CCM_ApplicationActions, and CCM_ApplicationPolicy, depending on the type of software distribution used.
A simple example of how to use ClientSDK is to get and set business hours defined on the client system. These business hours are designed to allow end users some self-service determination of when ConfigMgr client activity will occur (although ConfigMgr administrators can override this at will). Some customers want to modify or preconfigure these settings for end users. This section uses PowerShell to call out to WMI to get information about the configured business hours and change them.
You can start with getting the currently configured business hours by running the following command (run with elevated administrative rights), which invokes the GetBusinessHours method of the CCM_ClientUXSettings class:
Invoke-WmiMethod -Class CCM_ClientUXSettings -Namespace "root\ccm\clientsdk"
   -Name GetBusinessHours
This command returns something similar to the following (though internal WMI properties that start with __ and PSComputerName have been removed for readability):
EndTime          : 22
ReturnValue      : 0
StartTime        : 5
WorkingDays      : 62
These results show that on the test client, business hours start at 5 AM (05:00) and end at 10 PM (22:00). Figure 3.13 displays this in the Software Center.
)
FIGURE 3.13 The default Software Center business hours match what is found via the ClientSDK namespace.
You can alter this setting to set working hours to start at 6 AM (06:00) and end at 7 PM (19:00). Start by retrieving the order of the parameters for the SetBusinessHours method of the CCM_ClientUXSettings class. The Invoke-WmiMethod PowerShell cmdlet expects that input parameters are specified in a specific order. The following command finds the order:
([wmiclass]'root\ccm\clientsdk:CCM_ClientUXSettings').GetMethodParameters
  ('SetBusinessHours')
This command returns something similar to the following (though internal WMI properties that start with __ and PSComputerName have been removed for readability):
EndTime          :
StartTime        :
WorkingDays      :
This shows that the order of the input parameters is EndTime, StartTime, and WorkingDays. Leave WorkingDays as it is (on the test client, it is 62, which maps to Mon–Tue–Wed–Thu–Fri). The following command allows you to invoke the SetBusinessHours method to alter the client’s business hours to 6 AM to 7 PM (06:00 to 19:00):
Invoke-WmiMethod -Class CCM_ClientUXSettings -Namespace "root\ccm\clientsdk"
   -Name SetBusinessHours -ArgumentList 19,6,62
You should get a result with a ReturnValue property set to zero (success). Now if you re-invoke GetBusinessHours, you get the following (though internal WMI properties that start with __ and PSComputerName have been removed for readability):
EndTime          : 19
ReturnValue      : 0
StartTime        : 6
WorkingDays      : 62
This matches Figure 3.14, which shows the new Software Center business hours settings.
)
FIGURE 3.14 The changed Software Center business hours after invoking the SetBusinessHours method.
Further information on the ClientSDK namespace is available in the ConfigMgr SDK in MSDN at https://msdn.microsoft.com/library/jj874139.aspx.
Interaction Between WMI and PowerShell
ConfigMgr has been based on WMI since its SMS days. For IT pros, this meant using Visual Basic scripts to automate tedious ConfigMgr tasks or using alternative scripting languages such as Perl. With the advent of PowerShell, which has become the standard scripting interface across Microsoft’s products, ConfigMgr administrators faced a gap compared to the proliferation of PowerShell skills across other teams in their organizations. PowerShell can make calls to WMI, meaning it has always been possible to use PowerShell to make calls to the SMS provider to both get and set (read/write) data. However, it was not always straightforward, given some of the more niche capabilities of WMI that the SMS provider leverages. In addition, there were few samples of this from Microsoft, although the community generated many good examples and samples.
Starting with ConfigMgr Current Branch version 1610, Microsoft has integrated PowerShell cmdlets into each release of ConfigMgr Current Branch. This negates the need to update the cmdlet module in addition to the console with each release. The latest information on the changes in each release can be found at https://docs.microsoft.com/powershell/sccm/overview.
One of the most important capabilities of the PowerShell module is that it introduces the ability to handle XML data types. ConfigMgr 2012 and later rely heavily on XML data types of compliance settings and related objects (software update, application management, and MDM). When these features are accessed via WMI, critical data is stored only in string WMI properties as XML. Reading this data is therefore challenging if you do not have knowledge of the data types, and writing becomes a dangerous operation to codify.
The ConfigMgr console achieves reading and writing of these XML documents via specific .NET libraries, documented in the ConfigMgr SDK. The PowerShell module requires the console to be installed so it can leverage the full suite of the .NET libraries to enable access to the SMS provider.
Compare the results of this PowerShell WMI cmdlet:
$app = Get-WmiObject -Namespace "root\sms\site_CAS" -Class SMS_Application
  -Filter "LocalizedDisplayName='Microsoft Outlook'"
Get-WmiObject -Namespace "root\sms\site_CAS" -Class SMS_DeploymentType
  -Filter ("AppModelName='" + $app.ModelName + "'")
with the results of this ConfigMgr PowerShell module cmdlet:
Get-CMDeploymentType -ApplicationName "<application name>"
The ConfigMgr PowerShell method is simpler, and you can also easily create deployment types by using Add-CMDeploymentType, whereas with WMI, you would need to build the XML in PowerShell or use PowerShell to call out to .NET, neither of which is a trivial task.