This chapter is from the book
This chapter is from the book
This chapter is from the book
Making the Scenes
Before we start creating the actual scenes described above, we’ll want to make some changes to the project configuration. As this will be a proper 2D pixel art-styled game, we want those pixels to look nice and crisp on most run-of-the-mill 16:9 displays. A pixel art game is most commonly rendered with a low internal resolution, then stretched full-screen onto the display. For this, it is wise to choose an internal game resolution with a 16:9 aspect ratio, which shares an integer scaling factor with common resolutions like 1080p and 720p. We need to do this to prevent pixel squashing and stretching for most display configurations when running the game in full screen. For this example project, we’ll choose an internal game resolution of 320 x 180 pixels, because it nicely divides the resolutions 1920 x 1080 and 1280 x 720.
Luckily for us, Godot is built with this common 2D use-case in mind, and we can just make the following changes in the Display > Window section of project settings. It can be found in the main menu under Project > Project Settings.
In addition to setting the Width and Height properties to 320 and 180, respectively, we also set the Test Width and Test Height properties to 720p. The purpose of these is to get a bigger window resolution when testing the game in the editor, as 320 x 180 is pretty small on a modern 1080p desktop resolution.
If you want to test how the game looks in full-screen mode, tick the box beside the property Fullscreen. However, we recommend debugging scripts in windowed mode with the Resizable property enabled, as this is much more convenient, especially on a multi-monitor setup.
)
FIGURE 5.2 Display –> Window section of the project settings. Note the  symbol indicates a changed property.
To tell Godot that we want to stretch our game to the screen size while maintaining the aspect ratio, we need to modify the properties Mode and Aspect in the Stretch section. To maintain the aspect ratio, we can simply choose keep, which causes Godot to not disproportionally stretch our game (and therefore distort it) if the aspect ratio of our game and the aspect ratio of the display resolution differ. To stretch our game to the screen, we have two options to select in the Mode property: 2D and viewport.
The 2D mode renders the game at the current desktop resolution while stretching it to fit the screen. The viewport mode renders the game precisely at the specified resolution in the Width and Height properties into an off-screen image, then stretches that image to full screen. This might superficially sound very similar, but it has very different implications on the look and feel of the game. We encourage you to play with these modes after you finish making the game to get a better feel for it. To simulate a more retro look and feel, we will go with viewport mode for now.
With these preliminaries done, we will create the actual scenes needed for the game in the next section. If you get stuck at any point in this hour, feel free to take a look at the example project in the accompanied “Godot-Hour5” folder.
Creating the Player, Asteroid, Shot, and Explosion scenes
For the player, we need to make a new scene and create an  Area2D node as the root node. We will name it “player” and add it to the “player” group. Take a look at the previous hour if you need a refresher of how to add nodes to a group. As was briefly mentioned in the previous hour, an Area2D node, among other things, detects overlaps with other Area2D nodes and fires a signal on detection. We will use this fact to check for overlaps between the spaceship, the laser shots, and the asteroids, and differentiate between them using group names.
Before we can detect anything, however, we need to add a  CollisionShape2D node, on which the collision detection will be based upon, to our Area2D as a child node. Rename the CollisonShape2D node “hit_zone” and create a circle-shaped collision by clicking on <null> beside the Shape property in the Inspector and choosing
  New CircleShape2D. After that, we can change the radius of the circle shape to 6 pixels by clicking on <CircleShape2D> beside the Shape property in the Inspector.
)
FIGURE 5.3 Creating shapes in the CollsionShape2D node.
When we create the player script later, we’ll need to connect the area_entered signal of Area2D to the script. For now, we are finished with the Area2D and CollisionShape2D nodes.
We can now add an  AnimatedSprite node as a child node of “player” and call it “sprite.” The AnimatedSprite node is similar to the
  Sprite node you already encountered, with the difference that you can assign multiple images to the AnimatedSprite, which will play in a sequence at a predefined frame rate. There are other more flexible ways to animate Sprites in Godot beside the AnimatedSprite node, as you will see in Hour 10, “Animation.” As we want to keep it simple for now, we just use AnimatedSprite to get the job done.
We are now ready to create our first simple animation. First, locate the “sprites” folder, which contains all the needed Sprites for this hour, in the accompanying “Godot-Hour5” folder and copy it into your Godot project folder using your OS’s file explorer. In the AnimatedSprite Inspector, click on the <null> beside the Frames property, then click on New SpriteFrames. Click again on the new <SpriteFrames> to open the Animation Frames Editor at the bottom of the editor.
)
FIGURE 5.4 Inspector and Animation Frames window of the AnimatedSprite node.
Note that Godot created a default animation for us, so we only need to add some Sprite frames. Let’s do this by clicking on the  button left of the Paste button. This opens a file dialog where we can navigate to our “sprites” folder, then select and open both “player1.png” and “player2.png” by holding the shift key.
You might notice that the Sprite frames we inserted are not crispy at all. You might say, “But you promised me crispy pixels some paragraphs earlier! Why did we need to do all this setting up with screen resolution, if we still get blurry Sprites?” The problem has to do with how Godot handles importing textures, or in our case, the “player1.png” and “player2.png” images. We have to tell Godot that we want to use the images as pixel art Sprites, instead of the default smoothed textures Godot automatically imports.
To do this, navigate to the “sprites” folder in the editor’s FileSystem dock and double-click on “player1.png”. On the top-right side of the editor screen, click on the Import tab, which is beside the scene tab. You will see a lot of options, which you can ignore for now, as Godot provides us with a convenient preset for pixel art. By clicking on the Preset button, selecting the 2D Pixel preset and clicking on Reimport below, Godot will reload the image with pixel art-friendly settings.
If you repeat the previous paragraph for “player2.png” and then navigate back to our AnimatedSprite node, you should see nice and crispy Sprites like in the right side of Figure 5.5.
)
FIGURE 5.5 Left: Blurry Sprites we don’t want. Right: Crispy Sprites we do want.
Now you might ask if you need to do this process for every Sprite you put into your project. The answer is, gladly, no. After changing to a desired preset, you can choose Set as Default for ‘Texture’ after clicking on the Preset button. This applies your preset for every future image you bring into the project.
For images you already put into the project (like the ones in our “sprites” folder), you can just delete all the files in it that have an .import file extension using your operating system’s file explorer. These are metafiles where import settings for the corresponding image are stored. Godot will regenerate those files for each image automatically using your preset, so everything should now look crisp. For more information on importing images, check out Hour 14, “Project Management.”
)
FIGURE 5.6 FileSystem and Import docks in the editor.
To see the final animation, check the box beside the Playing property in the Inspector of the AnimatedSprite node. You should now see the spaceship’s exhaust animating in the editor.
The last thing we need to do before we are finished with the node creation part of the spaceship is add a Timer node as a child node of “player,” which we will name “reload_timer.” It will be used later in the script to limit our spaceship’s fire rate. Timer nodes in Godot are used to create timed events by firing a timeout signal on a timeout. By default, a Timer will restart after a timeout. As we want to restart our timer by ourselves, we set it to One Shot in the Inspector. While we are at it, let us change the Wait Time to 0.2. This will cause our ship to “reload” for 200 milliseconds after firing. We can later fine-tune this value when we write the actual player script.

FIGURE 5.7 Inspector showing the “reload_timer” Timer node.
TRY IT YOURSELF
Creating the Asteroid Scene
To create the asteroid scene, we need to repeat almost the same steps as when we created the player scene.
Create an
 Area2D node as the root, call it “asteroid,” and put it in the “asteroid” group.
Create a
 CollisionShape2D node called “hit_zone” as child of “asteroid” and add a
  CircleShape2D with Radius 6 to it.
Create an
 AnimatedSprite node called “sprite” as a child of “asteroid,” add the “asteroid1.png” and “asteroid2.png” frames to it, and make sure to check the Playing property.
Set the Speed (FPS) property of the AnimatedSprite to 3 (see Figure 5.4).
Creating the Shot Scene
To create the laser shot scene, we need to repeat similar steps to the ones above.
Create an
Area2D node as the root, call it “shot,” and put it in the “shot” group.Create a
CollisionShape2D node called “damage_zone” as a child of “shot” and add a  RectangleShape2D with Extends (8, 4) to it.
Create an
AnimatedSprite node called “sprite” as a child of “shot,” add the “shot1.png” and “shot2.png” frames to it, and make sure to check the Playing property.Set the Speed (FPS) property of the AnimatedSprite to 10 (see Figure 5.4).
Note the “damage_zone” of the shot scene uses a  RectangleShape2D instead of a
  CircleShape2D. By using a rectangular shape, we can model the Sprite shape of the laser shot much better than a circle would. Also note the shot scene does not have any Timer nodes like the player or asteroid scene, as it does not need any.
TRY IT YOURSELF
Creating the Explosion Scene
To create the explosion scene, we just need to:
Create a
 Sprite node as the root, call it “explosion,” and assign to it the “explosion.png” image.
Create a
 Timer node called “queue_free_timer” as a child of “explosion” and set it to One Shot and Autostart. Set the Wait Time of the Timer to 0.1.
Connect the timeout signal of the Timer to the queue_free function of the “explosion” node. See Hour 4 if you need a reminder on how to connect signals.
What you accomplished above is a scene that, when instantiated, frees itself (disappears) after 100 milliseconds. The enabled Autostart property of the “queue_free_timer” causes the Timer to start running as soon as it is instantiated in the game. And when the Timer timeouts, it frees its parent, causing the whole scene to disappear from the game. When placed into the game, it creates the illusion of a short explosion.
You can test this by running the scene by itself using the  button in the top right corner of the editor. Note that you may need to temporarily increase the Wait Time of the Timer to compensate for the startup delay of the game.
If you followed all the previous steps, you should get the following Scene Trees for the player, asteroid, shot, and explosion scenes:
)
FIGURE 5.8 Scene Trees of the player, asteroid, shot, and explosion scenes.
Creating the Stage Scene
TRY IT YOURSELF
Creating the Stage Scene (Part 1)
To create the first part of the stage scene, we need to:
Create a
 Node2D node as the root and call it “stage.”
Create a
 Timer node called “spawn_timer” as a child of “stage” and set it to Autostart.
Create a
 Sprite node called “background” as a child of “stage” and assign to it the “background.png” image.
Lock the Sprite with the
 button from the toolbar, like we learned in Hour 1, so we won’t accidentally select it in the editor due to its size.
Open the Offset fold in the Inspector of the Sprite and disable the Centered property so that the Sprite now aligns with the top left corner of the Viewport.
Instantiate your player scene as a child node of “stage.” Please take a look at Hour 2 if you need a refresher on how to instantiate a scene in the editor.
You should now see something similar to Figure 5.9 in your editor, except for the score and “game over” text, which we are going to create next.
)
FIGURE 5.9 Editor view and Scene Tree of the stage scene.
You encountered Godot’s UI elements briefly in Hour 1, and we will go into details about them in Hour 9, “GUI.” In this hour, we will use UI elements to show the player’s score and a “game over” text, though we will also see how to use custom fonts to match the in-game text to your game’s particular art style.
To make sure our on-screen text is always on top of all other in-game elements, it’s a good practice to place it into its own CanvasLayer node. A CanvasLayer node separates all its child nodes into a new canvas layer defined by the Layer property in the Inspector. Note that we have already used the ParallaxBackground in Hour 3, which is also a type of canvas layer, and we’ll go more into the details about canvas layers in Hour 21, “Viewports and Canvas.”
TRY IT YOURSELF
Creating the Stage Scene (Part 2)
To create the score in the stage scene, we need to:
Create a
 CanvasLayer node called “ui” as a child of “stage.”
Create a
 Label node called “score” as a child of “ui,” enable its Uppercase property in the Inspector, and set its Text to “score: 0.”
To make the score text look like the one in Figure 5.9, we need to:
Scroll down in the Inspector of the Label node until you see the Custom Fonts and Custom Colors folders, and open both.
For the Font Color and Font Color Shadow properties in the Custom Colors folder, pick some nice colors of your choice or insert the hex-codes 6fffbb (cyan) and 2f1f47 (dark purple), respectively.
Use your OS’s file explorer to locate the “fonts” folder in the accompanying “Godot-Hour5” folder and copy the “hour5.ttf” font into your project folder.
In the Font property of the Custom Fonts folder, create a
 New DynamicFont and open it in the Inspector (similar to how you did before with collision shapes).
In the Font folder, click on <null> beside the Font Data property, select Load, and choose the “hour5.ttf” font.
Finally, move the “score” Label to the top-left corner of the screen (or any place you like).
To make a game over text like in Figure 5.9, we need to:
Duplicate our “score”
 Label, rename it “retry,” and set its Align property to Center.
Change its Text to “game over” <linebreak>, then type: “-press the enter key to retry-”
Move the “retry” Label to the center of the viewport boundaries, like in Figure 5.9.
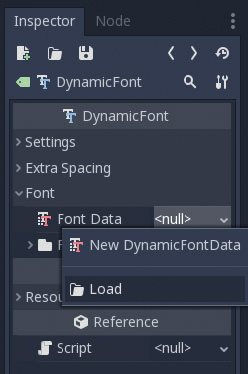
FIGURE 5.10 Loading a TrueType font as a Dynamic font. For more information on importing fonts, check out Hour 14, “Project Management.”
Note that we enabled the Uppercase property of the Label, because our provided TrueType font “hour5.ttf” only supports uppercase letters. Feel free to use your own fonts if you like to support lowercase letters and various symbols like exclamation marks or parentheses.
The last thing to do is hide the “game over” message by clicking on the  icon next to the “retry” Label. We will later make it reappear using the stage script when the spaceship is destroyed.
This concludes the creation of the stage scene.
Scripts and Input
In this section, we will write the scripts to make the game actually playable.
Creating the Player, Asteroid, and Shot Scripts
Let us jump right to creating and attaching a player script called “player.gd” for the root node of the player scene just like you learned in the previous hour. You can delete the _ready function and the comments, as we won’t need them. To get some basic ship movement going, let’s write a script similar to the movement script we wrote in the previous hour, shown in Listing 5.1.
LISTING 5.1 Basic Ship Movement with the Arrow Keys—player.gd
extends Area2D
const MOVE_SPEED = 150.0

func _process(delta):
    var input_dir = Vector2()
    if Input.is_key_pressed(KEY_UP):
        input_dir.y -= 1.0
    if Input.is_key_pressed(KEY_DOWN):
        input_dir.y += 1.0
    if Input.is_key_pressed(KEY_LEFT):
        input_dir.x -= 1.0
    if Input.is_key_pressed(KEY_RIGHT):
        input_dir.x += 1.0


    position += (delta * MOVE_SPEED) * input_dir
The above script first defines a move speed for the ship (in pixels per second), then in every frame asks the Input class if any of the arrow keys are pressed. If one of the arrow keys is pressed, the corresponding axis direction in the Vector2 input_dir is added. Finally, we add the input direction multiplied by a fraction of the ship’s move speed to the position. Note that we multiply with delta here to ensure a frame rate-independent movement of the ship.
Note also that the axis directions are the same as in Figure 3.1 of Hour 3, and that pressing two opposing directions like left and right at the same time sets the corresponding axis to zero, which is what we want to happen.
In Hour 7, “Handling Input,” we will see more sophisticated ways to handle input like defining input actions and using the gamepad and keyboard interchangeably. For now, the keyboard with some hard-coded keys is enough to get our simple game started.
TRY IT YOURSELF
Tweaking the Speed
You can play-test directly by pressing in the top-right corner  and controlling the ship with the arrow keys on your keyboard. Note that Godot might ask you to select a main scene; if so, select the stage scene you created in the last section. Play around with different values of MOVE_SPEED and choose one that feels comfortable.
While play-testing your game, you may have noticed that the spaceship can freely move out of the screen. We want to prevent this by extending our script shown in Listing 5.2.
LISTING 5.2 Ship Movement Constrained to Screen—player.gd
...
const SCREEN_WIDTH = 320
const SCREEN_HEIGHT = 180

func _process(delta):
    ...
    if position.x < 0.0:
     position.x = 0.0
    elif position.x > SCREEN_WIDTH:
     position.x = SCREEN_WIDTH
    if position.y < 0.0:
     position.y = 0.0
    elif position.y > SCREEN_HEIGHT:
     position.y = SCREEN_HEIGHT
You may remember that at the beginning of this hour, we set our game resolution to 320 x 180. Those are the exact numbers as in the SCREEN_WIDTH and SCREEN_HEIGHT constants. We use them to check if the ship moved past the screen borders and set it back to the screen border.
When play-testing, you may notice that the ship still moves halfway off the edge of the screen. This is because the spaceship’s position vector represents its exact center, so the ship is allowed to move past the screen until its center hits the edge. If you would like to fix this, you can add some pixel constant to the if-statements (see the exercises at the end of this hour).
With the movement done, let’s allow the ship to shoot some laser shots. Let’s first create a “shot.gd” script for the root node of the shot scene (Listing 5.3).
LISTING 5.3 Laser Shot Movement—shot.gd
extends Area2D
const SCREEN_WIDTH = 320
const MOVE_SPEED = 500.0

func _process(delta):
    position += Vector2(MOVE_SPEED * delta, 0.0)
    if position.x >= SCREEN_WIDTH + 8:
        queue_free()
The above script allows the laser shot to move horizontally to the right by a certain amount per frame. If the shot moves beyond the screen, we delete the shot from the game by calling the node’s queue_free function. This function makes sure the shot is deleted from memory after it has finished all of its processing in the current frame.
To do the actual shooting, we’ll want to spawn laser shots at the spaceship’s position when the player presses the spacebar. For this, the player script needs to know about the shot scene and instantiate it into the stage. We can get the shot scene with preload (“res://path_to_your_shot_scene/shot.tscn”) and save it into a variable for later instantiation.
To place a laser shot into the game, use the instance function on the loaded shot scene and add the instance into the stage scene’s root with the add_child function. To get the stage scene’s root, we can use the get_parent function, because our spaceship instance is a child node of the stage’s scene root (see Figure 5.9). We set the position of the instance to be the same as the ship’s position to make it appear as if the laser is coming out of the ship. Let’s extend our player script to let the ship shoot lasers (Listing 5.4).
LISTING 5.4 Spawning Laser Shots on Keypress—player.gd
...
var shot_scene = preload("res://scenes/shot.tscn")

func _process(delta):
    ...
    if Input.is_key_pressed(KEY_SPACE):
        var stage_node = get_parent()

        var shot_instance = shot_scene.instance()
        shot_instance.position = position
        stage_node.add_child(shot_instance)
When play-testing this, you will notice the ship fires lasers way too fast. We need to limit the fire rate somehow. Luckily, we already planned for that by providing a “reload_timer” to the player scene. Connect the “reload_timer” node’s timeout signal to our spaceship’s script (it should automatically create the _on_reload_timer_timeout function for you).
We next create a Boolean variable called can_shoot, set it initially to true, and conditionally check it before shooting. After shooting, we set it to false and start the “reload_timer,” When the “reload_timer” timeouts, it sets the can_shoot variable back to true so that the ship can shoot again. For all this to work, we need to make the following modifications to the player script:
LISTING 5.5 Limiting Fire-Rate—player.gd
...
var can_shoot = true

func _process(delta):
    ...

    if Input.is_key_pressed(KEY_SPACE) and can_shoot:
         ...
         can_shoot = false
         get_node("reload_timer").start()

func _on_reload_timer_timeout():
    can_shoot = true
There is now a noticeable fire-rate reduction when the game runs. You can tweak the reload time by modifying the Wait Time property in the Inspector of the “reload timer.”
)
Now that the ship can shoot lasers, we need some asteroids to shoot at. Instantiate some asteroid scenes in the stage scene by dragging the “asteroid.tscn” scene you created from the FileSystem dock into the editor viewport. Now shooting or flying into the asteroids will have no effect, because we did not write the needed scripts for it. Let’s change that by making the asteroids fly toward the spaceship and explode by either getting hit by the spaceship or a laser shot. Create an empty script for the root node and add an empty _process() function. Connect its area_entered signal to the _on_asteroid_area_entered function of your asteroid script like you learned in the previous hour. Your asteroid script should now look something like what is shown in Listing 5.6.
LISTING 5.6 Empty Asteroid Script—asteroid.gd
extends Area2D

func _process(delta):
    pass

func _on_asteroid_area_entered(area):
    pass # replace with function body
When the collision shape of a laser shot overlaps with the collision shot of your asteroid, the _on_asteroid_area_entered function is called. You can test this by putting a breakpoint keyword into the function body. The game will then halt at the moment a laser shot or the spaceship touches an asteroid.
To add the needed functionality, extend the asteroid script as shown in Listing 5.7.
LISTING 5.7 Asteroids Flying Toward the Spaceship and Exploding on Impact—asteroid.gd
extends Area2D

var explosion_scene = preload("res://scenes/explosion.tscn")

var move_speed = 100.0
var score_emitted = false

signal score

func _process(delta):
    position -= Vector2(move_speed * delta, 0.0)
    if position.x <= -100:
        queue_free()

func _on_asteroid_area_entered(area):
    if area.is_in_group("shot") or area.is_in_group("player"):
        if not score_emitted:
            score_emitted = true
            emit_signal("score")
            queue_free()

            var stage_node = get_parent()
            var explosion_instance = explosion_scene.instance()
            explosion_instance.position = position
            stage_node.add_child(explosion_instance)
This might seem like quite a lot at first, but we can mostly break things down into parts we have already seen before. For example, you may recognize the content of the _process() function is almost the same as the laser movement code from Listing 5.3, only going in the opposite direction. You also might recognize the last block in the listing. This spawns the explosion scene into the game at the position of the asteroid. We have seen this in Listing 5.4, where we spawned laser shot scenes from the player script.
Remember that we assigned the root nodes of the player, shot, and asteroid scenes to groups of their respective names? At the beginning of the _on_asteroid_area_entered function, we check whether the area that overlaps with our asteroid is a laser shot or the spaceship by verifying group names. We briefly saw this concept at the end of the previous hour, and use it to prevent the collision of asteroids with other asteroids.
Next, check if the score_emitted Boolean is false, set it to true, emit the score signal, and call queue_free. The score signal will later be used in the stage script to track the score. But why do we need the additional score_emitted Boolean if we free the asteroid anyway? This is to prevent the emitting of the score signal more than once. This can happen when two shots hit the asteroid in the same frame. As we hinted before, queue_free does not immediately delete the asteroid. It instead waits after the asteroid finished all its processing in the current frame, including all the calls to the _on_asteroid_area_entered function that are needed.
When play-testing, you should now see the asteroids you placed into the stage flying at you. Shooting at or flying into asteroids will destroy them. But you will also notice that the laser shots, as well as the spaceship, will keep on flying after colliding with an asteroid. We are going to change that next.
Note that the destroyed signal in the player script and the score signal in the asteroid script are used by the stage script that we will create in the next section.
Creating the Stage and Background Scripts
When play-testing, you should now have working gameplay. The asteroids fly toward your spaceship. and you can shoot them. The laser shots and asteroids disappear on collision, and the asteroids spawn an explosion. If the spaceship touches an asteroid, both explode. Now the problem is that the score is not tracked by the “score” Label, and we run out of asteroids quickly. Also, we cannot restart the game after colliding with an asteroid, and the “game over” message is nowhere to be found.
Let’s focus first on the player’s interaction with the game and UI by creating the following script shown in Listing 5.8 for the root node of the stage scene.
LISTING 5.8 Input and UI of the Stage—stage.gd
extends node2D
var is_game_over = false

func _ready():
    get_node("player").connect("destroyed", self, "_on_player_destroyed")

func _input(event):
    if Input.is_key_pressed(KEY_ESCAPE):
        get_tree().quit()
    if is_game_over and Input.is_key_pressed(KEY_ENTER):
        get_tree().change_scene("res://stage.tscn")

func _on_player_destroyed():
    get_node("ui/retry").show()
    is_game_over = true
This connects the destroyed signal of the spaceship to our custom _on_player_destroyed function as soon as the stage loads. We have seen in the previous hour this is an alternative to connecting to signals by using the editor. As soon as the spaceship is destroyed, it makes our “game over” message visible and enables pressing the enter key to restart the game.
Restarting the game works by using the change_scene function and passing our current scene as a parameter. Note that you can pass the path to any scene into the function, so level changes can also be done with it. The change_scene function is a method of the Scene Tree, which you can retrieve by calling the get_tree function. We also use it here a second time in conjunction with the quit function to let the player quit the game by pressing the escape key.
To create periodically spawning asteroids, we first connect the timeout signal of the stage scene’s “spawn_timer” node to our stage script. When the timer timeouts, we spawn an instance of the asteroid scene at a random location outside our screen. While we are at it, we can connect to the score signal of each spawned asteroid to update our score. For this, we do the following modifications to our stage script in Listing 5.9.
LISTING 5.9 Spawning Asteroids and Tracking the Score—stage.gd
...
var asteroid = preload("res://scenes/asteroid.tscn")
const SCREEN_WIDTH = 320
const SCREEN_HEIGHT = 180
var score = 0

func _ready():
    ...
    get_node("spawn_timer").connect("timeout", self, "_on_spawn_timer_timeout")

...
func _on_spawn_timer_timeout():
    var asteroid_instance = asteroid.instance()
    asteroid_instance.position = Vector2(SCREEN_WIDTH + 8, rand_range
(0, SCREEN_HEIGHT))
    asteroid_instance.connect("score", self, "_on_player_score")
    add_child(asteroid_instance)

func _on_player_score():
    score += 1
    get_node("ui/score").text = "Score: " + str(score)
Note the usage of the built-in rand_range (min, max) function. It returns a random floating point value between the min and max, which is in our case the top and bottom of our screen.
Also note that when changing scenes, everything, including the score we accumulated, is reset. Please look at Hour 12, “File System,” if you want to know how to save a game’s progress persistently to disk and reload it when needed.
When play-testing, you will notice everything now works as it should. But something feels off. Right! The background is still static. Let’s change that by creating the following script for the “background” Sprite in the stage scene, as seen in Listing 5.10.
LISTING 5.10 Infinitely Scrolling Background—background.gd
extends Sprite
const SCREEN_WIDTH = 320
var scroll_speed = 30.0

func _process(delta):
    position += Vector2(-scroll_speed * delta, 0.0)

    if position.x <= -SCREEN_WIDTH:
        position.x += SCREEN_WIDTH
The above code works very similarly to the movement code in the asteroid script, with the exception that it repositions the background Sprite one screen-width to the right if it moved past one screen-width to the left. This creates the illusion of an infinitely scrolling background.