- "Do I Know This Already?" Quiz
- Foundation Topics
- Exam Preparation Tasks
This chapter is from the book
This chapter is from the book
This chapter is from the book
Foundation Topics
Filesystem Overview
The filesystem’s structure starts with the root of the filesystem, which is denoted by the forward slash character (/). Every item on the filesystem is accessible by a single unique path from the root of the system, such as /usr/local/bin/foobar, no matter which device that file is stored on.
Unix evolved its own set of traditions as to where certain files would go. The fragmentation of the commercial and academic Unixes led to differences in conventions depending on which flavor of Unix you were using.
Linux borrows practices from many different Unixes and has fragmentation of its own in the form of different distributions. The community started working on a standard for filesystem layout called the File System Hierarchy Standard (FHS) to make it easier for both people and software to know where files can be found.
The latest FHS is always found at http://www.pathname.com/fhs/.
LPI bases the exam questions about the directory structure from the FHS 2.3. The FHS isn’t really a standard but a firm set of suggestions that most, but not all, distribution vendors obey. A good number of questions on the exams reference the FHS.
What Belongs Where
The exams make somewhat of a big deal about what the proper directories and locations are for Linux files, but few things are more vexing than to be asked what should positively be in the root (/) directory, or what can be elsewhere.
The Root of the System
Starting in the root (/) directory, the Table 5-2 lists common top-level directories and includes a short explanation for each:
Table 5-2 Common Directories
Directory |
Description |
bin |
Binaries for all users |
boot |
Kernel, system map, boot files |
dev |
Device files |
etc |
Configuration files for the host |
home |
Home directories for users |
lib |
Necessary shared libraries/modules |
lost+found |
Storage directory for unlinked files (found with fsck) |
media |
Mount points for removable media |
mnt |
Temporary mount point for the sysadmin |
opt |
Third-party application software |
proc |
Kernel and process information |
root |
The root user’s home directory |
sbin |
System binaries needed for boot |
tmp |
Temporary data |
usr |
Sharable, read-only data and programs, no host-specific data |
var |
Variable data, logs, Web, FTP, and so on |
The exam makes a big deal out of what’s optional and required in the root (/) directory. If you read the FHS 2.3 (highly recommended), you see that the word “optional” appears next to the /root and /home directories. It is possible that the computer is some kind of application server where users are not expected to log in. This is key because you’ll be asked questions about which directories are optional in the root filesystem.

The FHS documentation states, “The contents of the root filesystem must be adequate to boot, restore, recover, and/or repair the system. To boot a system, enough must be present on the root partition to mount other filesystems. This includes utilities, configuration, boot loader information, and other essential start-up data. /usr, /opt, and /var are designed such that they may be located on other partitions or filesystems.”
From this statement you can understand which of the preceding directories need to be on the root partition and which can be moved to other partitions.
Classifying Data
FHS makes distinctions between data that changes and data that is static, and data that can be shared versus data that’s local to the computer. Data of different categories should be separated into different directories.
Because of the way the FHS is laid out, with the root filesystem being described in section 3 and /usr and /var happening later, it’s easy to misunderstand what is really supposed to be on the root filesystem as opposed to another device that’s mounted after boot.
The relationship between /usr and /var is that, long ago in Unix times, /usr used to contain all types of data. The FHS tried to extract the data that changes and is nonsharable to /var, leaving /usr with just static, sharable data.
Where Programs Live
The FHS does not allow programs to create their individual named directories in the /usr section. The subdirectories allowed to exist directly under the /usr directory are
- bin—Contains user commands
- include—Contains header files for C programs
- lib—Contains libraries
- local—Contains local/sharable programs
- sbin—Contains nonessential system binaries
- share—Contains data/programs for multiple architectures
The /usr section has a location for programs named /usr/local. This is for the sysadmin to install software in a place that won’t conflict with the distribution files. Programs in the /usr/local path are also allowed for sharing among groups of hosts.
For example, say your developers have come up with a program to calculate loans and you want to install it on the workgroup server for other systems to remotely mount and use. Because this is a third-party or custom application, the logical place for it is in /usr/local/appname, possibly with a link to the program binary in the /usr/local/bin directory (because that’s where local binaries are expected to be found).
If given a choice between putting the software package BIGPROG in the /usr/local/BIGPROG section and the /opt/BIGPROG section, it’s hard to choose. Read any relevant exam question closely—the main difference being that the /opt section is not considered to be sharable, whereas the /usr section is often shared and mounted by client systems.
File Management Commands
A major section of the 101 exam is dedicated to how to run commands properly with the right options and arguments. As a good sysadmin, you are expected to know how to create, delete, edit, set permissions, display, move, copy, and determine the type of files and programs.
Tips for Working with Linux Files
Because most users and sysadmins come from a Windows or other OS background, a quick set of recommendations for the less-experienced can be of help here:
- Hidden files aren’t really hidden—They just begin with a ., such as the .bashrc and .bash_profile files. They are normally not visible unless you explicitly ask for them to be displayed and aren’t deleted by commands such as rm –f *.*.
- Filenames can contain multiple periods or no period characters—The filenames this.is.a.long.file and thisisalongfile are perfectly reasonable and possible.
- Spaces in filenames look nice, but are a pain to type—Use an _ or a - instead of spaces because it’s neater and easier than prefixing all spaces with a \. (To display a space in a filename, the system shows a space prefixed with a backslash.)
- File extensions aren’t mandatory—But they are useful for sorting, selection, and copy/move/delete commands, as well as for quickly identifying a file’s type.
Basic Navigation
The command to change the current working directory, cd, is used frequently and knowing how to move around the filesystem is a main focus of the exams.
The following command simply moves you from wherever you are to the /etc directory. This type of move uses absolute pathnames and can be used from within any directory:
cd /etc
The path is called absolute because it defines a path starting at the root of the filesystem. The easy way to tell whether the path is absolute is that it starts with a slash (/).
Moving relatively from the current directory to a subdirectory is quick and easy, such as if you are in the /etc/ directory and want to change into the /etc/samba directory. Here’s how:
cd samba
This is referred to as a relative path because the option you pass to the cd command is relative to the current directory. You are in /etc and moving to samba gets you in /etc/samba. If you were in /home and ran cd samba it would not work unless /home/samba also existed.
If you get confused as to where you currently are, use the pwd command to print the working (current) directory:
# pwd
/etc/samba
By itself, the cd command takes you back to your home directory, wherever you happen to be. The tilde (~) also means “home directory,” so cd ~ takes you to your home directory and cd ~sean takes you to Sean’s home directory.
Advanced Navigation
It’s good to get experience with some complex relative path situations. For example, if you were in the directory /home1/user1 and wanted to move into the directory /home2/user2, which command could be used?
$ tree /

/
|-- home1
|   `-- user1
`-- home2
    `-- user2
Remember, you aren’t using absolute pathnames, just relative pathnames.
The answer is
# cd ../../home2/user2
Each of the .. pairs takes you up one level: The first takes you to /home1 and the second puts you at the root. From there it’s relative pathnames. Practice this method, and remember that going up one level in this exercise only got you to the /home1 directory. This is a relative path because the path does not start with a /. The directory in which you end up depends on where you started.
Though this example of relative and absolute pathnames was used to look at changing directories, it applies to any situation where you’re prompted for a filename.
Listing Files and Directories
The ls command is used for listing directories or files, or both.
If you use the ls command to see a multicolumn output of the current directory, only the file or directory names are shown, not other details about the file:
ls
file1  file2  file3  file4
Use the –l long listing option to see all the details of a particular file or directory, or set of files or directories in a single column, like so:
$ ls –l
total 0
-rw-r--r--    1 root     root            0 Jan 24 18:55 file1
-rw-r--r--    1 root     root            0 Jan 24 18:55 file2
-rw-r--r--    1 root     root            0 Jan 24 18:55 file3
-rw-r--r--    1 root     root            0 Jan 24 18:55 file4
The –l long listing style is the only way to use the ls command and see the permissions, ownership, and link counts for objects. The only other command that can give such information is the stat command, which shows a single filesystem object at a time.
Other examples of using the ls command include
- ls /home/user—Shows a plain listing of that directory.
- ls –a—Lists all files, including hidden . files.
- ls –d foo—Lists just the directory called foo, not the contents.
- ls –i—Lists the inode number for the targetfile or directory. Inodes are the way Linux represents a file on disk and are discussed later in the section “Copying Files and Directories.”
- ls –l—Shows permissions; links; and date, group, and owner information. Permissions dictate who can access the file and are discussed in detail in Chapter 10, “Permissions.”
- ls –lh—Shows human-readable output of file sizes, in KB, MB, and GB, along with file details.
Chaining the options together produces useful results. For example, if you needed to see all the files (including hidden ones) in the current directory, their permissions, and their inode numbers, you would use the following command:
# ls –lai
290305 drwxr-x---  13 root   root      4096 Jan 24 18:55  .
     2 drwxr-xr-x  20 root   root      4096 Jan 24 17:56  ..
292606 -rw-r--r--   1 root   root      1354 Jan 21 00:23  anaconda-ks.
cfg
292748 -rw-------   1 root   root      3470 Jan 24 18:16 .bash_history
290485 -rw-r--r--   1 root   root        24 Jun 10  2000 .bash_logout
290486 -rw-r--r--   1 root   root       234 Jul  5  2001 .bash_profile
290487 -rw-r--r--   1 root   root       176 Aug 23  1995 .bashrc
290488 -rw-r--r--   1 root   root       210 Jun 10  2000 .cshrc
Determining File Types
With no requirement for extensions on Linux files, a tool for easily determining file types is essential. The file command can be used to read the file’s headers and match that data against a known set of types.
The file command uses several possible sources, including the stat system call, the magic number file (/usr/share/magic), and a table of character sets including ASCII and EBCDIC. Finally, if the file is text and contains recognizable strings from a given programming or other language, it is used to identify the file.
The output can be used, manipulated, and filtered to show you useful things.
For example, simply using the file command on a given file shows the type:
$ file file1
file1: ASCII text
Running the file command against a known binary shows various elements about the architecture and layout of the file, such as shown here:
$ file /bin/ls
/bin/ls: ELF 32-bit LSB executable, Intel 80386, version 1 (SYSV),
dynamically linked (uses shared libs), for GNU/Linux 2.6.32, stripped
Running the file command against a directory full of files is useful for viewing the possible types, but the real gold lies in filtering the output using the pipe operator (|) and the grep command, showing only the results that contain the word “empty”:
$ file /etc/* | grep empty
/etc/dumpdates:                             empty
/etc/exports:                               empty
/etc/fstab.REVOKE:                          empty
/etc/motd:                                  empty
/etc/printconf.local:                       empty
This is one way of finding empty files that are littering your system. They are probably required in the /etc directory but only clutter temporary directories such as /tmp.
One thing that’s distinct about Linux (and all Unixes) is that the shell is responsible for expanding the glob to the list of files it matches. If you type ls /tmp/thing* and there are two files that start with thing such as thing1 and thing2, it’s the same thing as if you typed ls /tmp/thing1 /tmp/thing2:
$ ls thing*
thing1    thing2
This globbing feature is why renaming a group of files is harder. In Windows you could type ren *.foo *.bar and any file with an extension of foo would then have an extension of bar. In Linux, typing mv *.foo *.bar would expand the globs to the list of files matched—*.foo would match the files you want to rename and *.bar would match nothing. This is different from what you might expect! The following output shows this problem.
$ ls *.foo *.bar
ls: *.bar: No such file or directory
file1.foo      file2.foo
$ echo mv *.foo *.bar
mv file1.foo file2.foo *.bar
$ mv *.foo *.bar
mv: target `*.bar' is not a directory
In the output, the first command shows there are three files with an extension of foo but none of bar. The echo command displays the output that follows it, such that it shows what would be executed if you ran the mv command by itself. The *.bar glob shows up because there are no files that match it. The error happens because there is no such directory called *.bar.
There are other glob operators. Example 5-1 shows some uses of file globs.
Example 5-1 Examples Using a Glob
$ ls
file  file1  file10  file11  file2
$ ls file*
file  file1  file10  file11  file2
$ ls file?
file1  file2
$ ls *1
file1  file11
$ ls file[123]
file1  file2
Example 5-1 starts by listing all the files in the directory. The same list of files is also available with file*, which matches the word “file” followed by anything, or nothing at all. Note how it includes the bare name “file”. Next the file? glob matches anything starting with the word “file” and followed by one character. Both “file” and the files with two-digit numbers in their names are excluded.
Globs don’t have to appear at the end of a filename. *1 matches anything ending in the number “1”. Finally, file[123] uses the square bracket operator that means “any one character from the set”. This matches file1 and file2.
Touching Files
The touch command seems odd at first, but it comes in handy often. You give it the name of one or more files, and it creates the files if they don’t exist or updates their timestamps if they do.
There are various reasons to use the touch command, such as creating a new blank log file or updating a file’s modification time to use as a reference such as to know the last time a job was run.
To create a new file, you can use the relative pathname for creating one in the current directory:
touch filename
Or, you can use absolute pathname to create the file, such as shown here:
touch /home/rossb/filename
Expect to see touch on the exams for log file creation, along with using a reference file to mark the last backup. In other words, if a log file is created from a successful backup, that file can be used as a date and time reference file because it occurred at a desirable time.
When you use touch on an existing file, the default action is to update all three of the file’s times:
- access—The last time a file was written/read from
- change—The last time the contents of the file were changed, or that the file’s metadata (owner, permission, inode number) was changed
- modify—The last time the file’s contents were changed
A programmer preparing a new release of a software package would use the touch command to ensure that all files have the exact same date and times. Therefore, the release could be referred to by the file date, given multiple revisions.
Setting a file’s date is relatively easy; the following command sets file1’s date to a particular date and time:
touch -t 201501010830 file1
The time format used is represented by yyyymmddhhmm, or a four-digit year, two-digit month, two-digit day, two-digit hour, and two-digit minutes.
Reference files are useful, particularly when you just want to have a file or set of files updated to a particular date/time, not the current one. You could use
touch -r reffile file2update
The date and time of reffile is applied to the file2update file date and time.
Copying Files and Directories
One aspect of copying an object is that the act creates a new file with a separate inode. This means that the operating system sees the new file as separate from the old one. Contrast this to a move operation where it’s the same file with a new name.
When you create an object in a filesystem, it gets its own permissions. cp doesn’t always copy the permissions over to the new file. This can be done, but it requires the use of the -p option to preserve the permissions and ownership. The root user is the only user that can change the ownership of a file; therefore, regular users using this option always own the copied files no matter who the original owner was.
A normal copy is simple to perform. You’re essentially causing the file to be replicated to the new location:
cp file1 /dir1/file2
A few options that make life easier for copying files include
- -d—Doesn’t follow symbolic links; copies the link instead. Links point one file to another and are explored later in the “Linking Files” section.
- -f—Force overwriting existing files.
- -i—Interactively asks before overwriting.
- -l—Creates a hard link to the source file.
- -r or –R—Recursively traverses directories (copying everything).
- -s—Creates a symlink to the source file.
- -u—Only updates the copy when the source is newer than the target or the target doesn’t exist.
- –x—Doesn’t traverse to filesystems mounted from other devices.
Copying an existing directory to a new one is simple:
# cp –r dir1 dir2
The -r option is necessary because the cp command doesn’t process directories by default. As long as the target directory does not exist, the previous command makes an identical copy of the source and all subordinate files and directories in the target directory.
Copying a source directory to an existing target directory doesn’t attempt an overwrite; it makes the source directory into a new subdirectory of the target.
For example, if you are in the /test directory and have the structure shown in the following, you might assume that issuing a cp –r dir1 dir2 would overwrite dir2, or at least prompt you to see whether you wanted to:
$ tree .
|-- dir1
|   |-- file1
|   `-- subdir1
`-- dir2
When you issue the cp –r dir1 dir2 command, the filesystem (along with the cp command) notices the existing dir2 entry and automatically drops the source directory into dir2 as a subdirectory, like this:
|-- dir1
|   |-- file1
|   `-- subdir1
`-- dir2
    `-- dir1
        |-- file1
        `-- subdir1
The correct way to copy the contents of dir1 into dir2, thereby mirroring dir1 exactly, is to focus on the word “contents.” By suffixing the source (dir1) with a forward slash and an asterisk (dir1/*), you tell the cp command to ignore the directory entry and focus on the filenames inside the directory.
With the same initial setup, if you issue the command cp –r dir1/* dir2, you get the correct results:
$ tree .
|-- dir1
|   |-- file1
|   `-- subdir1
`-- dir2
    |-- file1
    `-- subdir1
The inability to properly copy a directory or its contents will come back to haunt you on the exam. In addition, if you see a source directory with only a trailing forward slash (dir1/) but no asterisk, it’s identical to using (dir1). In other words, to copy just the contents of a directory, you have to address them specifically with the forward slash and asterisk (dir1/*).
Two special characters used in relative directory naming are often used when copying files. The current directory is represented by a single period (.) and the parent directory by two periods (..).
For example, if you are currently in the /home/rossb directory and want to copy a set of files from the /home/lukec directory, you can avoid typing the full path of the current directory with the (.) character. Both of these commands perform the same action:
cp /home/lukec/*.mp3 .
cp /home/lukec/*.mp3 /home/rossb
Moving Objects
Where the cp command copies a file by creating a new file, inode, and data, the mv command simply changes which directory file contains the file or directory entry or alters the entry in the file if it stays in the same directory. By changing just the metadata that points to the file, moving a file on the same device is quick. If the file move happens across two devices, the file is copied to the new device and deleted from the old one.
Create a file named file1; then run the stat command on it to check the details, as shown in Example 5-2.
Example 5-2 Running the stat Command on file1
$ touch file1
$ stat file1
  File: `file1'
  Size: 0         Blocks: 0          IO Block: 4096   regular empty
file
Device: fd00h/64768d         Inode: 2261179     Links: 1
Access: (0664/-rw-rw-r--) Uid: (500/sean)    Gid: (500/sean)
Access: 2015-02-03 21:47:46.000000000 -0600
Modify: 2015-02-03 21:47:46.000000000 -0600
Change: 2015-02-03 21:47:46.000000000 -0600
 Birth: -
Now move the file to a new name with the mv command, as shown in Example 5-3.
Example 5-3 Moving Files to a New Name
$ mv file1 file2
$ stat file2
  File: `file2'
  Size: 0          Blocks: 0          IO Block: 4096   regular empty
file
Device: fd00h/64768d         Inode: 2261179     Links: 1
Access: (0664/-rw-rw-r--) Uid: (500/sean)    Gid: (500/sean)
Access: 2015-02-03 21:47:46.000000000 -0600
Modify: 2015-02-03 21:47:46.000000000 -0600
Change: 2015-02-03 21:48:41.000000000 -0600
 Birth: -
Because the device and inode stayed the same you know this is the same file as before. The change time was modified to reflect the fact that the file was renamed.
When you move a file, the mv command overwrites the destination if it exists. This command supports an option, -i, that first checks the target to see whether it exists. If it does, mv asks whether you want to overwrite the target. Some distributions make -i a default option with a shell alias. Chapter 11, “Customizing Shell Environments,” discusses shell aliases in more detail.
Another quirk of the command is the lack of an -r, or recursive, option. This is because when you move a directory or a file you’re just changing the directory entry for the file. The directory continues to point to the same files so there is no need to move the files themselves.
You can avoid the overwriting of newer target files or directories with the -u option, preserving the latest copy of an object.
Examples of moving files and directories include moving a single directory to another directory name, as shown here:
mv -f dir1 dir2
This merely changes the directory entry dir1 to the new name dir2. It also removes the “are-you-sure” prompt with the -f option.
Just like the cp command, moving directory contents requires a correctly formed command; otherwise, you’ll move a directory not to the new name, but to a subdirectory of the existing directory.
For example, consider the /test directory again, with its structure similar to the following:
$ tree .
|-- dir1
|   |-- file1
|   `-- subdir1
`-- dir2
If you were a Windows administrator, it would make sense to run the following command to move dir1 to dir2:
mv dir1 dir2
If you do this on a Linux system and then run the tree command, you see the following output:
$ tree .
`-- dir2
    `-- dir1
        |-- file1
        `-- subdir1
This moves dir1 under dir2 because dir2 already existed. To properly move the contents of the source dir1 to the target dir2, you don’t need to use the nonexistent -r option (exam trick). You can just use a forward slash and an asterisk to refer to the files underneath dir1, like this:
mv dir1/* dir2
If you run the tree command, you see the following output:
$ tree .
|-- dir1
`-- dir2
    |-- file1
    `-- subdir1
Finally, the directories you pass to the mv command don’t always have to be underneath your current directory. You can use absolute pathnames, such as mv /dir1 . to move dir1, which is off the root directory into the current directory. You can also run mv /dir1 /tmp from anywhere in the system to move that same directory into the temporary directory.
Transforming Data Formats
The dd command is useful for a variety of tasks, not the least of which is creating backup images, called ISO files, of CD or DVDs. The two main formats dd interacts with are the raw device file and the full path of a file or object on the system.
For example, when creating a new boot disk, the .img binary file is read block by block from the CD-ROM (as a file) and written to a USB disk raw device as a set of blocks:
dd if=/mnt/cdrom/images/boot.img of=/dev/sdb
Creating an image of a CD-ROM involves reading the raw USB device block by block and creating a file on the filesystem that contains all those blocks:
dd if=/dev/sdb of=/root/usb.img
To duplicate a USB device named sdb to another USB device named sdc, the command is
dd if=/dev/sdc of=/dev/sdc
The if keyword means input file and the of keyword means output file. The exact order is unimportant, but as you can imagine, mixing up the in and out files can cause you to do terrible things such as overwriting parts of your hard drive!
dd, unlike most other Unix utilities, does not use dashes for its options. Options are specified in the format of option=value.
The dd command is also often used to duplicate a drive or partition of a drive to another like object.
For example, to copy the first partition from the /dev/sda disk to the same location on the second hard drive on the system, you would use the following command:
dd if=/dev/sda1 of=/dev/sdb1
You can also copy an entire disk device to another on the system by leaving off the partition numbers:
dd if=/dev/sda of=/dev/sdb
This works only if the second device is as large as or larger than the first; otherwise, you get truncated and worthless partitions on the second one.
Backing up the MBR is another trick that dd does well. Remember that the master boot record contains the indexes of all the partitions on that drive, and thus is very important. To create a disk file that contains only the first 512 bytes of the first hard drive in the system, use this command:
dd if=/dev/sda of=/root/MBR.img count=1 bs=512
The count keyword sets the number of reads from the input file you want to retrieve, and the bs keyword sets the block size.
If you don’t set the count and block size on this command to back up the MBR, you’ll be copying the entire device’s blocks to the filesystem—a snake-eating-its-own-tail operation that is guaranteed to fill up the partition quickly and crash the system.
The restoration procedure is just the opposite:
dd if=/root/MBR.img of=/dev/sda count=1 bs=512
Creating and Removing Directories
A basic task of file management is to be able to create and remove directories, sometimes creating or removing whole trees at once. To create a directory named dir1, you use mkdir dir1. To create a directory named subdir1 in the dir1 directory, you use mkdir dir1/subdir1.
Always think of the last segment of any directory path as the object being created or removed, and think of the rest as supporting or parent objects. The mkdir and rmdir commands are similar in features and options, including the capability of mkdir to create a deep subdirectory tree from scratch in a single command:
mkdir –p /dir1/dir2/dir3/dir4
One of the quirks about the rmdir command is that it cannot remove anything but an empty directory. For example, the last directory of the chain /dir1/dir2/dir3/dir4 is the real target for this command, and only if that directory is empty (no regular or directory files) can it be removed.
rmdir –p /dir1/dir2/dir3/dir4
One option to the rmdir command does allow it to remove directories that have files and so on in them. It’s called --ignore-fail-on-non-empty and is the longest option I know of in Linux. I’d rather type rm –rf targetdir 20 times than this beast.
Removing Objects
It follows that you’ll want to remove objects after creating or copying them, and this is done with the rm command for most objects. rmdir can also be used.
Deleting files with the rm command is a matter of choosing the target to be removed and the options that work best.
If you want to remove a particular file and never be prompted by confirmation messages, the command is rm –f target.
To remove a directory and all its contents, and never get a confirmation message, the command is rm –rf /full/path/to/target.
Where Are Those Files?
Having a mechanism for finding or locating files on a Linux system is essential because the sheer amount of directories and files makes searching manually nearly impossible.
There are two methods for accomplishing this task—quick and dirty or slow and methodical. Most people try the quick locate command before resorting to the plodding find command.
Locating Files with Locate
The quickest way to find a file or set of files is to use the locate command. It’s fast, database-driven, and secure. When you run the locate command you are searching a database instead of the filesystem, and only files that you have access to are shown. The downside of the database is that it’s updated nightly and is therefore unaware of any changes that have happened since the last update.
locate has a quirky way of showing results. You would probably expect that using locate for a file named readme would locate only files named readme, but that’s not quite true. It finds anything that has a filename of readme, including regular files and any part of the path.
For example, while attempting to locate the readme file, you run the following command:
locate readme
This finds both of the following entries, one with the string readme as a part of the filename and the other a directory:
/readme
/usr/src/linux-2.4.20-8/drivers/net/wan/8253x/readme.txt
Use the locate command to find items you know are on the disk, or that you know existed before the last locate database update. The database that locate uses is updated nightly when the system runs its maintenance routines, or on demand. If you don’t have permissions to the object, it isn’t shown in the locate output.
Use locate with the -i option to ignore the case (upper or lower) and return anything that matches your search string using a case-insensitive match:
locate -i string
The locate database needs to be updated regularly to ensure good results. Your distribution probably puts it in the list of nightly jobs to be run. For more details on the nightly jobs, see Chapter 16, “Schedule and Automate Tasks.” Updating the database can take a long time, and it is frustrating having to wait for the updates to finish when you need to search.
The update commands must be run as root, and either one will do the job:
updatedb
Sometimes you want to exclude files or directories from the locate database because they either are inappropriate or simply take too long to index without any apparent benefit. This is configurable in the /etc/updatedb.conf file. This file is read and the variables are used by the updating commands.
The two main methods of excluding objects in the configuration file are either by filesystem type or path. The following output is an example of a working /etc/updatedb.conf file:
PRUNEFS="devpts NFS nfs afs sfs proc smbfs autofs auto iso9660"
PRUNEPATHS="/tmp /usr/tmp /var/tmp /afs /net /sfs"
export PRUNEFS
export PRUNEPATHS
The PRUNEFS keyword is for filesystem types you want excluded from the locate database update; as you might expect, the PRUNEPATHS keyword is for directory trees you want excluded. Notice that most of the paths are temporary data locations or exotic file locations.
Remember for the exam that locate returns results for the search string in any portion of the path or filename it finds the string in. There will be questions that locate is right for, and some that really want the whereis command.
Finding Files
The find command is the most accurate but time-consuming method for searching the system for file objects because it crawls the list of files in real time versus the locate indexed database. The command consists of several (sometimes confusing) sections. But, if it’s learned properly, it can be a powerhouse for the busy sysadmin.
The structure of a find command is
find startpath –options arguments
To make sense of this jumble of sections, let’s take a look at a useful find command and match up the sections:
# find /home –iname *.mp3
/home/snuffy/g3 – red house.mp3
The previous command sets the start path to the /home directory and then looks for any instance of the string mp3 as a file extension, or after the last . in the filename. It finds a file in the user snuffy’s home directory and returns the full path for that file.
Options for find include
- group—Based on files belonging to the specified group
- newer—Based on files more recent than the specified file
- name—Based on files with names matching a case-sensitive string
- iname—Based on files with names matching a non-case-sensitive string
- user—Searches for files belonging to the specified user
- mtime—The modify time; used for finding files x days old
- atime—Based on the number of days since last accessed
- ctime—Based on the number of days since the directory entry was last changed
A useful feature of the find command is its capability to execute another command or script on each and every entry normally returned to standard output.
For example, to find all MP3 files in the user’s home directories and archive a copy into the root user’s home directory, you could use this command:
find /home –iname *.mp3 –exec cp –f {} .\;
This command uses the -exec option, which accepts every line returned to standard output one by one and inserts the full path and filename between the curly brackets ({}). When each line of output is parsed and the command is executed, it reaches the \; at the end of the line and goes back to standard input for the next line. The last line of output is the last one with a command executed on it; it doesn’t just keep going and error out.
Running multiple operators in a single command is possible, too. Just be sure not to get the values for one operator mixed up in the next. You could look for all MP3 files owned by a given user with the following command:
find /home –iname *.mp3 –user snuffy
/home/snuffy/bls – all for you.mp3
The find command is complex, and rather than bore you with more possible options, I’ve worked out a number of examples of how to use find:
To find a file and execute cat on it, use
find /etc –iname fstab –exec cat {} \;
To delete all core files older than seven days, use the following:
find /home -mtime +7 -iname core -exec rm -f {} \;
To find all files on the system owned by bob and change the ownership to root, use
find / -user bob –exec chown root {} \;
To find all files by user tjordan and change his group, use this command:
find /data -user tjordan -exec chGRP users {} \;
For safety you can use -ok instead of -exec to be prompted for confirmation each time the command runs.
find /data -user tjordan -ok chgrp users {} \;
To find all inodes related to a hard link, use the command find / -inum 123456.
The find command’s operators and the capability to execute commands on the search results will be covered on the exam. Practice all the examples you see here and get inventive with the possibilities. Particularly watch out for the use of -mtime and its cousins: -atime and -ctime.
Which Command Will Run?
With the plethora of commands and executable scripts offered on a Linux machine, you need to know which of the possible commands will run when you type the name of it on the command line. This all depends on the contents of the PATH variable. This variable’s contents are used as a sequentially read set of locations to search for executable objects.
The which command is used to determine the full path of commands that are queried from the PATH variable. To determine which command is indeed executed just by typing the name, run the following command:
which ls
alias ls='ls --color=tty'
        /bin/ls
As you can see, two entries were found that contain the ls command. The first is an alias, one that sets some color functions to the ls command; the other is the real command binary in /bin/ls.
When you execute a command, it finds the first available match, which might not be the one you wanted, as is the case with the ls command. To make it execute a physical binary and ignore any aliases that have been set, preface the command with a backslash (\), like so:
\ls
Try it again on a command that has two executables on the system, the gawk command:
which gawk
/bin/gawk
This returns a single entry, but there are multiple gawk commands on a Linux box. The first matching command found is returned by default, and only if you use the proper switch does it find all possibilities:
which -a gawk
/bin/gawk
/usr/bin/gawk
Researching a Command
When you need more information about a command than just which one will execute, try whereis. This command shows up to three possible bits of information, including its binary files, the man page path, and any source files that exist for it. Here’s its syntax:
$ whereis ls
ls: /bin/ls /usr/man/man1/ls.1.gz
Options for whereis include
- -b—Searches for binaries
- -m—Searches for manual entries
- -s—Searches for sources
- -u—Finds unusual or improperly documented entries
To find a file by name but not get all the entries that contain the name in the path, use the whereis command—not the locate command—because it finds the string in all elements of the path.
In Chapter 11, Customizing Shell Environments, you will learn how to extend the shell to make common tasks even easier. The type command will tell you if a command has been extended. To check what happens when you type ps:
$ type ps
ps is /bin/ps
The output of the type command above indicates that the /bin/ps application will be run if you type ps.
The ls command is often extended to show common options, such as to add color to the output:
$ type ls
ls is aliased to `ls --color=auto'
The output above shows that when you run ls, you actually get ls --color=auto. You can see all the possible variants of ls by using type’s -a option:
$ type -a ls
ls is aliased to `ls --color=auto'
ls is /bin/ls
The -a option shows that the shell knows about both an alias and a file on disk.
Linking Files
Links come in two varieties: symbolic and hard. (Symbolic links are often known as soft links.) Each has its own set of advantages and disadvantages. Sysadmins use links for a multitude of purposes; chief among them is the need to make shortcuts on the system for users to access data without having to navigate multiple directory levels.
If you have users on your Linux systems, you need to have a single mount point accessible to multiple users. The options include having users navigate to the /mnt/somemount directory to save data or putting a link to that mount point in their home directories. You’re much better off using a link for this task.
Symbolic Links
Symbolic links are used primarily to make a shortcut from one object to another. A symbolic link creates a tiny file with its own inode and a path to the linked file. Symlinks can span across filesystems and drives, primarily because a symlink has its own inode. Figure 5-1 shows the relationship between a symlink and the target file.
)
Figure 5-1 Symbolic link detail
For example, you might mount an external disk on the /mnt/projdata mount point and want each user to be able to access that remote share from her own home directory. You simply have to issue the following command in each user’s home directory to accomplish this:
ln –s /mnt/projdata projdata
ls –l projdata
lrwxrwxrwx    1 root   root    13 Jan 26 12:09 projdata -> /mnt/
projdata
Notice that the listing for the new symlink shows exactly where the link points, and the permissions are set to the maximum so as to not interfere with the permissions on the target object.
Symbolic links always look like they have the same permissions, but don’t try to change them. Changing permissions on a symlink changes the permissions on the target permissions instead.
Hard Links
A hard link is normally used to make a file appear in another place. A hard link is simply an additional name in a directory that points to the exact same inode and shares every aspect of the original file except the actual name (although the filename could be identical if in a different directory). Figure 5-2 shows the relationship between a hard link and the target file.
)
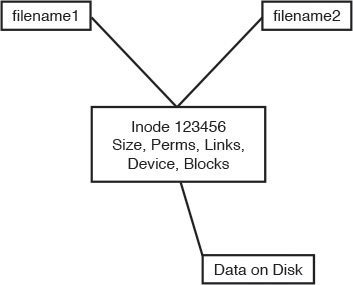
Figure 5-2 Hard link detail
For an example of using a hard link, consider the need to ensure that a frequently deleted file is easily restorable for a given user. The user, Jaime, travels a lot, but when he’s in the office he seems to delete things a lot or claims the system has eaten his files. When Jaime is flying, you don’t have any issues, so the problem must be the user’s actions.
To anchor or back up an important file such as the company contact list in Jaime’s home directory, you first must create a backup directory, something like /backup.
Then, you create a hard link from Jaime’s ccontactlist.txt file to a file in the /backup directory, like so:
cd ~jaime
ln ccontactlist.txt /backup/home_jaime_ccontactlist.txt
ls –l ccontactlist.txt
-rw-r--r--    2 jaime    users    0 Jan 26 13:08 ccontactlist.txt
Notice that the file appears normal, but the number 2 for the link count lets you know that another name entry for this file exists somewhere.
Also notice that the listing for the new hard link doesn’t show the target file or seem to refer to it in any way. Running the stat command on this file won’t show you the other filename or seem to be aware of it outside the higher link count.
The name and location of a file are the only things about the file not stored in the inode. This appears on the exam in questions for this set of objectives.
Hard links can’t be created if the target is on another filesystem, disk, or remote object. The need to associate multiple names to the same inode makes this impossible.
Be careful when changing the permissions and ownership on the hard-linked files because all name entries point to exactly the same inode. Thus, any changes are instantly made to what would appear to be multiple files but what, in reality, are only filenames.
To delete a file that has multiple hard links requires the removal of every hard link or the multiple names. To find all the links for a file, run the following command:
ls –i ccontactlist.txt
17392 ccontactlist.txt
find / -inum 17392
/home/jaime/ccontactlist.txt
/backup/home_jaime_ccontactlist.txt
Backup Commands
As an administrator you often are called upon to deal with file archives, which are one or more files that have been packaged into one file and optionally compressed.
There are several uses for archives:
- You want to send a few files to someone or copy them to another server and want to package and compress them.
- You need to back up a partition to other media in case a disk fails or the file is otherwise lost.
- You want to make a temporary copy of something before you make a change so you can restore it quickly if needed.
- You need to keep files around but in compressed format, such as for archiving old logs.
A number of backup options are available for Linux systems. Some are more useful than others, and some act on files, whereas others work best on partitions or disks as a unit.
Backup commands on the exams include the following:
- cpio
- tar
- gzip and gunzip
- bzip2 and bunzip2
- xz
Using tar
The tar command is the workhorse of the archival world. The name comes from the term tape archive and goes back to the time when most backup was done to a local tape drive. You can think of tar as a pipeline that takes in a series of files and outputs a single file that is meant to be streamed to tape, but this output could be sent to a file on disk as well.
On the way through the pipeline you can do some transformations on the files such as chop up the output onto something that fits across multiple tapes, exclude files that weren’t recently changed, or rewrite the directory names stored in the archive.
tar also provides the extraction options. You take a .tar file, also called a tarball, and run it through tar to get back a copy of the original files. It is possible to extract only certain files and manipulate the filenames.
The tar command also can use various compression commands, particularly the gzip/gunzip and bzip2/bunzip2 commands by the use of special option characters. This has the effect of creating a compressed archive file, typically named .tar.gz for gzip-compressed files and .tar.bz2 for bzip2-compressed files.
tar commands have an unusual syntax. The command is tar, followed by a dash (-), and then all the options concatenated together such as xvjf. After this is a list of zero or more filenames; the meanings depend on the options you chose.
The tar command has three main methods that act on files or tar archives; each has a corresponding letter that must be the first letter in the list of options:
- c—Creates an archive
- t—Tells you the contents of an archive
- x—Extracts files from an archive
The rest of the command can be optional, but some typical options are
- v—Be verbose by giving a list of files as they are processed.
- j or z—Compress or decompress with bzip2 or gzip, respectively.
- f—The next word is the name of the file to operate on.
Figure 5-3 shows your choices graphically. We look at examples of each.
)
Figure 5-3 Picturing the tar options
When you’re creating an archive with tar, you should think about what you want to archive, where you want the resulting archive to be created, and what compression if any you want to use.
To create a simple tar archive, the options you need are as follows:
tar -cf archive.tar /foo
In this example, the -c option signals tar to create the file specified after the -f option and specifies the directory you are archiving, which is the /foo directory. Note that you have to add the .tar suffix. By default the operation is recursive.
To create the same archive with gzip compression, you simply insert a -z option and use the letters .gz as the filename suffix:
tar -czf archive.tar.gz /foo
This creates a compressed archive file that uses the gzip compression algorithms. If you want slightly higher compression, use the -j option (instead of the -z option) for bzip2 compression and create your archive with a suffix of .bz or.bz2.
You will likely see questions on the exam that test your knowledge of which compression command has the highest compression. For example, using bzip2 generally results in a smaller archive file at the expense of more CPU cycles to compress and uncompress. The gzip package is almost always part of the default installation of Linux while bzip2 may not be.
To create a tar archive and see the filenames as they are processed use the -v option:
tar -cvf archive.tar /foo
This produces the following output:
tar: Removing leading `/' from member names
foo/
foo/install.log
foo/install.log.syslog
foo/.bash_logout
If given an absolute directory name to archive, tar strips the leading / from the full path of the objects in the archive. It would not be good if you could overwrite files in your /usr directory by extracting a file in an unrelated directory!
You may pass more than one directory or file to tar. For example, tar –cf foo.tar bin var creates an archive called foo.tar containing both the bin and var directories.
Taking Pity on the Unarchiver
It’s considered proper and elegant to create tar archives by specifying a directory that contains the files to be archived, not just a bunch of files that are in the current directory. This means that when the files are untarred they show up in a single directory instead of in the current directory.
For example, create an archive of the /etc directory contents with the following command:
tar -cf etc.tar /etc
When you unarchive the tar file, by default it creates an etc directory in the current directory, which contains the entirety of the /etc directory you archived.
Contrast this with the nightmare that happens when you navigate to the /etc directory and create the archive from there with this command:
tar -cf /root/badetc.tar *
This archive file contains the same files as the previous one, except they aren’t contained in a top-level etc directory—everything is in the top level of the archive.
Imagine what will happen to your system when you unarchive this file in the root user’s home directory. You will have spewed approximately 2,400 files directly into the root user’s home directory!
It really does matter where you are in the filesystem and which path options you use when you create or expand an archive file. It’s best practice to use absolute pathnames.
To solve the problem of 2,400 files polluting your root user’s home directory, use the following command, where badetc.tar is the offending archive file:
tar -tf badetc.tar | xargs rm -rf
This command produces a list of the paths and filenames of files in the archive and uses the xargs command to feed each line of output as a filename specification to the rm -rf command, removing all the files and directories expanded from the badetc.tar file.
Useful Creation Options
A number of other options can be used for creating tar archives. Here is a list of the more useful and testable ones:
- -b—Sets the block size to fit the media to which you are archiving. This is necessary for some tape devices.
- -M—This specifies multiple archive targets or spreads a large archive across multiple tapes or media.
- -g—Creates a new format incremental backup (only those that have changed since the last full or incremental).
- -l—Stays on the local filesystem; it’s used to keep from backing up the entire NFS network by accident.
- -L—This is followed by a number that reflects 1024 bytes, so -L 500 equals 500KB. (It’s used for setting the tape length so multiple tapes can be used for an archive.)
- --remove-files—This is dangerous because the specified files are removed from the filesystem after they have been added to the archive!
Listing Archive Files
An underrated option, listing is something that typically is used after you don’t get the results you want or realize what you’ve just done and want to confirm how hard it is going to be to clean up.
To tell you the contents of a tar archive, use the following command:
tar -tf archive.tar
This produces the output shown here:
etc/
etc/sysconfig/
etc/sysconfig/network-scripts/
etc/sysconfig/network-scripts/ifup-aliases
etc/sysconfig/network-scripts/ifcfg-lo
To list an archive that uses compression, simply insert the necessary letter between the -t and the -f options, such as the bzip2 -j option shown here:
tar -tjf archive.tar.bz2
This produces the following output:
etc/
etc/sysconfig/
etc/sysconfig/network-scripts/
etc/sysconfig/network-scripts/ifup-aliases
etc/sysconfig/network-scripts/ifcfg-lo
To list an archive and see the file details for its contents, you add the -v option to the existing command to see an output of the details:
tar -tvjf archive.tar.bz2
This returns output similar to the following:
drwxr-xr-x root/root         0 2015-02-10 03:46 etc/
drwxr-xr-x root/root         0 2015-01-31 10:09 etc/sysconfig/
drwxr-xr-x root/root         0 2014-11-10 22:13 etc/sysconfig/network-
scripts/
When you create an archive with the -v option, a list of the files being archived is shown onscreen. When you unarchive an archive with the -v option, it shows a similar list of the files being unarchived.
It’s only when you list an archive with the -v option that you get the type of output that approximates an ls -l command being run on the archive contents. This is an exam topic, so be ready for it.
Using cpio
The cpio command appears extensively in the Level 2 LPI objectives. This level of the exam might ask you about the cpio command at only the simplest levels, such as knowing that it exists, how it works in general terms, and whether it can be used to back up a Linux system.
The cpio command actions all treat the filesystem as the home base. If you are copying out, it’s from the filesystem out to another file. The same is true with copying in—it’s from a file into the filesystem.
The cpio command has three options for acting on files and filesystems:
- -o or --create—This copies files to an archive using a list of files typically created by the find command.
- -i or --extract—This copies files into the filesystem from an archive or a list of the archive contents.
- -p or --pass-through—This copies files from one directory tree to another without the use of an archive, essentially performing the same function as the cp -r command.
The cpio command accepts a list of files in a one-file-per-line format and uses this list to send the archived files to either the standard output or an archive file you specify.
cpio supports a variety of archive formats, including binary, ASCII, crc, and tar, to name the most relevant.
An example of creating a cpio archive from the files in the current directory is shown here:
find . "*" | cpio -o > archive.cpio
This outputs the list of files found by this particular find command, with the cpio command taking the entirety of the files and sending them to the archive.cpio file by redirecting standard output to the file.
The cpio command doesn’t accept a list of files to archive on the command line like the other utilities you’ve seen so far. Instead, it reads the names of the files from the standard input or console. So be aware that using either the find or ls command is necessary to feed cpio a list of filenames.
For example, if you needed to archive all the files that have an extension of .txt in the current directory to a cpio archive named txt.cpio, you would use the following command:
ls *.txt | cpio -o > txt.cpio
Notice that you’re redirecting the output of cpio to a file rather than letting it write the file itself. Therefore the filename is up to you, and if you want a cpio file extension, you need to add it yourself.
Compression Utilities
Whereas the tar command is used to gather files and put them in a container, the gzip, and bzip2 commands are used to compress that container. Used by themselves, they act on each file they find and replace that file with a compressed version that has an extension that indicates the file is compressed.
The gzip and bzip2 compression utilities compress files and are similar in their functions and operations. The main difference is that bzip2 offers slightly better compression than gzip, but gzip is much more widely used.
These commands replace the original file with a new file that has an additional extension, so don’t delete the .gz or .bz2 files that you create. They are the original files in a compressed wrapper!
To compress all the files in the current directory with gzip or bzip2, use this command:
gzip *
This replaces all the regular files (not the directories or their contents) in the current directory with the original filenames plus a .gz extension. So, if you had two files named file1 and file2 in the directory, they would be replaced with
file1.gz
file2.gz
To uncompress these files, just do the exact opposite of the compression:
gunzip *
This restores the original files.
Using bzip2 produces the same sort of results. You can issue the following command in the same directory:
bzip2 *
You would then have the following two files:
file1.bz2
file2.bz2
To uncompress these files, issue this command:
bunzip2 *
This restores the files to their original states.
xz is a third option for compressing files just like bzip2 and gzip. It is newer, and in some cases has better performance than bzip2 at a cost of more memory. Files are compressed with one of xz, xz -z, or xz --compress, and decompressed with one of unxz, xz -d, xz --uncompress, or xz --decompress.
The .xz file extension indicates that a file was compressed with xz. To uncompress foo.xz you would run xz -d foo.xz, and would be left with an uncompressed file called foo.
Watch for questions that ask about why you would use either gzip or bzip2 for a particular compression task. bzip2 offers slightly better compression at the expense of increased CPU cycles. gzip2 is faster but doesn’t compress as well. gzip2 also has a recursive option (-r) that compresses all files in a directory.
Summary
In this chapter you learned about the Linux File System Hierarchy Standard (FHS) and what it means for laying out partitions. You also learned how to find files in real time with the find command, and through a database lookup with the locate command. This chapter also covered the cp, mv, and touch commands for copying, moving, and updating files, along with the proper use of file globs for matching files on the command line.
Finally you learned about the various archival and compression utilities that Linux makes available to you.