Accessing Your Windows Vista Computer with Remote Desktop
This chapter is from the book
This chapter is from the book
This chapter is from the book
This excerpt explains how to set up remote access to your own computer. If you want to use the Remote Desktop Connection client to access another computer, see the section entitled "Using the Remote Connection" in chapter 40 of Special Edition Using Microsoft Windows Vista
Across a local area network (that is, between computers in your home or office), Remote Desktop Connection works right "out of the box"—you just have to enable the feature.
However, if you want to use Remote Desktop to reach your computer from other computers over the Internet, you have to set up several other things in advance. I give you step-by-step instructions shortly, but to give you an overview, the requirements are as follows:
- You must enable Remote Desktop; it's disabled by default. You also have to specify which user account(s) are to be given access.
- A password has to be set for any user account that you want to use when connecting remotely. You can't use Remote Desktop to connect to an account that has no password.
- Your host computer must be reachable over the Internet whenever you want to connect to it; this means that it needs an always-on Internet connection. Cable Internet service usually works this way. If you have a DSL connection that requires you to sign on every time you use it, you need to either use a connection-sharing router device and tell it to keep the connection up 24x7, or use third-party software to tell Windows to keep your connection open. I show you how shortly.
- Your Internet connection needs a static (fixed) IP address, or you need to use a dynamic DNS service so that your computer's IP address can be determined from afar. With most cable and DSL Internet service, your connection's IP address can change from day to day. You might be able to ask your ISP for a static address for an added monthly fee. If that's not an option, I show you shortly how to install some free add-on software or use a connection-sharing router that supports dynamic DNS (DDNS).
- Finally, if you use a shared Internet connection, the router or sharing computer has to be set up to forward incoming requests to the computer you want to reach by Remote Desktop.
This sounds complex, but it really isn't that bad. Let's go through the process step by step. You can go about this in other ways, of course, but what I give you here is a procedure that's suitable for a home user with Windows Vista Ultimate edition or a small-office user with the Business version.
Enabling Remote Desktop Access to Your Computer
To enable Remote Desktop connections to your computer, follow these steps:
- Click Start, right-click Computer, and select Properties.
- Under Tasks, click Remote Settings and then confirm the User Account Control prompt.
- Select Allow Connections from Computers Running Any Version of Remote Desktop. (The "more secure" version works only on corporate networks using IPSec security, and on such networks, you probably won't be allowed to change these settings anyway).
- By default, all Administrator level accounts will be allowed to connect to the computer. If you want to grant Remote Desktop access to any Limited users, click Select Users, Add, Advanced, Find Now, and then locate the desired name in the Search Results section. Double-click it. To add another name, click Advanced and Find Now again.
- Click OK to close all the dialog boxes.
At this point, you should do two things to be sure that Remote Desktop has been set up correctly:
- Click Start, Control Panel. Under Security, select Allow a Program Through Windows Firewall and confirm the User Account Control prompt. On the Exceptions tab, find Remote Desktop in the Exceptions list and be sure it's checked. If it isn't, check it. On the General tab, be sure that Block All Incoming Connections is not checked.
- Use another computer to test Remote Desktop before you get involved in the Internet part. Use the instructions in the second part of the chapter to open the Remote Desktop client on another computer on your network. As the host name, type in the name of the computer you just set up. Make sure that you can connect over your own local network before proceeding.
If you just want to use Remote Desktop within your home or office network, you're finished and can skip ahead to the part of the chapter titled "Connecting to Other Computers with Remote Desktop."
However, if you want to reach your computer through the Internet, you have more work to do.
Establishing 24x7 Access
Because you won't be there at your home or office to turn on your computer and establish an Internet connection, you have to set things up so that your computer and connection are always working. If the power goes out at your home or office and your computer doesn't start itself up again automatically, you won't be able to connect. Your computer must start up automatically.
To set this up on a desktop computer, you need to get to the BIOS setup screen. You can get there when you first power up the computer, or by restarting Windows and waiting for the screen to go black. Be prepared to press the BIOS Setup hot key. The screen tells you what key to press; it's usually the Del or F2 key.
When you've gotten to the BIOS setup screen, look for the Power Management settings. Find an entry titled AC Power Recovery, or something similar. Change the setting so that your computer turns itself on when the AC power comes on. On some computers, there is also an option that turns on the computer only if it was on when the power failed. That works, too. Then save the BIOS settings and restart Windows.
Besides a 24x7 computer, you need a 24x7 Internet connection. If you have cable Internet service or a type of DSL service that does not require you to enter a username or password, you have an always-on Internet connection already and can skip ahead to the next section.
For DSL service that requires sign-on, you need some means of automatically reestablishing the connection whenever your computer starts up or the connection goes down. Microsoft's built-in Broadband connection sign-on software does not provide a reliable way by itself to keep the Internet connection permanently open. You can work around this in three ways:
- You can see if your DSL provider can upgrade your service to provide a static IP address and always-on service. This might be inexpensive enough to make it worthwhile.
-
You can use a hardware connection-sharing router. The router connects to your DSL modem and your computer(s) to the router. The router makes the DSL connection for you, and you can configure it to keep it going all the time.
If you don't have a router already, it's a worthwhile investment to buy one. They cost between $0 (after rebate, when there's a sale) and $75, and can also provide wireless networking capability for your home or office.
Chapter 22, "Connecting Your Network to the Internet," tells how to set up a router for DSL service, so I don't cover that here. Be sure to enable the router's "keepalive" feature so that your connection is kept going all the time. Otherwise, the connection might be allowed to close when there is no activity from inside your LAN, and you might not be able to connect later.
- If you use the Broadband connection feature built into Windows Vista, you can add a third-party program to force Windows to keep the connection open all the time. Although I personally prefer the first two options, the DynDNS Updater program that I discuss later can do this for you, so you can forgo the router if you want to.
Next, you must make sure you can locate your computer from out on the Internet.
Static IP Address or Dynamic DNS
All Internet connections are established on the basis of a number called an IP address, which is to your Internet connection as your telephone number is to your phone. Your IP address uniquely identifies your computer among all the millions of connected computers worldwide. If you use a shared connection, all your network's computers share one public IP address, much as the phone extensions in an office share one outside telephone number.
The question is, when you're somewhere else, how do you find your computer's IP address so that Remote Desktop can establish a connection to it?
If you have purchased a static IP address from your ISP, the answer is, they'll tell you. It has four sets of numbers separated by periods and looks something like this: 64.220.177.62. This will always be your computer's number. You can simply type this in when using the Remote Desktop client to connect to your computer. However, static addresses are relatively hard to get and usually carry a monthly surcharge; in some cases, ISPs simply cannot or will not provide them. So although this is worth looking into, it might not be an option. (My home ISP is sonic.net and static addresses are not expensive, but this is the exception instead of the rule.)
In most cases, dial-up, DSL, and cable Internet connections use dynamic addressing, in which a different IP address is assigned to you every time you or your router connects to your ISP (or, in the case of cable service, whenever your cable modem is reset). Thus, your computer's IP address can change at any time, and you won't necessarily know what it is when you want to connect from somewhere else.
The solution to this problem is to use a free dynamic domain name service (DDNS). It has two parts: First, on a DDNS provider's website, you register a host name, a name of your own choice, attached to one of several domain names that the provider makes available. For example, you might register the host name mycomputer in the domain homedns.org. Second, you set up dynamic DNS client software that periodically contacts the DDNS provider and informs it of your current IP address. Some Internet connection-sharing routers have a DDNS client built in, or you can download and install a software version on your computer. When this is all set up, you can use the name (mycomputer.homedns.com, in our example) to connect to your computer from anywhere on the Internet.
To set up dynamic DNS service at dyndns.com, follow these steps:
- View www.dyndns.com in Internet Explorer. Click Create Account. Select a username and password, and enter these along with your email address in the registration form. Be sure to note the username and password.
- Read and acknowledge the terms of service, check I Will Create Only One Free Account, and click Create Account. (You're allowed only one free account, but you can use it to register several computers, if you want.)
- Await the confirmation email, and follow its instructions to activate your account and sign on.
- When you are at the dyndns.com website and have logged on, click Services, Dynamic DNS, Add Dynamic DNS.
- Enter a host name that you can easily remember, and select a domain name from the pull-down list. Leave the other information as is and click Add Host. If someone else has claimed the name you chose, change the name or domain and try again until you succeed. Be sure to write down the host name and domain name that you eventually select.
Now your DDNS service is set up. Next, you need to set up the DNS client, so that changes to your IP address are sent to dyndns.com.
If you are using an Internet connection-sharing router that supports DDNS, use your router's setup screens to enable DDNS using your dyndns.com login name, password, and full host name. Your router's setup screen will likely differ from this, but it will generally look something like the one in Figure 40.2.
)
Figure 40.2 Configure your router to update your host name using dynamic DNS.
If your router doesn't have a DDNS client built in, or if you are not using a hardware router, you have to install a software DDNS client to do the job. You want one that doesn't require any manual intervention to get started and that always runs even when nobody is logged on. This means that you need one that operates as a Windows service rather than as a regular desktop application. The free DynDNS Updater program available from dyndns.com fits this bill nicely. Here's how to set it up.
If you use Windows Internet Connection Sharing, perform this procedure on the computer that shares its connection with the Internet, whether or not it's the computer that you're enabling for Remote Desktop access. Otherwise, do this on the computer that you're enabling for Remote Desktop access.
- Log on as an Administrator. Open Internet Explorer and view www.dyndns.com/support/clients. Download dyndns-setup.zip by following the link on this page.
- After downloading, open dyndns-setup.zip and drag setup.exe to your desktop.
- Right-click setup.exe and select Run As Administrator. Confirm the User Account Control dialog box and then click Allow to run the downloaded program.
- Step through the installation screens. At the last screen, check Launch DynDNS Updater and click Finish.
Follow the wizard's instructions, clicking Next after you fill in any required information on each page.
On the first page, if you have dial-up or DSL service that requires a logon and password and the connection is made directly from your computer, click Dial-Up. If you have cable Internet service or you have a router that establishes the connection for you, select Local Area Network.
- If you selected Dial-Up, select the correct connection name and provide the username and password for the connection. DynDNS Updater ensures that your dial-up or DSL connection is kept going permanently, reconnecting as necessary if the connection is interrupted.
- At the Public IP Address screen, click Detect MY IP and confirm that the address matches the one shown when you registered at dyndns.com.
- On the Hostname Group page, enter my group.
- On the Login Information page, enter your dyndns.org username and password.
- At the Entering Host Name page, select Yes, Do Automatic Download. (When you click Next, there might be a considerable delay.)
- On the Host Name Information page, check the entry for the host name and domain name you selected for your computer.
- On the Automatic Update page, leave Enable Automatic Update checked.
- On the Program Start Options page, select Install As Service.
- To start the service, click Start and right-click Computer. Select Manage. In the left pane, open Services and Applications, and select Services. Locate DynDNS Updater in the right pane. Right-click it and select Start.
- Wait a few moments and then click Start, All Programs, DynDNS Updater, DynDNS Updater. View the Log tab. You should see a notification that the updater successfully updated your IP address information at dyndns.org, as shown in Figure 40.3. (The log file's time stamps are UTC, formerly known as Greenwich Mean Time, so the times shown are several hours ahead of U.S. local time.)
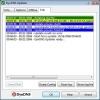
Figure 40.3 The DynDNS Updater log should show a successful update.
)
Now your registered host name will always point to your computer, even when your IP address changes. After a change, it might take up to an hour for the update to occur, but changes should be infrequent.
Port Forwarding
The last setup step is to make sure that incoming Remote Desktop connections from the Internet make it to the right computer. If your computer connects directly to your cable or DSL modem, you can skip this step.
However, if you use Internet Connection Sharing or a connection-sharing router, you have to instruct your sharing computer or router to forward Remote Desktop data through to your computer. To be precise, you have to set up your sharing computer or router to forward incoming requests on TCP port 3389 to the computer you want to reach by Remote Desktop.
The procedure depends on whether you are using the Internet Connection Sharing service built into Windows or a hardware-sharing router. Use one of the procedures described in the next two sections.
Port Forwarding with Internet Connection Sharing
If you use the built-in Internet Connection Sharing service provided with Windows to share an Internet connection on one computer with the rest of your LAN, the forwarding procedure is pretty straightforward using these steps:
- Go to the computer that is sharing its connection (whether or not it's the one that you want to reach via Remote Desktop) and log on as an Administrator.
- View the Properties dialog box for the local area connection that corresponds to the Internet connection itself. On Windows Vista, click Start, Control Panel, Network and Internet, Network and Sharing Center. In the Tasks list, select Manage Network Connections.
- Locate the connection that goes to your Internet service. This might be a broadband icon if you use DSL service, or a local area connection icon for cable service. It should have the word Shared next to it. Right-click the icon, select Properties, and view the Sharing tab.
- Click Settings and, under Services, check Remote Desktop. The Service Settings dialog box appears, as shown in Figure 40.4. Enter the name of the computer that you want to make available via Remote Desktop and click OK.
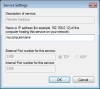
Figure 40.4 Enter the name of the computer that you want to make available via Remote Desktop.
- If you want to make additional computers available, as discussed at the end of the chapter, you can click Add to add entries for the additional computer. Enter external port numbers 3390, 3391, and so on, but enter 3389 for the internal port number in each case.
- When you're finished, click OK to close all the dialog boxes.
)
Now you should be able to reach your computer from anywhere on the Internet. If the connection doesn't work, check the "Troubleshooting" section at the end of the chapter for some suggestions.
Port Forwarding with a Router
If you are using a hardware connection-sharing router, setup is a bit more difficult but is worthwhile. First, because your router doesn't know your computers by their names, you have to set up a fixed IP address on the computer that you will be using via Remote Desktop, using these steps:
- Click Start, All Programs, Accessories, Command Prompt.
- Type the command
ipconfig /all
and press Enter. Locate the local area connection part of the printout, which will look in part something like this:
Ethernet adapter Local Area Connection:

        Connection-specific DNS Suffix  . : quarterbyte.com
        Description . . . . . . . . . . . : NVIDIA nForce Networking Controller
        Physical Address. . . . . . . . . : 00-50-8D-D7-CA-5F
        Dhcp Enabled. . . . . . . . . . . : Yes
        Autoconfiguration Enabled . . . . : Yes
        IP Address. . . . . . . . . . : 192.168.15.102
        Subnet Mask . . . . . . . . . : 255.255.255.0
        Default Gateway . . . . . . . : 192.168.15.1
        DHCP Server . . . . . . . . . . . : 192.168.15.1
        DNS Servers . . . . . . . . . . . : 192.168.15.1
The important information is noted in bold. (On your computer, the numbers will be different—use your numbers, not these!) - Click Start, Control Panel, Network and Internet, Network and Sharing Center, Manage Network Connections.
- Right-click your local area connection icon and select Properties. Confirm the User Account Control prompt.
- Select the Internet Protocol Version 4 (TCP/IPv4) entry and click Properties.
- Check Use the Following IP Address. Enter the first three parts of your original IP address exactly as you see it in your command prompt window, but replace the last part with 250. For example, on my computer, I'd enter 192.168.15.250.
- For the subnet mask and default gateway, enter the same numbers that were displayed in the command prompt window.
- Check Use the Following DNS Server Addresses. Enter the one or two addresses that were displayed in the command prompt window.
- Click OK.
(If you need to set up any other computers with a fixed IP address, use the same procedure but use addresses ending in .249, .248, .247, and so on, counting backward from .250.)
Now you have to instruct your router to forward Remote Desktop connections to this computer. You need to use the router's setup screen to enable its Port Forwarding feature, which some routers call Virtual Server or Applications and Gaming. There you need to enter the fixed IP address that you assigned to your computer and tell the router to forward connections on TCP port 3389 to this address. Every router uses a slightly different scheme, but Figure 40.5 shows a typical router. If a range of port numbers is required or external and internal numbers are entered separately, enter 3389 in all fields.
)
Figure 40.5 Use your router's setup system to forward TCP port 3389 to your computer.
|
→ |
To learn more about forwarding network requests on a shared Internet connection, see "Enabling Access with a Sharing Router," p. 734. |
Now you should be able to reach your computer from anywhere on the Internet.